Global features
The search and filter features are available in the Summary, Queue, Active, Agents, Follow Up, and Bookmarks tabs. They work the same way in each tab and you can configure these features independently in each tab.
Global feature: Sort
In each tab view, you have the ability to sort all records by the column of your choice. Click the column header to sort by that column. You can sort by ascending order, descending order, or none. Click the column to change the sort order. A down-arrow indicates descending order and an up-arrow indicates ascending order. If no arrow is visible, then the column is not being used for sorting.
In the following example the table is sorted by Business Rule in ascending order.
Global feature: Search
Using the Search feature to show or hide rows in the current tab view you have selected. When you enter a search phrase in the Search field, all rows in the table that contain the search phrase are displayed and the rest are hidden. If none of the cell values in a row match the search phrase, that row is hidden in the table. The table remains in this state until you clear the search phrase. This is convenient if you are interested in seeing only certain information, such as a specific agent or agent status.
To use global Search:
-
Enter some text in the Search field at the top right of the tab. The filtering happens immediately as you type.
-
See the results in the table. Here's an example showing records containing agt1:
Note: The Search feature can be used in all the tabs, except Summary.
Global feature: Filters
Filters allow you to limit the data displayed within each column so that you will see only the data you care about. Filters are based on logical conditions you define. Filters can be used in all the tab views, except Summary.
Note: Filters are specific to each tab view. Filters configured in one tab view will not apply to other views.
To access the Filter menu:
Click Filters in the top right of the tab to display the following options:
-
Add New Filter
-
Show Column Search
Adding a new Quick Filter
Use Quick Filters to make temporary changes to the view. They are created for a single use and cannot be modified.
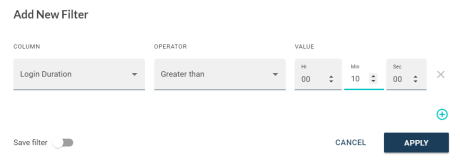
Quick Filters give you great flexibility in showing or hiding specific information that you care about. You can specify a filter for any column in the current view. For example, if you wanted to see only engagements with a duration of more than 10 minutes, you would set the filter for 'Duration' + 'Greater than' + '10 mins' as shown here:
This filter would immediately hide all engagements with a duration of less than 10 minutes. For details about the filter operators, see: Operators used in filters.
The active filters are indicated by a blue filter icon ( ) to the right of each column that is being used for filtering. Filters can be applied per column, and they can be combined with other column filters.
To add a Quick Filter:
-
Click Filters in the top right of the tab view. The filter dialog will open. Under Column, select the column you would like to add the filter to.
-
Under Operator, select Show Only, Hide or other operator that applies to your value (which can be numeric or text). For details about the filter operators, see: Operators used in filters.
-
Under Value, enter the value you want to filter on.
-
Click Apply. The filter now takes effect. A blue filter icon (
 ) should be visible to the right of the column name.
Adding an additional column to a filter
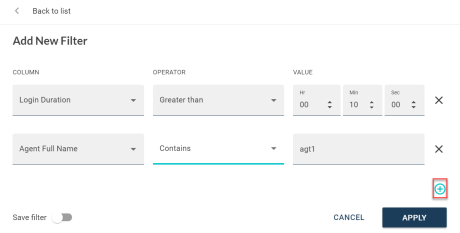
You can add an additional column to the filter. A row must satisfy all the filters you specify to be displayed.
-
Follow the steps 1-3 above in Adding a new Quick Filter. Do not click Apply.
-
Click the + icon to add an additional column.
-
Enter the values for the additional column.
-
Click Apply when done. The filter now takes effect. A blue filter icon (
 ) should be visible to the right of the column name.
Saving a new filter
-
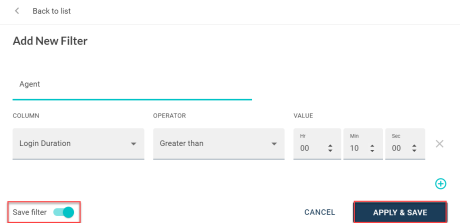
Follow the steps 1-3 above in Adding a new Quick Filter. Do not click Apply.
-
Select Save filter in the toggle on the lower left.
-
Enter a name for the filter under Filter Name.
-
Click Apply & Save. The filter now takes effect. A blue filter icon (
 ) should be visible to the right of the column name.
Operators used in filters
There are many options available for the Operator value. Certain operators are available only with numeric or time columns and others with non-numeric columns (text data). The operators you see will depend on the Column you have selected. For example, to filter a numeric or time column, you could select Greater than, Less than, Equal to, and so on. To filter a text column, you could select Contains, Does not contain, Starts with, and so on.
|
Operator |
Description |
|---|---|
| Show only | Shows only the rows that match the specified value. All others are hidden. |
| Hide | Hides the rows that match the specified value. All others are shown. |
|
Contains |
Contains a specific character. |
|
Starts with |
Starts with a specific character. |
|
Ends with |
Ends with a specific character. |
|
Does not contain |
Does not contain a specific character. |
|
Does not start with |
Does not start with a specific character. |
|
Does not end with |
Does not end with a specific character. |
|
Equals |
Equals a specific value. |
|
Not equals |
Excludes that specific value. |
|
Less than |
Less than a specific number. |
|
Greater than |
Greater than a specific number. |
|
Less than or equal to |
Less than or equals a specific number. |
|
Greater than or equal to |
Best applied to number/time values: Greater than or equal to a specific number. |
|
Is null |
Can be applied to text and numbers: Is zero. |
|
Is not null |
Can be applied to text and numbers: Is not zero |
Turning off a filter
You can turn off filters that aren't needed anymore.
-
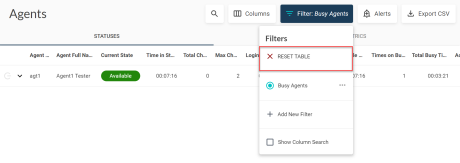
Click the filter icon in the top-right of the tab view.
-
Click Reset Table.
Once turned off, the filter will no longer be marked with a blue filter icon.
Editing and deleting existing filters
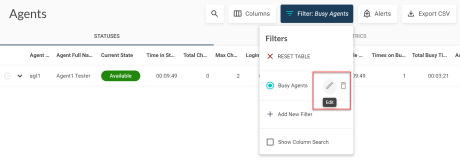
You can edit or delete existing filter.
-
Access the Filter menu.
-
Hover over the ellipsis icon (
 ) of the filter you want to update or remove.
 -
To edit the filter, click Edit to display the filter dialog and make edits.
-
To delete the filter, click Delete (
 ).
).
Global feature: Show Column Search
Show Column Search option allows you to search each column for a specific value. When enabled, a Search field will appear underneath each column.
Show Column Search filters the rows in the same way as the main Search feature, except the search scope is limited to cell values in the selected column.
To use Show Column Search:
-
Click Filters in the top right of the tab view. The filter dialog will open.
-
Select Show Column Search in the dialog.
-
Enter text in any column to begin filtering.
Global feature: Reordering columns using the keyboard
The Supervisor Desktop allows users to use the keyboard to reorder columns that appear in various tab views.
To move a column:
-
Open the tab view and press TAB repeatedly to navigate to the column header you want to move.
-
Hold down SHIFT and use the LEFT arrow key and RIGHT arrow keys to navigate to the position where you want to drop the column.
-
Once the column header has been moved to the new position, release the SHIFT key to drop the column at the position.
Global feature: Navigating a table using the keyboard
Supervisor Desktop allows users to navigate through tables in the various tab views without using a mouse. Using the keyboard, users can navigate through all headers and cells, view and copy cell values, open transcripts, and expand or collapse the inner table.
Expanding and collapsing table rows
Some tables contain rows that you can expand and collapse. For example, the Agents > Statuses table displays a row for each active agent.
Press the TAB key repeatedly to navigate to the arrow button ( ) and then press ENTER to expand the list of engagements for that agent. Press ENTER again to close the inner table.
Displaying a transcript for an engagement
For tables that display rows of individual engagements, such as the Active > Chats table, press the TAB key repeatedly to navigate to a row, then press ENTER to open the transcript window to the right:
Copying cell values in a table
Press the TAB key repeatedly to navigate to a cell. The selected cell displays a drop-down tooltip containing the full cell value and a Copy button. Press ENTER to copy the value to the clipboard.
Cells in the Agent Groups column are sometimes collapsed because they contain a large number of AGs. Press ENTER to expand the list of AGs. If the list contains more than 20 AGs, only the first 20 AGs are shown by default and you can press ENTER (or the arrow icon:  ) to display the full list.


