Editing custom content
If you belong to the DIY Tableau group, you can edit existing custom content using the Tableau Web Editor or the Tableau Desktop tool. When you have made all desired changes to the custom content, you can save (update) the content in its current location if you are also the owner of the content, or else publish with a different name, optionally in a different custom workbook.
-
To use the Tableau Desktop tool, you must have the tool on your local PC and have a license for its use. This procedure describes how to publish using the Web Editor tool.
-
You can only publish custom content in its current location (overwriting existing content) using the Publish option and not the Publish As option. The Publish option is available only if your current user profile is the owner of the workbook or report you are updating.
Perform the following procedure to create a new custom report by altering an existing standard report and saving your changes into a custom workbook.
-
If you would like to edit custom content at the Workbook level, do one of the following:
-
In Nuance Insights, at the Site level, drill down into the custom project and then in the row for the custom workbook you would like to edit, under Actions, click the ellipsis (
 ) and then click Edit Workbook.
 -
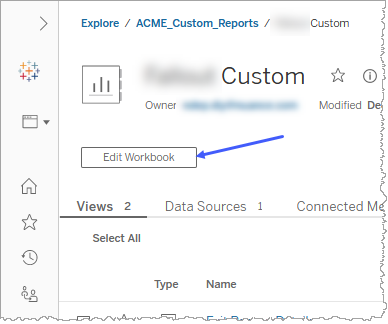
In Nuance Insights, at the Site level, drill down into the custom project and then the custom workbook to the Workbook level. Click Edit Workbook near the top of the page.
-
-
If you would like to edit custom content at the View level, perform the following sub-steps:
-
In Nuance Insights, at the Site level, drill down into the custom project and then the custom workbook to the Workbook level.
-
In the row for the custom report you would like to edit, under Actions, click the ellipsis (
) and then click Edit View.
-
-
Use the Tableau Web Editor to customize content as desired.
-
When you are ready to publish, click Publish, if available and if you would like to overwrite the existing content, or Publish As, if you want to publish a new instance.
Note: The Publish option is available only if the content you are republishing exists as a result of someone at an earlier time editing and publishing a whole workbook. If, instead, the custom content you are republishing exists as a result of someone editing and publishing at the View level (and not at the Workbook level), only the Publish As option is available. When Publish is available as a publishing option, you will have both Publish and Publish As available to you.
-
If you selected Publish As, in the Publish Workbook window, enter a name for the custom workbook this content will belong to.
Note: You must enter a unique name for the custom workbook.
-
Click Publish.
