Using holiday hours
Holiday Hours are an advanced feature used with Holiday controls. If you don't want to allow calling during the entire 24 hours of a holiday, you can ignore Holiday Hours because the default behavior is to have no calling windows during the holiday. Use the Holiday Hours control to specify messaging windows on specified holidays. At runtime on the specified holiday, these windows are substituted for any existing Consumer hours. If other hour codes are also specified for that record, such as Call Center hours or Region hours, those hours are also applied, the calling window(s) will be the intersection of all these hours.
After you create a Holiday Hours control, it will appear as an option in the Holiday Hours dropdown of the Holiday Handling panel in Holiday controls. It has no effect on messaging until it is selected as a holiday handling option for a specific Holiday control.
For information about Holiday controls, see Using holiday controls.
Scheduling using holiday handling
When a Holiday control is used, by default, the platform does not allow messaging windows for the entire 24 hours of the holiday. This treatment serves most business cases, so typically users don't need to define holiday handing. But if you need custom treatment of the Holiday, such as blocking calls the day before or after the holiday, or allowing calls during certain hours of the Holiday, you can set up holiday handling. Holiday handling can be configured at the client, calendar, or campaign level (in order of increasing specificity). In most cases a client-level setting will suffice, and this setting will apply to that holiday when it appears in any calendar for any record in the client. If you happen to need customized handling for a particular campaign or calendar, can configure it, and at runtime, the setting at the most specific level is used.
Suppose a client wanted to allow calling on the morning of a holiday. They would define a Holiday Hour code called Morning with the specified hours, say 9:00 AM to 12:00 PM. They would then open a Holiday, click Holiday Handling, and select Morning from the Holiday Hours dropdown. When the holiday arrived, the client's Holiday Hours would be in effect, overriding any Consumer hours in effect. However, Call Center hours would still apply, and the result would be Window 1 below. Consumer hours are always ignored when Holiday hours are used.

Adding a holiday hours control
After you create a Holiday Hours control, it becomes available for selection in all holiday controls.
- From the header bar, click CONTROLS.
- From the left menu bar, click Holiday Hours, which appears under DISPATCH.
- Click Add.
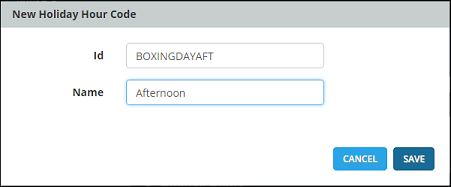
- Enter the Id and Name for your new Holiday Hour Code. Here is an example:
Editing the default holiday hours
When you create a Holiday Hours control, it always contains an hours set called Default. If you want to add messaging windows, edit the Default hours as described here. If you want to override the default hours, you can optionally create another hours set, which is described in Adding additional holiday hours (Optional). However, most users need only edit the default hours.
- From the header bar, click CONTROLS.
- From the left menu bar, click Holiday Hours, which appears under DISPATCH.
- Click a holiday hour code to display its details.
- Expand Holiday Hours.
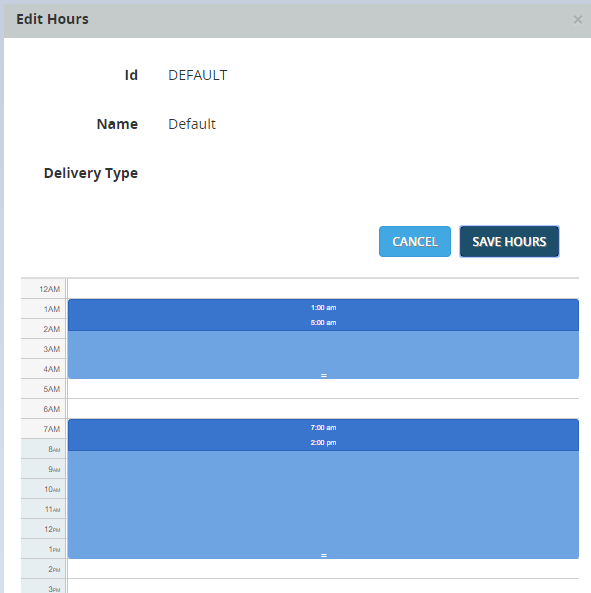
- Click Default. then click Edit.
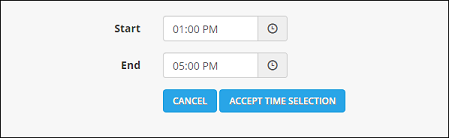
- The Edit Hours dialog opens. Select the Start and End times for each window as needed. Here is an example with two windows:

- After each change in hours, click Accept Time Selection.

- When all windows are finished, click SAVE HOURS.The Holiday Hours can now be selected from the Holiday control.
Adding additional holiday hours (Optional)
When you create Holiday Hours, Default hours are automatically included as described in Editing the default holiday hours. But you can create additional hours as needed. For example, you might want to create alternative hours for SMS and Email messages. Most users won't need to do this.
To add additional hours, use the following procedure.
- From the header bar, click CONTROLS.
- From the left menu bar, click Holiday Hours, which appears under DISPATCH.
- Click a holiday hour code to display its details.
- Expand Holiday Hours.
- Click Add Hours.
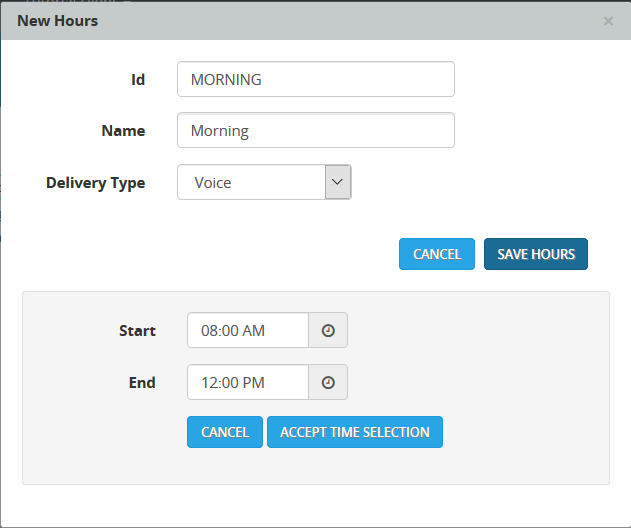
- Enter the ID, Name, and Delivery Type (Email, Sms, or Voice). Then select the Start and End times for the window. Here is an example showing that the hours from 8:00 AM to 12:00 PM have been selected:

- When you finished setting up your Holiday Hours windows, click Accept Time Selection.
- Click SAVE HOURS.The Holiday Hours can now be selected from the Holiday control.