Using campaign controls
Use the campaign control![]() Controls are containers for a group of related, reusable settings that govern service-level operations. Controls include Campaigns, Calendars, and Holidays. to manage settings used together in campaigns, such as dispatch rates, throttles, campaign rate overrides, and segment settings. The campaign control gives you precise control over how and when dispatches should occur in a messaging campaign.
Controls are containers for a group of related, reusable settings that govern service-level operations. Controls include Campaigns, Calendars, and Holidays. to manage settings used together in campaigns, such as dispatch rates, throttles, campaign rate overrides, and segment settings. The campaign control gives you precise control over how and when dispatches should occur in a messaging campaign.
If you are not a Nuance employee, you cannot create campaigns and your ability to manage campaigns is limited. In most cases, Nuance will create the campaigns you need and configure them per your request. Standard users have the ability to change the most commonly used settings, such as pacing, hour codes, calendars, and overrides, but other settings may be hidden or read-only.
Overview of campaign settings
If you open Composer and click Controls and then Campaigns, you'll see the list of existing campaigns. Click a campaign to show the details for it. Here's an example for a campaign called West Coast Collections:

Notice that there are four panels that contain settings:
- Campaign: Use this panel to select the realtime throttle to be used, if any, the dispatch rate and type, and the default hour codes.
- Campaign Rate Overrides: Use this panel to add, edit, or delete campaign rate overrides. During an override period that you define, the dispatch rate set in the Campaign panel will be temporarily superseded by a new dispatch rate. This is an advanced feature and typically isn't necessary.
- Segment Options for Campaign: Use this panel to view details about segments and delivery type overrides. These settings override those at the campaign level.
- Apply Calendars: Use this panel to apply calendars to the campaign. By default, no calling windows are permitted during the holidays in the calendar, and dispatches are held until the next calling window. Calendars can be applied to all campaigns at the client-level, even if this setting isn't used. This panel is another view of the settings that are visible under Calendars > [calendar name] > Apply to Campaigns.
Some campaign settings, such as dispatch rates, can be configured at three different levels: campaign, campaign segment, and campaign segment delivery type. At runtime, the Dispatch service will use the most specific setting that is configured for a record. For most applications only the top-level campaign settings are required, however in some cases a lower-level setting is required. For example, if a campaign uses both email and voice deliveries, and you want a different dispatch rate for each delivery type. Non-Nuance employees cannot create new overrides at the campaign segment or campaign segment delivery type level, but they can view and edit overrides created by Nuance.
Editing the Campaign panel of a campaign control
- In the header bar, click CONTROLS.
- From the left menu bar, click Campaigns, which appears under DISPATCH.
- Click a campaign name.
- In the Campaign panel, click Edit. This displays the Edit Campaign dialog. The following settings are displayed. Edit the settings and then click SAVE.
Campaign panel settings
Note: The system does not validate the selection of hour codes in a campaign. The user must manually confirm that the consumer and call center hour codes selected from the Campaign match the hours version assigned to the project version.
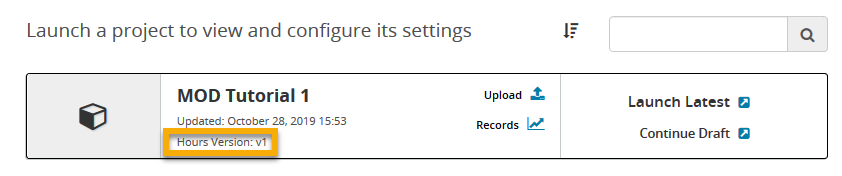
To view the hours version for a project, click PROJECTS on the header bar and find the project in the list. Each project in the list displays the name, time stamp, and hours version. In this screenshot, the hours version for MOD Tutorial 1 is 'v1'. The user would need to confirm that any hour codes selected in campaigns for MOD Tutorial 1 are those defined in hours version 'v1'.
Using campaign rate overrides
You can use campaign rate overrides to temporarily override the dispatch rate for a campaign. Doing so will not affect the dispatch rate set for the campaign and will only be active for the specified override period. Keep in mind that any segment settings or delivery type settings will supersede any campaign rate override settings.
You cannot add campaign rate overrides if the Pacing Strategy setting is 'None'.
Adding a campaign rate override
- In the header bar, click CONTROLS.
- From the left menu bar, click Campaigns, which appears under DISPATCH.
- Click a campaign name.
- In the Campaign Rate Overrides panel, click Add Override. This displays the New Override dialog.
- Edit the settings and then click SAVE. For details about the settings, see Campaign Rate Overrides settings.
Editing a campaign rate override
- In the header bar, click CONTROLS.
- From the left menu bar, click Campaigns, which appears under DISPATCH.
- Click a campaign name.
- In the Campaign Rate Overrides panel, select the override you want to edit, then click Edit. This displays the Edit Override dialog.
- Edit the settings and then click SAVE. For details about the settings, see Campaign Rate Overrides settings.
Campaign Rate Overrides settings
| Setting | Description |
|---|---|
|
Dispatch Rate |
Enter the dispatch rate to use during the override period. The units depend on the pacing strategy selected.
|
| Day of Week | Select a day of the week when the override will be in effect. |
| Start Time | Select the time when the override will start. |
| End Time | Select the time when the override will end. |
| Time Zone | Select the time zone for the specified start and end times. |
Editing segments for the campaign
Use this panel to view details about the segment or segments used with the campaign.
- In the header bar, click CONTROLS.
- From the left menu bar, click Campaigns, which appears under DISPATCH.
- Click a campaign name.
- Click the Segment Options for Campaign panel to open it. On the left side of the panel, click a segment name to display its settings. The settings here work the same way as those in the Campaign panel, but override those settings when the segment is in use. For details about the settings, see Campaign panel settings.
- To edit a segment, click Edit. The Edit Campaign Segment dialog opens. Make any changes and click SAVE.
- To edit a delivery type (if any have been defined), click the Delivery Types panel. Select the tab and click Edit.
Editing Voice, SMS, or Email delivery types for a segment
Use the Delivery Types panel to override the dispatch settings of a particular delivery type in a campaign segment. The types are Voice, SMS, and Email. You cannot add new delivery types, but you can edit existing ones.
- In the header bar, click CONTROLS.
- From the left menu bar, click Campaigns, which appears under DISPATCH.
- Click a Campaign name.
- Click Segment Options for Campaign.
- Under Segment Name, click a segment name.
- Click Delivery Types.
- Select one of the existing delivery types (Email, SMS, or Voice) and click Edit. The Edit Campaign Segment Delivery Type dialog is displayed.
- Make any changes, and then click SAVE.
Applying calendars to the campaign
- In the header bar, click CONTROLS.
- From the left menu bar, click Campaigns, which appears under DISPATCH.
- Click a campaign name.
- Click the Apply Calendars panel to open it. A list of available calendars is displayed. Select the check box for each calendar you want to apply to this campaign. Clear all the other check boxes. This panel is another view of the settings that are visible under Calendars > [calendar name] > Apply to Campaigns.
