Upgrading database software
If you have a prior Speech Suite installation with a Management Station database, and you intend to update the database software, the best procedure is to remove Speech Suite, update the database, and then install Speech Suite. (When you uninstall Speech Suite, the data in the database remains intact, and the service property configuration files in the NUANCE_DATA_DIR location are preserved.)
Upgrading to MySQL 8.0 on Linux
Note: MySQL 8.0 is supported by Speech Suite 11.0.4 and above
- Backup the database and Management Station hosts. (They might be on the same host.)
- Uninstall Speech Suite on the Management Station host.
-
On the database host, modify the MySQL configuration file. See Update the MySQL configuration.
-
Proceed with MySQL upgrade. See Upgrade MySQL .
-
Update the Connector/C to version 8.0 (if needed) on all hosts where Speech Suite speech components are installed. See Install the MySQL Connector/C for details.
-
Install Speech Suite.
Upgrading to MySQL 8.0 on Windows
- Backup the database and Management Station hosts. (They might be on the same host.)
- Uninstall Speech Suite on the Management Station host.
-
On the database host, modify the MySQL configuration file. See Update the MySQL configuration.
-
Proceed with MySQL upgrade. See Upgrade MySQL .
-
Update the Connector/C to version 8.0 (if needed) on all hosts where Speech Suite speech components are installed. See Install the MySQL Connector/C for details.
-
Install Speech Suite.
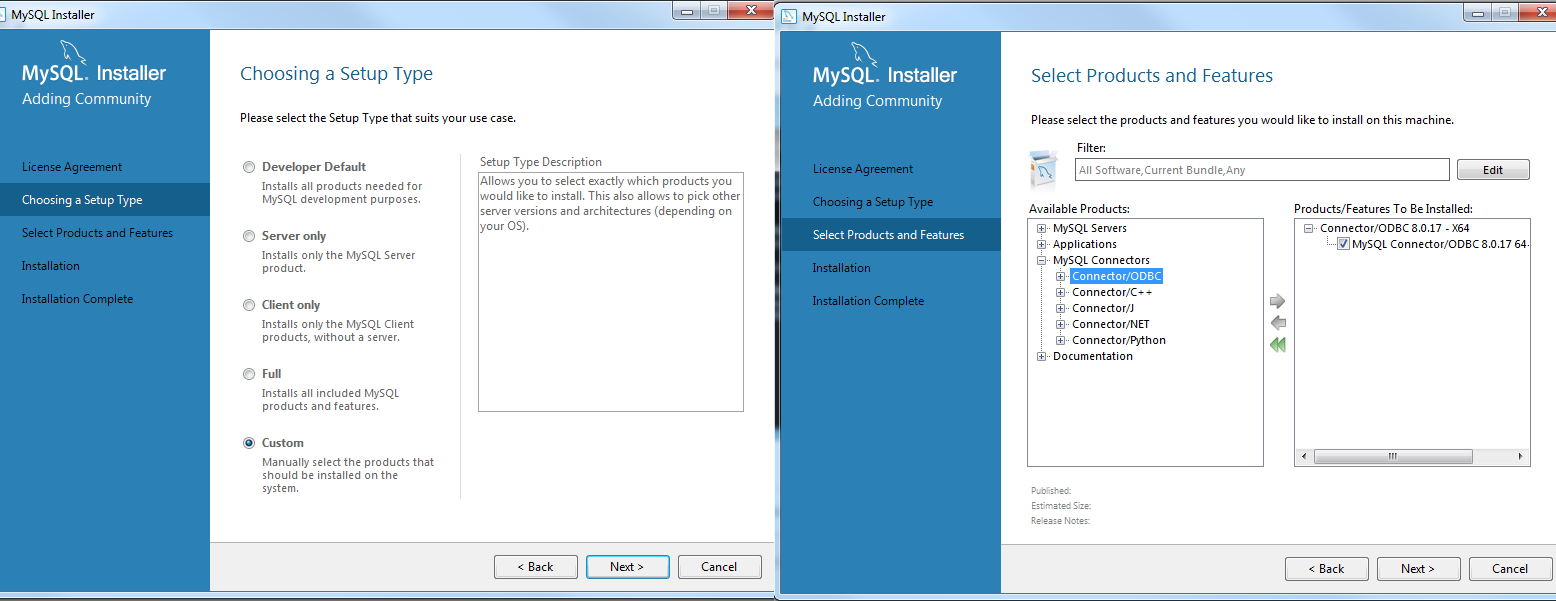
When updating the Connector/C, you can use the Windows MySQL Installer with a custom setup that only includes the Connector/ODBC product. For example:
Update the MySQL configuration
You must update the MySQL configuration before upgrading to MySQL 8.
On Linux, edit the /etc/my.cnf configuration file as described below.
Edit the /etc/my.cnf configuration file:
On Windows, edit the C:\ProgramData\MySQL\my.ini configuration file. (Your path might be different. For example, C:\Program Files\MySQL\)
Edit the C:\ProgramData\MySQL\my.ini configuration file. (Your path might be different. For example, C:\Program Files\MySQL\)
Note: Before editing the configuration file, you'll need to open the existing MySQL Server 5.7 folder and copy the my.ini file and Data folder to a newly created MySQL Server 8.0 folder.
Make these changes to the configuration file:
- Remove NO_AUTO_CREATE_USER from sql-mode.
-
Ensure the file contains local-infile=1.
- Remove query_cache_size from the file.
- Ensure the mySQL installation does not include ONLY_FULL_GROUP_BY in the sql_mode setting:
- Display the setting with this command:
mysql> select @@GLOBAL.sql_mode;
Example output:
ONLY_FULL_GROUP_BY,STRICT_TRANS_TABLES,NO_ZERO_IN_DATE,NO_ZERO_DATE,ERROR_FOR_DIVISION_BY_ZERO,NO_ENGINE_SUBSTITUTION
- If ONLY_FULL_GROUP_BY appears in the output, remove it. A simple way to do this is to add a new sql_mode setting in your mysql configuration: copy the output text (except for ONLY_FULL_GROUP_BY), add it to a MySQL system variable "sql-mode" in the mysql configuration, and save the changes.
- Restart MySQL and confirm the change by repeating the
select @@GLOBAL.sql_mode;command.
- Display the setting with this command:
-
Ensure that datadir has the path to the new data directory.
For example
datadir="C:/ProgramData/MySQL/MySQL Server 8.0/Data" -
Ensure that secure-file-priv has the path to the new data directory.
For example
secure-file-priv="C:/ProgramData/MySQL/MySQL Server 8.0/Uploads"
Upgrade MySQL
Use the upgrade instructions below are examples. If you have questions, use the MySQL instructions for complete details.
Note: You must prepare the database configuration before performing the upgrade. See Update the MySQL configuration.
If you used “yum install” to install MySQL 5.7, you must disable the 5.7 Community Server version in your yum repository and enable version 8.0. This procedure updates to the latest MySQL 8.0.x version and automatically restarts the MySQL service:
- List the contents of enabled items in the yum repository:
# yum repolist enabled | grep mysql
- Disable version 5.7 and enable 8.0 as follows:
# yum update
# yum install yum-utils
# yum-config-manager --disable mysql57-community
# yum-config-manager --enable mysql80-community
- Proceed with the update:
# yum update mysql-server
The MySQL Installer does not support upgrades between release series, such as from 5.7 to 8.0. Instead, you must download the Windows Zip Distribution from MySQL Downloads, and extract the contents to C:\Program Files\MySQL\MySQL Server 8.0, as follows:
- Open a Command window as Administrator.
- Navigate to
C:\ProgramData\MySQL\ - Execute these commands (the name MYSQL57 might be different on your system):
NET STOP MYSQL57
sc delete MYSQL57
- Navigate to
C:\Program Files\MySQL\MySQL Server 8.0\bin - Execute these commands:
mysqld.exe” –install MYSQL80 –defaults-file=”C:\ProgramData\MySQL\MySQL Server 8.0\my.ini”
NET START MYSQL80
-
Update your system environment variables to point to new locations (the MySQL 8.0 directories). For example, your PATH envar might refer to these old locations:
C:\Program Files\MySQL\MySQL Server 5.7\bin
C:\Program Files\MySQL\MySQL Server 5.7\lib\
