Installing MySQL
Note: This topic is for MySQL. Alternatively, see Installing SQL Server.
Except for these instructions, there are no special Nuance requirements and you can follow the vendor instructions for a normal database installation, and take advantage of all tools, features, and deployment architectures. If you have already installed the database, you can confirm the settings and reconfigure if necessary.
Complete these tasks in order, and then continue to Run the installer on Windows
Download required MySQL software
The Management Station supports open-source and commercial MySQL, 64-bit versions. See the Release Notes for the supported versions. These instructions use open-source MySQL as an example.
- Download the supported MySQL Community Server package to a temporary location on the designated database host.
Note: download the package from the yum repository.
- Extract the file.
- You must install the Connector/J on the Management Station host. See Install the Connector/J.
-
You must install the Connector/C on each host that runs Nuance speech software with the statistics collector service. See Install the MySQL Connector/C.
Install the Connector/J
You must install the Connector/J on the designated Management Station host. See the Release Notes for the supported versions.
- Download the Connector/J from the MySQL downloads site to the designated Management Station host.
- Extract the package. It contains many files you can ignore. The important file (which you point to during the Management Station installation) is mysql-connector-j-version.jar.
The Connector/J is included in the MySQL installation package, which you obtain from the MySQL downloads site.
- Run the custom MySQL installation on the designated Management Station host and select only the Connector/J.
- Remember the location for the Management Station installation.
Install MySQL
Install MySQL on the designated database host.
- Verify that you don’t have another non-supported version of MySQL installed. Remove it if you do.
- Install the product using the
yuminstall command. - Start the MySQL service. MySQL generates a temporary root password that you need to change.
- Enter this command to locate the temporary root password:
> cat /var/log/mysqld.log | grep 'temporary password' | cut -d ":" -f4- | sed -e 's/ //' | tee tmppswd
If mysqld.log is empty, look in /var/log/messages for the temporary password.
- Reset the temporary root password using either the SET PASSWORD or ALTER USER command.
- Continue to Create a MySQL user account.
- Verify that you don’t have another non-supported version of MySQL installed. Remove it if you do.
- Run the executable and choose a Custom setup type.
Note: Ensure you install an InnoDB storage engine.
- Select the MySQL Server (x64) and Connector/J.
You install each component on the appropriate host. For example, MySQL on the dedicated database host and the Connector/J on the Management Station host.
- Follow the prompts on the screen and install MySQL. Make a note of the Connector/J location and filename for the Management Station installation.
- Install the MySQL Connector/C on the Nuance speech software host.
-
When the installation is complete, continue with the product configuration:
- Type and Networking—Select Standalone MySQL Server/Classic MySQL Replication, click Next, then select Config Type: Server Machine. Leave the remaining default settings.
- Accounts and Roles:
- Create the root account.
- Make a note of the account password for the Management Station installation.
- Windows Service: Accept the defaults.
- Plugins and Extensions: Accept the defaults.
- Apply Server Configuration: Click Execute.
- Click Finish.
-
Ensure the PATH system environment variable includes the
mysql\bindirectory. - The MySQL installation and initial configuration is complete. Continue to Configure MySQL.
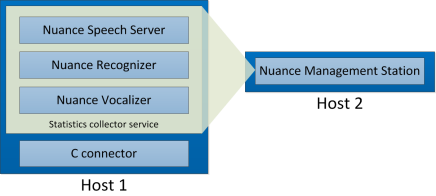
Install the MySQL Connector/C
You must install the Connector/C on each host that runs Nuance speech software with the statistics collector service.
Note: Speech Suite does not support the Connector/C++.
The statistics collector service uses the Connector/C to deliver billing information to the Management Station database (The service is included in all provided role files that configure hosts running Nuance speech software).
For example:
The steps to install MySQL Connector/C depend on whether the Statistics Collector is running on the same host as the database or on a different host.
If the collector is on the same host as the database:
-
When prompted during the Speech Suite installation, enter the following path to locate
libmysql.dll. (The installer adds the library to the host by the MySQL installation):C:\Program Files\MySQL\MySQL Server 8.0\lib\libmysql.dll
-
After the Speech Suite installation, ensure the path is included in the PATH system environment variable.
On a host where the database is not present, follow these instructions:
-
Create a folder on the Windows VM, eg.
> cd C:\ > mkdir c_connector -
Copy over the following DLL file from the host where MySQL is installed to the newly created folder above, i.e.
C:\Program Files\MySQL\MySQL Server 8.0\lib\libmysql.dllC:\Program Files\MySQL\MySQL Server 8.0\bin\libcrypto-x_x-x64.dll (where x is the your MySQL version)C:\Program Files\MySQL\MySQL Server 8.0\bin\libssl-x_x-x64.dll (where x is the your MySQL version)
-
When proceeding with the Speech Suite installation, include the path to the newly created folder where you copied over the 3 DLL files when asked to specify the path to the 64-bit Connector/C library, e.g.
C:\c_connector\libmysql.dll
| Use Case | MySQL 8 |
|---|---|
| SC running on the same host as DB | Option 1 |
| SC running on different host than DB | Option 2 |
Option #1
On the database host, the libmysqlclient.so.X is already present following the MySQL installation. The required symbolic link should automatically be present, if it is not you will need to create it:
> ln -s /usr/lib64/mysql/libmysqlclient.so.xx /usr/lib64/libmysqlclient.so
where ".xx" is the version number appended to the name of the library. This symbolic link ensures that the Speech Server can locate the library.
Option #2
Install the 'mysql-community-libs' package for your Linux distribution.
Here are the example commands for CentOS 7:
# rpm -Uvh mysql80-community-release-el7.rpm
# yum clean all
# yum --enablerepo=mysql80-community install mysql-community-libs
The required symbolic link should automatically be present, if not you will need to create it:
> ln -s /usr/lib64/mysql/libmysqlclient.so.xx /usr/lib64/libmysqlclient.so
where ".xx" is the version number appended to the name of the library. This symbolic link ensures that the Speech Server can locate the library.
Re-use or remove legacy databases
If you have a prior Speech Suite installation with a Management Station database, you can re-use the database with the new Speech Suite installation: the installer allows you to specify existing mserver and audit databases from the previous installation. Alternatively, you can replace the legacy databases. In this case, Nuance recommends backing up and removing the legacy Management Station databases before installing Speech Suite.
If you need to upgrade the database software, it's best to perform the database upgrade before upgrading Speech Suite. See Upgrading database software.
To remove a database, open a command-prompt window and use this command:
> mysql -h hostname -u mserver_username -pmserver_password -e "drop database mserver;"
For example, with hostname mtl-venus.nuance.com, mserver_username ms, and mserver_password msp, the command is:
> mysql -h mtl-venus.nuance.com -u ms -pmsp -e "drop database mserver;"
To remove a saved audit database, use the same command and substitute the audit username, password, and database name.
Configure MySQL
On Linux, edit the /etc/my.cnf configuration file as described below.
Edit the /etc/my.cnf configuration file:
On Windows, edit the C:\ProgramData\MySQL\my.ini configuration file. (Your path might be different. For example, C:\Program Files\MySQL\)
Edit the C:\ProgramData\MySQL\my.ini configuration file. (Your path might be different. For example, C:\Program Files\MySQL\)
Make these changes to the configuration file:
- Remove NO_AUTO_CREATE_USER from sql-mode.
-
Ensure the file contains local-infile=1.
- Remove query_cache_size from the file.
- Ensure the mySQL installation does not include ONLY_FULL_GROUP_BY in the sql_mode setting:
- Display the setting with this command:
mysql> select @@GLOBAL.sql_mode;
Example output:
ONLY_FULL_GROUP_BY,STRICT_TRANS_TABLES,NO_ZERO_IN_DATE,NO_ZERO_DATE,ERROR_FOR_DIVISION_BY_ZERO,NO_ENGINE_SUBSTITUTION
- If ONLY_FULL_GROUP_BY appears in the output, remove it. A simple way to do this is to add a new sql_mode setting in your mysql configuration: copy the output text (except for ONLY_FULL_GROUP_BY), add it to a MySQL system variable "sql-mode" in the mysql configuration, and save the changes.
- Restart MySQL and confirm the change by repeating the
select @@GLOBAL.sql_mode;command.
- Display the setting with this command:
-
Ensure that datadir has the path to the new data directory.
For example
datadir="C:/ProgramData/MySQL/MySQL Server 8.0/Data" -
Ensure that secure-file-priv has the path to the new data directory.
For example
secure-file-priv="C:/ProgramData/MySQL/MySQL Server 8.0/Uploads"
Create the database and tables
You must create or reuse a Management Station database (mserver) and its underlying tables. Optionally, you can create or reuse an audit database for logging Management Station user actions.
By default, the database installs to this location:
To create the Management Station database:
- Get the create-tables.sql script from the external_db_scripts directory in the Management Station download package.
- Copy the scripts to the MySQL host.
- Change directory to the location of the SQL script files for creating the database tables.
- Log in to the MySQL client as root.
- Create the database. By convention the name is mserver, but you can use any name:
mysql> create database mserver;
- Make a note of the database name for the Management Station installation.
- Specify the name of the Management Station database to use:
mysql> USE ms_database_name; -
Create the tables in the Management Station database:
mysql> SOURCE create-tables.sql;
To create the audit database:
- Get the create-audit-tables.sql script from the external_db_scripts directory in the Management Station download package.
- Copy the scripts to the MySQL host.
- Log on to the database host as root or Administrator (or as a user with root/administrator privileges).
- Create the database and give it a name. For example, mserver_audit.
- Make a note of the audit database name for the Management Station installation.
- Create the audit user with all privileges. You can skip this step and just use the MySQL user account for the Management Station database.
- Change directory to the location of the SQL script files for creating the database tables.
- Create the tables in the audit database:
mysql> SOURCE create-audit-tables.sql;
After creating the database and tables, continue to Create a MySQL user account.
Create a MySQL user account
You must create a user account with specific privileges for the Management Station. (Later, you specify this account during the Management Station installation.)
To create a MySQL user account, use the MySQL client installed on your host running MySQL:
- Log in to the MySQL client as root.
- Create a MySQL user account for the Management Station database. Repeat the following CREATE USER command to create database user accounts with several hostname formats. (Having multiple accounts with different hostname formats avoids errors when MySQL receives a client request from the Management Station and validates the source host of that request.)
mysql> CREATE USER 'ms_username'@'ms_hostname' IDENTIFIED WITH MYSQL_NATIVE_PASSWORD BY 'ms_password';
- ms_username — Nuance recommends ms as the username (because this is the default name used by the Management Station), but you can specify any value. Remember the username and provide it during the Management Station installation.
- ms_hostname — is where you intend to install the Management Station. Provide all combinations of hostname formats (repeat the CREATE USER command once for each format).
- Hostname (for example “nuanceHost1”)
- Fully qualified hostname (for example “nuanceHost1.nuance.com”)
- IP address (for example “100.191.05.00”)
- localhost (if the database is on the same host as the Management Station)
- ms_password — any password that conforms to MySQL rules and the Management Station rules below. Remember the password and provide it during the Management Station installation.
- Repeat these commands for each of Management Station account (once per each ms_hostname format).
mysql> CREATE USER IF NOT EXISTS 'username'@'MS_hostname' IDENTIFIED WITH MYSQL_NATIVE_PASSWORD BY 'password';
mysql> GRANT ALL PRIVILEGES ON mserver.* TO 'username'@'MS_hostname' WITH GRANT OPTION;
mysql> GRANT ALL PRIVILEGES ON mserver_audit.* TO 'username'@'MS_hostname' WITH GRANT OPTION; (if using audit db)
mysql> GRANT CREATE USER, RELOAD ON *.* to 'username'@'MS_hostname';
mysql> FLUSH PRIVILEGES;
Verify that this user is granted privileges on the MySQL database:
mysql> show grants for 'ms_username'@'ms_hostname';
- Continue to Install the MySQL Connector/C.
The Management Station installation does not support database passwords that contain these characters:
| Character | Name |
|---|---|
| | | Pipe |
| ` | Back quote (grave accent) |
| \ | Backslash |
| [ | Open bracket |
| ] | Close bracket |
| { | Open curly brace |
| } | Close curly brace |
| " | Double quote |
Related topics
Related tasks
Running the Speech Suite installer on Linux
Running silent installations on Linux
Upgrading Speech Suite software for version 11.0.3 or earlier
Updating Management Station after upgrading Tomcat
Changing ownership of Management Station logs
Configuring Management Station to use a JDK or JRE
Upgrading Speech Suite software for version 11.0.4 or later
