Installing SQL Server
Required if using Management Station: you must install a MySQL
Note: This topic is for SQL Server. Alternatively, see Installing MySQL.
Note: For a new SQL Server installation, you must install SQL Server Management Studio and SQL Server Configuration Manager.
Complete these tasks in order, and then continue to Run the installer on Windows
Install SQL Server
Except for these instructions, there are no special Nuance requirements and you can follow the vendor instructions for a normal database installation, and take advantage of all tools, features, and deployment architectures. If you have already installed the database, you can confirm the settings and reconfigure if necessary.
Install the Connector/J
You must install the Connector/J on the designated Management Station host. See the Release Notes for the supported versions.
- Download SQL Server JDBC Driver from the Microsoft SQL Server downloads site to the designated Management Station host.
- Extract the package. It contains many files you can ignore. The important file (which you point to during the Management Station installation) is sqljdbcnumber.jar.
Configure the database for mixed authentication
You must configure mixed mode authentication for SQL Server, as SQL Server authentication is used between the Management Station application and the database. Configure the database as follows:
- Configure the database engine for Mixed Mode (SQL Server...) and enter a password for the system administrator account.
- Click Add Current User and wait for the entry to appear in the administrators list before continuing.
- Continue with the installation as normal and click Install when prompted.
Ensure TCP/IP is enabled
The Management Station installation connects to the database through TCP port 1433. You can specify a different TCP port and verify that TCP/IP is enabled.
To enable TCP/IP:
- Run SQL Server Configuration Manager.
- Select SQL Server Network Configuration→Protocols for MSSQLSERVER.
Note: MSSQLSERVER is the default.
- Verify that TCP/IP is enabled (default).
- Right-click TCP/IP and select Properties.
- Select the IP Addresses tab, scroll-down to IPALL, and set the TCP Port value (default is 1433).
- Make a note of the TCP Port value, if different from the default, for the Management Station installation.
Create a SQL Server Login
You must create a user account with specific privileges for the Management Station. (Later, you specify this account during the Management Station installation.)
The Management Station installation does not support database passwords that contain these characters:
| Character | Name |
|---|---|
| | | Pipe |
| ` | Back quote (grave accent) |
| \ | Backslash |
| [ | Open bracket |
| ] | Close bracket |
| { | Open curly brace |
| } | Close curly brace |
| " | Double quote |
To create the login:
- Log in to the sqlcmd interface using system administrator account credentials. Run the following command where sa login is the system administrator login and saPassword is system administrator account password:
sqlcmd -U salogin -P saPassword -S hostname\dbinstancename - To create the database user account for Management Station, run the following commands where mslogin is the database user login for Management Station (default: ms) and msPassword is the database user password for Management Station (default: msp):
CREATE LOGIN mslogin WITH PASSWORD = ‘msPassword’, CHECK_POLICY = OFF, DEFAULT_LANGUAGE = English;
go - To add the dbcreator server role (the public server role is automatically assigned), run the following commands:
SP_ADDSRVROLEMEMBER ‘mslogin’, ‘dbcreator’;
go - Run the following command:
quit
Remove legacy databases
If you have a prior Speech Suite installation with a Management Station database, you can re-use the database with the new Speech Suite installation: the installer allows you to specify existing mserver and audit databases from the previous installation. Alternatively, you can replace the legacy databases. In this case, Nuance recommends backing up and removing the legacy Management Station databases before installing Speech Suite.
To remove MS SQL Server databases:
- Log in to the sqlcmd interface using ms login credentials. Run the following command where mslogin is the database user account for Management Station (default: ms) and msPassword is database user password for Management Station (default: msp):
sqlcmd -U mslogin -P msPassword -S hostname\dbinstancename - To remove the Management Station database, run the following commands where mserver is the name of the Management Station database (default: mserver):
drop database mserver;
go - To remove the audit database, if required, run the following commands where mserver_audit is the name of the Management Station audit database (default: mserver_audit):
drop database mserver_audit;
go - Run the following command:
quit
Create the databases and tables
You must create or reuse a Management Station database (mserver) and its underlying tables. Optionally, you can create or reuse an audit database for logging Management Station user actions.
To create the databases and tables:
- Download and unzip the Management Station download package to the designated Management Station host.
- Log in to the sqlcmd interface using ms credentials. Run the following command where mslogin is the database user account for Management Station (default: ms) and msPassword is database user password for Management Station (default: msp):
sqlcmd -U mslogin -P msPassword -S hostname\dbinstancename - To create the Management Station database, run the following commands where mserver is the name of the Management Station database (default: mserver):
create database mserver;
go - To create the audit database, if required, run the following commands where mserver_audit is the name of the Management Station audit database (default: mserver_audit):
create database mserver_audit;
go - Run the following command:
quit - To create tables in the Management Station database:
- Change directory to the external_db_scripts directory in the Management Station download package.
- Create the database tables using the following commands:
> sqlcmd -U mslogin -P msPassword –d mserver -S hostname\dbinstancename -i create-tables-sqlserver.sql
- Create tables in the audit database using the following commands:
- Change directory to the external_db_scripts directory in the Management Station download package.
- Create the database tables using the following commands:
> sqlcmd -U mslogin -P msPassword –d mserver_audit -S hostname\dbinstancename -i create-audit-tables-sqlserver.sql
Install the ODBC Driver
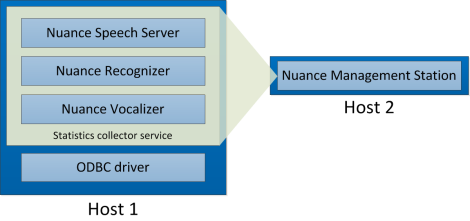
The ODBC Driver is required on each host that runs the Nuance statistics collector service. The statistics collector service collects statistics used for billing and is included in all provided role files that configure hosts running Nuance speech software.
Note: Check the Release Notes to ensure you've got a driver version that is compatible with the database.
The statistics collector service uses the ODBC Driver to communicate with the Management Station database. You install the following ODBC Driver components on all hosts running Nuance speech software:
- ODBC Driver Manager
- ODBC Driver for SQL Server (64 bit)
For example:
To install the ODBC Driver:
- Download the x64 ODBC Driver from the Microsoft downloads website.
- Run the msi file and complete the setup wizard.
Note: On the Feature Selection step of the wizard, make sure you select to install ODBC Driver for SQL Server SDK.
- Open the Control Panel, select Administrative Tools→Data Sources (ODBC)→System DSN tab.
- Click Add, select the ODBC Driver, and click Finish.
- Specify MSERVER (uppercase) as the data source name, specify the MS SQL Server host, and click Next.
If the database uses a non-default port, append the port number to the host name using a comma delimiter.
Note: If you use a different data source name, you must configure the sc.DSN property in Management Station (by adding the property/value in the Advanced Tab for Stats Collector).
- Select SQL Server Authentication and specify the Login ID for the database account that Management Station uses. Optionally, provide the password. This is needed for testing the connection after the database configuration is finished. Then, click Next.
- Select Change the default database to.
- Select the name of the database from the menu and click Next.
- Accept the defaults on the next window and click Finish.
- Test the connection between the ODBC Driver and the database.
