Getting alerts when alarms occur
You can configure the Management Station to alert designated recipients when a scheduled report or alarm has been generated. Alert notifications are sent via email or HTTP Posts.
This alerting mechanism has several advantages; for example, it:
- Saves Management Station users from having to periodically log in just to see if something of interest has occurred. When an alarm occurs or a scheduled report is generated, designated recipients receive immediate notification along with the alarm or report contents.
- Provides a more secure environment by reducing the number of users accessing the Management Station.
- Saves you, the administrator, the burden of having to configure, then train users whose only reason for logging in to the Management Station is to check for alarms or look at reports.
Step 1: Select delivery method
To select the delivery method:
- Click the Administration tab.
- Click Alerting on the toolbar. The Alerting page appears.
- Select the delivery method, Email or HTTP Post.
Step 2: Validate delivery method
It is important to verify that the Management Station can successfully send an email or HTTP Post. If the validation fails (for example, in the case of an incorrect SMTP server address or port, a malformed or invalid URL), an error message appears. Fix the error and resubmit the information to complete the validation step.
Currently, the Management Station posts only alarms, not reports. To validate and configure the HTTP Post delivery method:
- Click HTTP Post in the left frame. The HTTP Post Configuration page appears. For example:
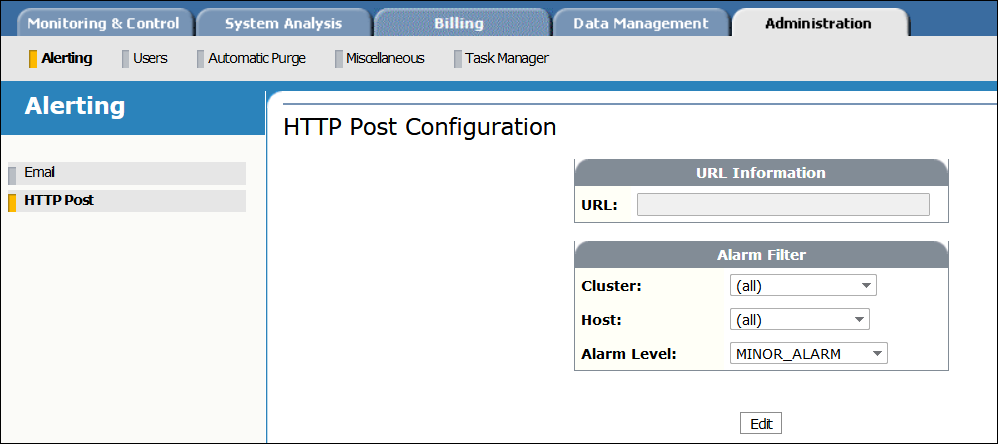
- Click Edit and specify the URL where the Management Station will post alarms.
- Optionally, set alarm filters to trigger an alarm notification before submitting the URL for validation. When these conditions are met, the Management Station posts the alarms to the specified URL. The alarm level setting includes alarms at that level and higher.
- Click Submit. The Management Station validates the URL and displays a message indicating success or failure. If an error message appears, verify you’ve entered a valid URL.
- If the URL is successfully validated, the HTTP Post Configuration page reappears:
- Click Edit to set the alarm filter (if you haven’t already done so) or change the URL. You can only configure one URL.
- Click Disable Configuration to stop sending HTTP posts to a configured URL. A message appears asking for confirmation. Click OK.
To validate the email delivery method:
- Click Email in the left frame. The Email Configuration page appears. For example:
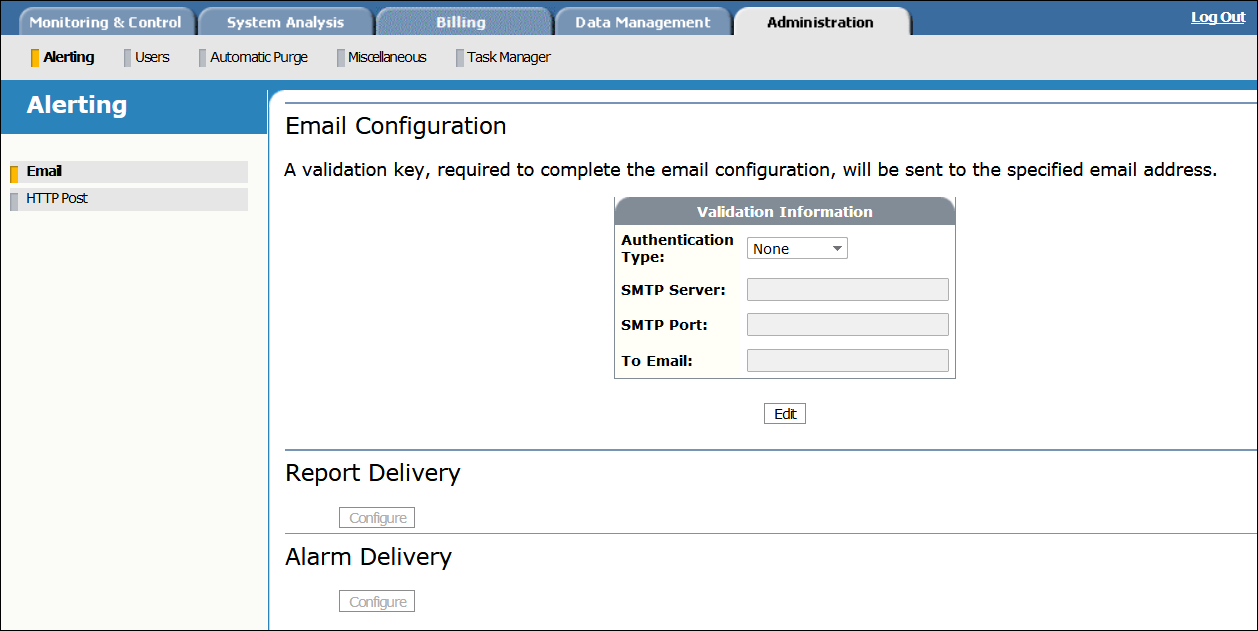
- Click Edit and fill in the fields as follows:
- Authentication Type: Select None to enter only the SMTP server information, or select Plain Text to configure additional settings, such as encryption.
Encryption Type: For Plain Text, select an encryption protocol: STARTTLS or SSL/TLS.
- SMTP Server: Enter the hostname or IP address of the machine running the SMTP server.
- SMTP Port: Enter the port number used to connect to the SMTP server. The default is 25. You can get the correct port number from your internet service provider.
- User Name: For Plain Text, enter the username for your SMTP server account. The Management Station uses the username and password, below, to authenticate the email addresses entered in the From Email and To Email fields.
Note: Depending on the type of SMTP server you use, you might need to enter an email address in place of your username.
- Password: For Plain Text, enter the password for your SMTP server account.
- From Email: For Plain Text, enter a From email address to display to the email recipient.
- To Email: For Plain Text, enter an email address to which to send the validation key for configuring email notifications.
- Click Submit.
The Management Station informs you it’s sending an email containing a validation key to the specific address. It then displays the Validation page so you can complete the process. For example:
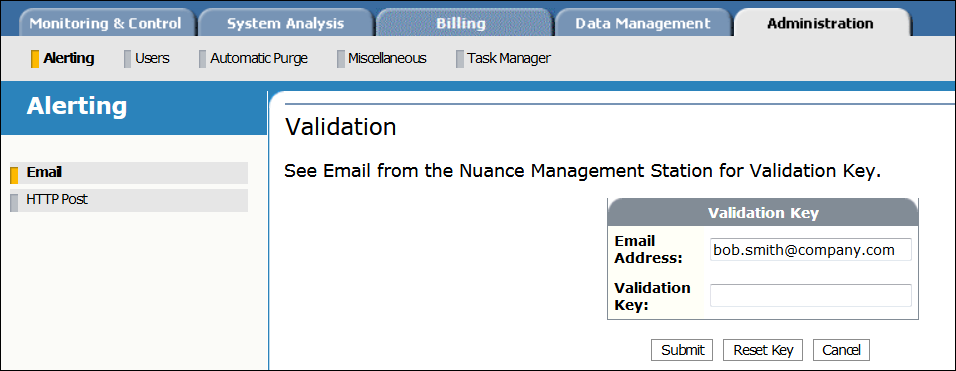
Expect to receive the email within a minute. If you don’t, click Reset Key to return to the Validation Information page and verify the email address. Edit and resubmit.
- Copy the validation key from the email and paste it into Validation Key.
- Click Submit to complete the validation process. The Management Station informs you that the validation was successful and displays the Email Configuration page.
- Specify the designated recipients and set alarm filters, described below.
Configure report delivery
To configure the Management Station to deliver scheduled reports to designated recipients:
- From the Email Configuration page, click Configure to display the Report Delivery Configuration page.
- Click Edit and add the email addresses for the designated recipients (one at a time).
For example:
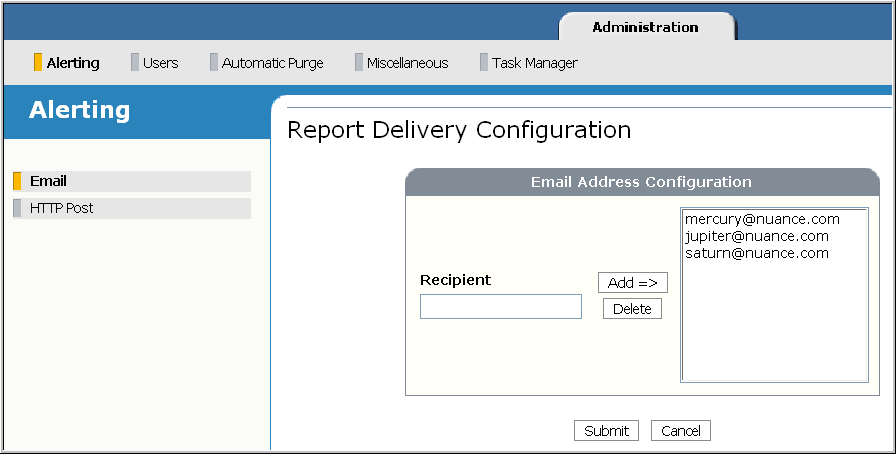
- When done, click Submit. When a scheduled report is generated, the Management Station emails it to the designated recipients.
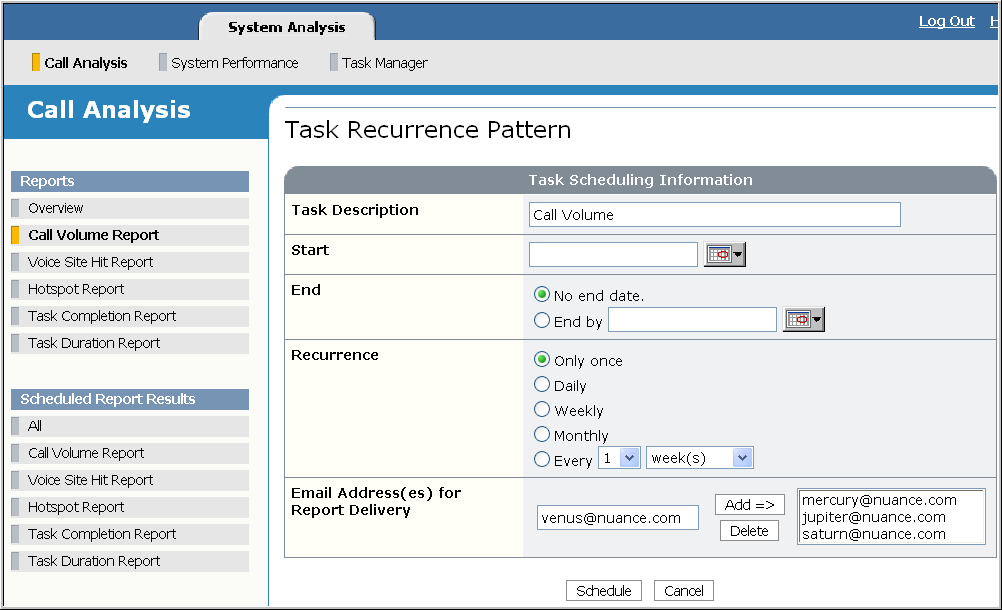
The email subject contains the name of the task (as indicated on the Task Description field of the Task Recurrence page) and the time the report was generated. So if you entered Overall Automation—All Companies for the Task Description, and the report executed on Jan. 23, 2012 at 03:30:36, the email subject would be “Management Station report: Overall Automation—All Companies-2012/01/23 03:30:36.”
You can add or remove recipients when scheduling a report. To modify the list on already scheduled reports, just click the recurrence icon from the Task Manager.
This example adds a new email address to the list previously configured:
Configure alarm delivery
To configure the Management Station to deliver alarms to designated recipients:
- From the Email Configuration page, click Configure to display the Alarm Delivery Configuration page.
- Click Edit and add the email addresses for the designated recipients (one at a time).
- Select an address to activate the Alarm Filter region and specify the filters to trigger an alarm notification. For example:
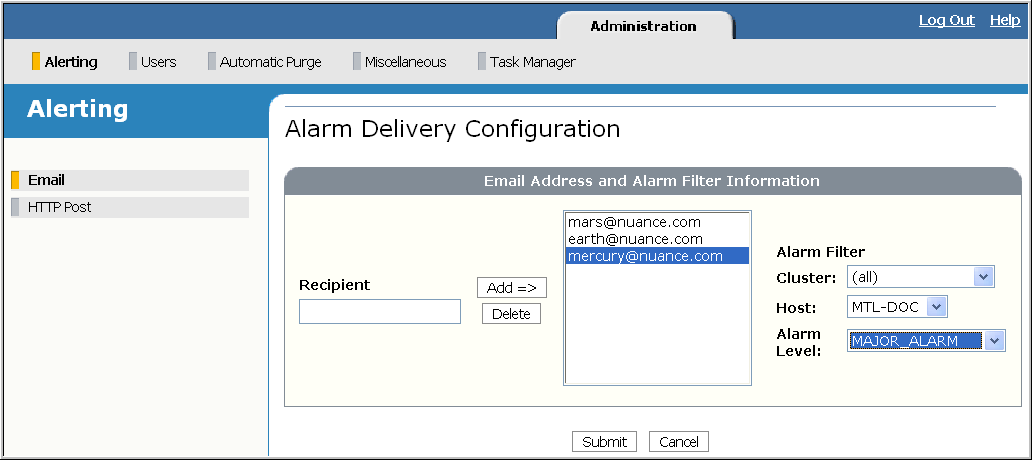
The filter applies to all recipients in the list. When these conditions are met, the Management Station sends an email with the alarm contents to all designated recipients. The alarm level setting includes alarms at that level and higher. The alarm is embedded in the body of the email. To receive it as an attachment instead, set emailAlertAsAttachment to true in %MSTATION_HOME%\mserver\webapps\mserver\config\mserver_cfg.properties.
Note: To configure different alarm filters for different recipients, add the first recipient, select it, specify the alarm filter, and click Submit. Repeat for the next recipient, and so on.
- Click Submit.
You can edit or disable the current email configuration for report and alarm deliveries.
From the Email Configuration page, click Edit to change any validation information. For example, if your SMTP password expires or is changed on a regular basis for security reasons, you will need to update your configuration. Make the changes and click Submit. Repeat the steps to validate the email delivery.
Click Disable to disable the current email configuration and stop sending reports and alarms. Disabling the configuration also disables modifying the email recipient list on the Task Recurrence page. Click Enable to enable the current configuration.
Note: If you forget to update the email configuration after changing your password, the Management Station generates a major alarm. But it continues to send email alerts to the old password. To prevent your account possibly locking up, please update your configuration immediately, or disable the configuration until you’re able to do.
If the SMTP server goes down, the Management Station generates an alarm the next time if tries to send an email notification. Once you bring the SMTP server back up, email deliveries continue as before.
Related topics
Related tasks
