Scheduling and managing tasks
Whenever you perform certain tasks, for example, importing log files, generating reports, and so on, you have the option of scheduling when and how frequently to execute the task.
For example, you might want to import call log files every night at 2 a.m., when demands on the system are low. You might want to generate a weekly Call Volume report based on the previous week’s imported call log files. And you might want to purge summarized call log data on a weekly basis.
The task management feature offers an intuitive interface for specifying a time window and recurrence pattern for automatic task execution.
See Use case for a scenario that includes scheduling tasks: to import call logs, generate reports, and purge old call log data after report generation.
Scheduling tasks
Follow these steps to schedule a task:
- Click the Schedule function button, available with the particular task you’re performing. For example, function can be a data management or report-generation task, like Schedule Data Import or Schedule Report.
Use the Task Recurrence Pattern page to schedule the task frequency. The bottom of the page shows filters you applied when creating the task.
For example:

- Set a time and recurrence pattern:
- Task Description: Enter a comment describing the task, for example, Weekly Call Volume Report or Daily Call Log Import. (Special characters are allowed.) This makes it easier to track the task on the Task Manager page.
- Start: Click the calendar icon to specify a date and time interval for starting the task. If left blank, the current time is the start time. (Select the time first, then click the day.)
- End: Select End by, then click the calendar icon to specify a date and time to end the task. Otherwise, leave No end date checked.
- Recurrence: Select how often you want to the task to recur, for example, weekly, or every three months.
- Email Address(es) for Report Delivery: Add or modify the email addresses for those recipients to receive the generated report by email. You must already have validated that the Management Station can deliver emails. See Getting alerts when alarms occur.
- Click Schedule. The task is now saved in the Management Station database.
The Task Manager page appears showing all the running and scheduled tasks.
Monitoring tasks
From the Task Manager page, you can:
- Monitor scheduled tasks
- Perform different actions like delete a task, or cancel one in the process of executing
- To display this page, click Task Manager from the toolbar, available from either the Monitoring & Control, System Analysis or Data Management tabs.
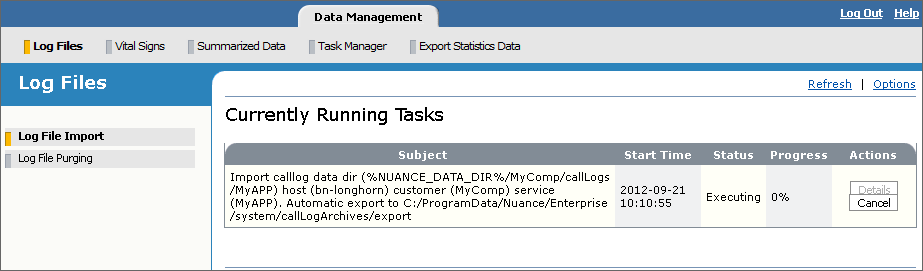
A Task Manager page might look like this:

When the scheduled start time expires, the task starts to execute and appears in the Running Task area. If you have scheduled a recurring task, it still remains in the Scheduled Tasks area but the scheduled start time is updated to the next occurrence.
- Depending on the task, you may have one or more possible actions:
- Start Now executes a task immediately. The scheduled start time changes to the current time. After a few seconds (or just click Refresh Page), the task appears as executing in the Running Tasks area of the page.
- Delete removes a previously scheduled task from the database. You can only delete tasks that haven’t started executing.
- The recurrence icon returns you to the Task Recurrence Pattern page for rescheduling the task. For example, you could reschedule a canceled task or a task that hasn’t started executing.
- Cancel stops an executing task. This option appears in the Running Task area only when a task supports this action, for example, an import call log task. The task is still saved in the database for later rescheduling.
For example:
Viewing task history
The Management Station maintains a history of all executed scheduled tasks arranged in chronological order. Among other things, it shows when the task started and finished, and the status. It also provides a way to delete scheduled tasks from the database and view any report results.
- Click Task Manager on the toolbar.
- Click Task History in the left frame. The Task History page appears where you can view, among other things, the status of the completed task. For example:
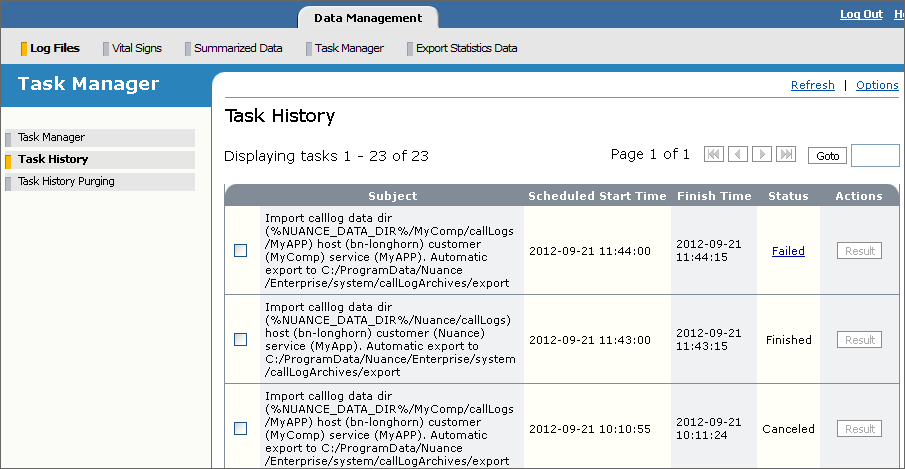
The status results mean:
- Finished—The task executed successfully.
- Canceled—The task was canceled (an action you performed from the Task Recurrence Pattern page).
- Failed—The task execution failed. To find out the reason why, click Failed to display a detailed error message listing the error, cause, and action to take to fix the problem. For example:
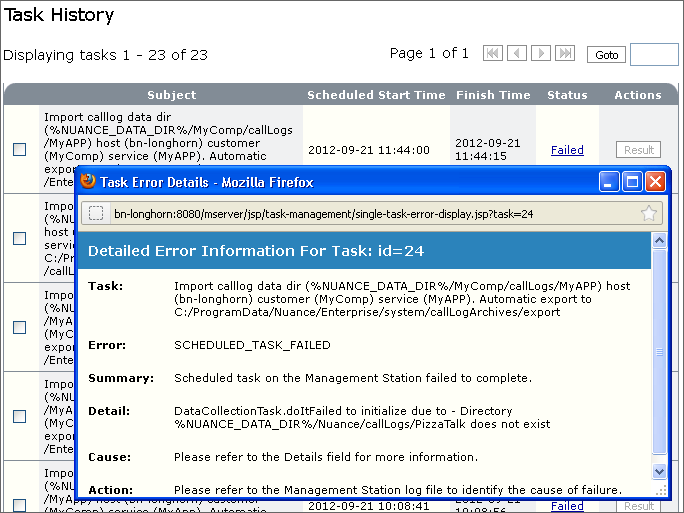
Possible error codes are:
- DATABASE_QUERY_FAILURE—The Management Station failed to access the database or execute the SQL query.
- JAVA_EXCEPTION— An unexpected Java exception was thrown during the task execution.
- OUT_OF_DISK_SPACE—The Management Station ran out of disk space to complete the operation.
- OUT_OF_MEMORY— A memory exception occurred, possibly caused by a huge data set or errors in the code.
- SCHEDULED_TASK_FAILED—The scheduled task failed to complete.
- UNCLASSIFIED—Some sort of general error has occurred. Refer to the log file for more details.
- Click Result to view the results of any generated report. (This action appears only for report tasks.)
- Use the navigation links in the upper right corner to jump to different pages. To move to a specific page, enter the number in the Goto box.
- You can delete tasks from the Management Station database. Check specific ones and click Clear Marked, or click Clear All to clear the task history. You can also purge the task history over a specified date range, described next.
Purging task history
The Task Manager gives you the option of purging the task history, which includes executed scheduled tasks and report results. The purge function uses the date only (not the time) from the Finish Time to calculate what tasks to keep or remove. If, for any reason, the Finish Time field is blank, the default is the current date.
- Click Task History Purging from the left frame to display the Purge Task History page. For example:
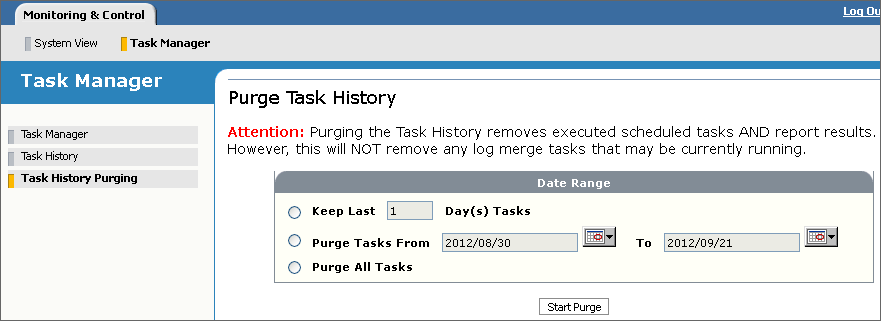
- Choose one of these options:
- Keep Last x Day(s) Tasks: Select this option to keep all tasks over the last specified number of days and purge the rest. The last one day is today, the current day.
For example, if you specify to keep the last 10 days, then all tasks older than 10 days are purged. If today’s date is August 25, 2009, then all tasks whose Finish Date is before 2009-08-25 will be deleted (August 25 is the last 10th day).
- Purge Tasks From/To: Select this option then click the calendar icon to specify a date interval for purging tasks. All tasks whose Finish Time (date only) falls within the specified interval will be purged. The dates specified in the fields are included in the interval.
- Purge All Tasks: Select this option to purge the entire task history.
- Keep Last x Day(s) Tasks: Select this option to keep all tasks over the last specified number of days and purge the rest. The last one day is today, the current day.
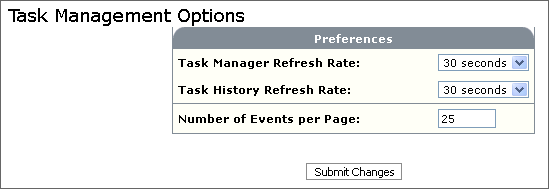
Task management options
The Task Manager and Task History pages are updated every 30 seconds. To change how often these pages are refreshed, click Options in the upper right corner from either page and select another time interval from the Refresh Rate list. You can also change the number of tasks that appear per page. For example:
Use case
You’ve just implemented an automated self-service application. You want to look at the average call volume and call duration on a weekly basis to what trends occur. Your tasks are:
- Import call log files on a daily basis
- Generate a Call Volume report on a weekly basis
- Purge old call log data after the report generation (optional)
Assumption
The use case assumes that each task can be completed in a two-hour interval. In a real-life situation, you would need to consider factors like the total call volume, system use, processor speed of managed hosts, CPU availability for the file transfer service when importing call log files, and so on.
Schedule the log file import
The first thing to do is schedule the import task. You’ve decided to import call log files every night at 2 a.m. when system use is slow.
- Click the Data Management tab to display the Log File Import page.
- Specify the import fields as desired. For the time range, select Last 1 day to import call logs from the past 24 hours.
- When finished, click Schedule Data Import. The Task Recurrence Pattern page appears.
- To track the task, enter a Task Description, for example, Daily call log import.
- Click the calendar icon and select a start date. Select 2:00:00 for the time (the hours are based on a 24-hour clock).
- Keep No end date checked.
- Specify Daily Recurrence.
- Click Schedule. The import task appears in the Task Manager’s list of scheduled tasks. The task will execute every night at 2 a.m., importing the last 24 hours’ worth of call logs.
After the call log import, these actions occur:
- The Management Station extracts and stores the data needed to generate reports.
- It summarizes this data to conserve space in its database.
- It automatically exports the original call log file to %NUANCE_DATA_DIR%\system\callLogArchives\export.
- On a weekly basis, the Management Station automatically purges any exported call log data older than four weeks.
Schedule the report generation
The next thing to do is schedule the report after the data collection.
- Display the Call Volume report (System Analysis→Call Volume Report).
- Customize the Call Volume report as follows:
- For the date range, select the Past field and choose Last 7 days. Since this report will be scheduled as a recurring task, leave the To/From fields blank. The report will be generated on data from the current day (say Sunday back through the previous Monday, inclusive).
Using the Past field ensures that the report is always generated on new data.
- Since customers can call 24/7, keep all days of the week checked and specify All Day for the time interval.
- Group by week.
- Accept the remaining defaults (all companies and applications).
- For the date range, select the Past field and choose Last 7 days. Since this report will be scheduled as a recurring task, leave the To/From fields blank. The report will be generated on data from the current day (say Sunday back through the previous Monday, inclusive).
- Click Schedule Report. The Task Recurrence Pattern page appears.
- To track the task, enter a Task Description, for example, Weekly Call Volume Report.
- Click the calendar icon to select the start date and time. Since you want the report to show Monday through Sunday, select the next Sunday for the start date. Make sure to specify a time after the time you’ve scheduled for the daily import task, for example 5:00:00 (5 a.m.). Make sure to allow enough time for the Management Station to automatically export the call log files as well.
- Keep No end date checked.
- Select a weekly recurrence. From now on, a weekly report will be generated every Sunday.
- Click Schedule. The report task appears in the Task Manager’s list of scheduled tasks. The task will execute every week on Sunday at 5 a.m., based on call log files imported over the past seven days.
Once the Management Station generates a report, you can view the results from either the Task History page (Task Manager→Task History) or Stored Results page (Call Analysis→Scheduled Reports Results→Report). Since the Scheduled Reports Results function groups reports by type, it’s easier to manage them. You can also configure the Management Station to send you the report by email or HTTP Post.
Purge old call log data
Once the report is generated, the stored call log data is now out of date and you can purge it. It’s good practice to regularly purge old data to free up space in the Management Station database.
These instructions assume you want to manually purge call log data, instead of waiting for the Management Station to run its automatic purge task.
- Display the Log File Purge page (Data Management→Log File Purging).
- Specify the purge fields as desired. For the time range, select All available.
- Click Schedule Data Purge. The Task Recurrence Pattern page appears.
- Enter a Task Description, for example, Weekly call log purge.
- Click the calendar icon and select the same start date as the first report task, January 26 in our example. Select a time that allows enough time for the Management Station to complete its report task, for example, 8 a.m. Make sure to allow enough time for the export task to complete before purging.
- Keep No end date checked.
- Select a weekly recurrence pattern.
- Click Schedule. The purge task appears in the Task Manager’s list of scheduled tasks. The task will execute every month on Sunday at 8 a.m., purging all call log data in the Management Station database.
Related topics
Related tasks
