Adding languages and voices
If using Nuance Recognizer or Nuance Vocalizer you can set up a multi-lingual environment. Ignore this topic if not using those components.
Language and voice requirements
- If using Nuance Recognizer you need at least one language pack.
- If using Vocalizer you need least one voice pack.
- For a multilingual system, get additional languages and voice packs.
You can install languages and voices during the initial Speech Suite installation and at any time thereafter. Optionally, you can store the packs on a single host that serves all recognition service and Vocalizer service hosts.
If you download a language and voice before running the Speech Suite installer, you can specify a Recognizer language and a Vocalizer voice during the Speech Suite installation. For example, you would download the files and set the value of Languages, voices to refer to their path during the installation.
At any time in the future you can add more languages and voices by installing them separately, without using the Speech Suite installer.S
Setting up a dedicated server for languages and voices
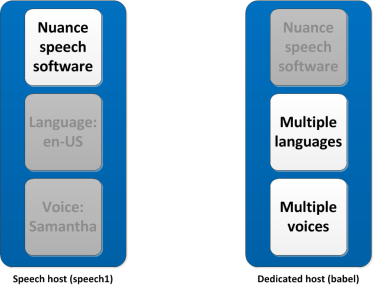
This example shows how you can perform Speech Suite installations on two hosts: one with Nuance Speech Suite, a Recognizer language, and a Vocalizer voice (we call this the speech host ), and the other with Speech Suite and any additional languages and voices (we call this the dedicated host). At runtime, the speech host runs the Nuance speech software, which retrieves languages and voices from the dedicated host when they are needed.
To set up this configuration, including to configure your Nuance products to retrieve the language and voices from the dedicated host, follow these steps:
- Set up your speech host as described in Run the installer on Linux
The one language installed on the speech host will be the default language for Recognizer, since it is the first language installed.
- Download the other languages and voices to a downloads directory on the dedicated host and extract them.
- On the dedicated host, run the installation to install Speech Suite, Recognizer languages, and voices (if using TTS).
This installs all the languages to $SWISRSDK/config and all the voices to $VOCALIZER_SDK/languages on this host. (You can install the Vocalizer voices together in the languages folder or individually in subfolders beneath languages.)
- Ensure that the language directory and voice directory on the dedicated host are viewable and readable from the network.
- On the speech host, set
- On the speech host, set
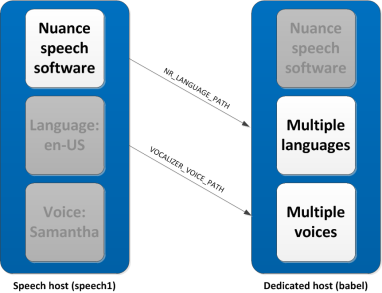
Explanation:
- Recognizer on the speech host has access to the language on its own host, and to all languages in the
- Vocalizer on the speech host has access to the voice on its own host and to all voices in the
You decide to set up a deployment with a Nuance speech software host (speech1), and to put several languages and voices on a single dedicated host (in this case, a host called babel). The speech host will have the US English language and a US English voice, Samantha. The dedicated host will offer Canadian French, Mexican/US Spanish, and standard German (de-DE) languages. It will also offer the Canadian French voice Amelie, the Mexican Spanish voice Angelica, and the standard German voice Petra.
- On the speech1 host, download the en-US language and the en-US voice Samantha to a temporary directory (for example, C:\temp) and extract them.
- Run the Speech Suite installer on the speech host. When the installation prompts you for language and voice location, specify the C:\temp directory where the installation can find the extracted language and voice.
- On the babel host, download the other languages (fr-CA, es-MX, and de-DE) and voices (Amelie, Angelica, and Petra) to a temporary directory (for example, C:\temp) and extract them.
- Install Speech Suite on the dedicated host. When the installation prompts you for the language and voice location, specify the C:\temp directory.
The installation installs all languages and voices it finds in the directory. The languages are installed by default to the C:\Program Files\Nuance\Recognizer\config\ directory, and the voices to the C:\Program Files\Nuance\Vocalizer for Enterprise\languages\ directory.
- Verify that these directories are both visible and readable from the network, so the speech host will be able to use them.
- Configure each recognition service and vocalizer service:
- For each recognition service, set
- For each vocalizer service display the Setting tab, set
- For each recognition service, set
You can use any of these languages and voices in your applications by specifying them in the session configuration file (session.xml) or in the VoiceXML for any application that uses the Nuance speech software on the speech1 host.
- The default language is US English (en-US), because this was installed on the speech1 host before any languages were installed on the babel host.
- The default voice is Samantha because the directory containing the voice is named with the three-letter language code for US English (enu), which comes first in the alphabet before the codes for Canadian French (frc), Mexican Spanish (spm), or standard German (ged).
Having set up the languages and voices on the babel host, you can use it as a language and voice resource for other speech hosts. On the additional speech hosts, you can install Speech Suite and configure the
After setting up the speech1 and babel hosts, you later decide to add a new language and voice for an application that uses Mandarin Chinese.
- On the babel host, download the zh-CN language and the Mandarin Chinese voice Tian-Tian to your downloads directory (C:\temp), and extract them.
- In the extracted language directory, run the installer.
- In the extracted voice directory, navigate to the voice_installer subdirectory and run the installer.
The new language and voice are available to applications running on the speech1 host.
- The default language continues to be en-US.
- The default voice continues to be Samantha, because the three-letter language code for US English (enu) still comes before the code for Mandarin Chinese (mnc). However, the default voice changes if you install a new language with a code that comes before US English (for example, dad for Danish or ena for Australian English).
After setting up the speech1 and babel hosts and adding Mandarin Chinese to the babel host, you decide to add a second speech2 speech host to your configuration.
- On the speech2 host, download the en-US language and the en-US voice Samantha to a temporary directory (for example, C:\temp) and extract them.
- Run the Speech Suite installer on the speech host. When the installation prompts you for language and voice location, specify the C:\temp directory where the installation can find the extracted language and voice.
- Use the Management Station to configure the recognition services and vocalizer services on the speech2 host:
- For each recognition service, display the Setting tab, and set
- For each vocalizer service, display the Setting tab, and set
- For each recognition service, display the Setting tab, and set
