Managing vital signs
The Management Station displays vital signs about various aspects of the system; for example, CPU and memory use, resource allocation, and so on. By default, vital signs are stored only in memory, not in the Management Station database.
You can configure the Management Station to manage vital signs in a similar fashion to logs. You can collect the vital signs from each host and store them in the database, export them to a file, and purge them from the database. As with imported log files, once the vital signs are in the Management Station database, the data is available for generating system performance reports.
Collecting vital signs
Follow these steps to enable vital sign collection and configure the collection rate:
- From the Data Management tab, click Vital Signs on the toolbar. The Vital Signs Collection Configuration page appears for specifying filters to control the collection:
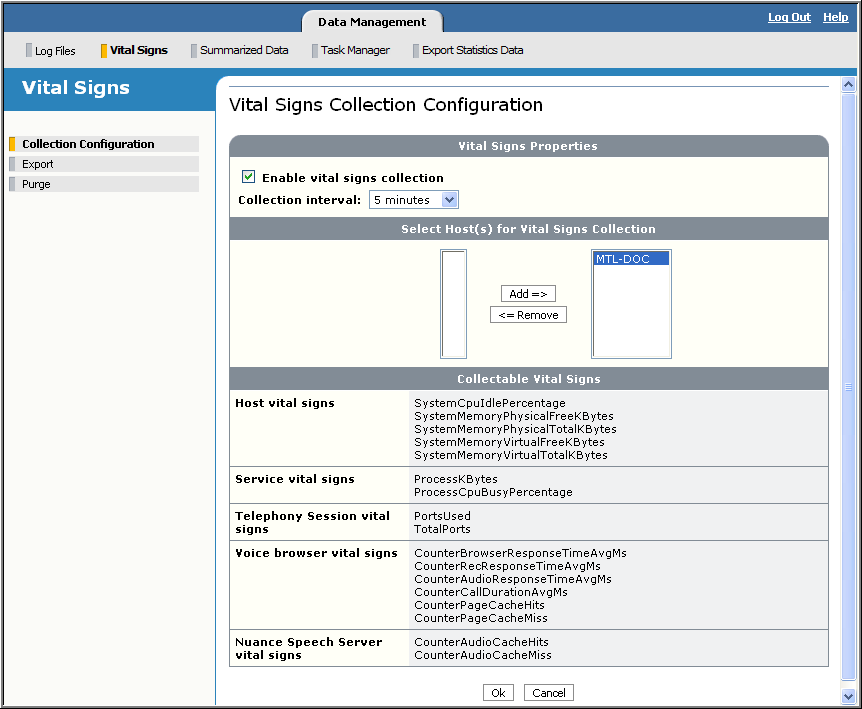
- Enable vital signs collection (by default, this is unchecked) and choose a collection interval from the list, for example, 15 minutes. This interval specifies the frequency at which the Management Station will collect vital signs from the host.
- Select the host(s) to collect vital signs from. Highlight the host or hosts from the list on the left and add them to the right. You can also filter by clusters. Selecting a cluster selects all hosts in that cluster. (Only clusters with online hosts appear in the list.)
The vital signs that are collected are shown at the bottom of the page. The Management Station displays the name of the actual counter (internal system name). See Vital sign counters.
Note: The Management Station displays additional vital signs that may not be available with the Nuance product you have purchased.
- Click OK to enable collection. Note that this task cannot be scheduled.
Exporting vital signs
You can export vital signs from the database for analysis. Follow these steps:
- Click Export from the Vital Signs view on the left side. The Export Vital Signs page appears for specifying filters to control the data export:
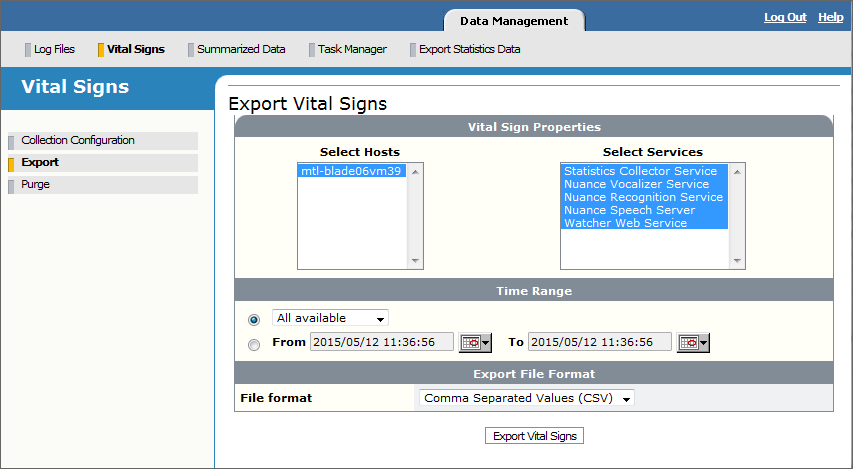
- Select the vital signs that interest you. By default, the vital signs from all hosts and services are exported.
For example, you can choose the Watcher Web Service to export host-level vital signs like the available physical and virtual memory or the percentage of the total time that the CPU is idle.
- Specify a time interval for selecting the vital signs to export:
- All available: Choose a time interval from the list. Only vital signs with a timestamp in that interval will be exported.
- From/To: Select this option then click the calendar icon to specify a date and time interval for selecting vital signs.
- Click Export to download the results.
A File Download dialog appears where you can choose to open or save the export file. The file will be saved in a text file that can later be read by tools like Microsoft® Excel.
When you choose Open, the results open in the same or a different window depending on your Windows configuration. To change your configuration, go to Windows Explorer→Folder Options→File Types. Select XLS and click Advanced. Check or uncheck Browse in the same window to get the desired result.
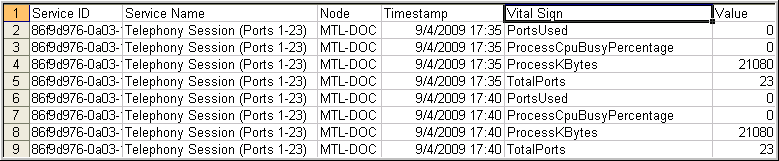
- Open the file to examine the results.
Once you expand the columns and format the timestamp to show a date and time, the file will look similar to the following example. The Service ID is a unique number assigned to each service configured to run on a host. See Vital sign counters for definitions.
Manually purging vital signs
From time to time, you can purge aged vital signs from the database to free up space. (Management Station can purge automatcially. See Automatically purging vital signs.)
To manually purge vital signs:
- Click Purge from the Vital Signs area. The Purge Vital Signs page appears.
- As with collecting or exporting, select the host(s) and services whose vital signs you want to purge.
- Select a time interval on which to base the purge operation.
- Click Purge. The Management Station displays the number of records purged.
- After purging vital signs, consider optimizing the Management Station database. See Optimizing the MySQL database.
Automatically purging vital signs
The Management Station automatically purges vital signs on a regular basis by default.
To configure automatic vital signs purge, display the Vital Signs Purging page, available from Administration→Automatic Purge. For example:
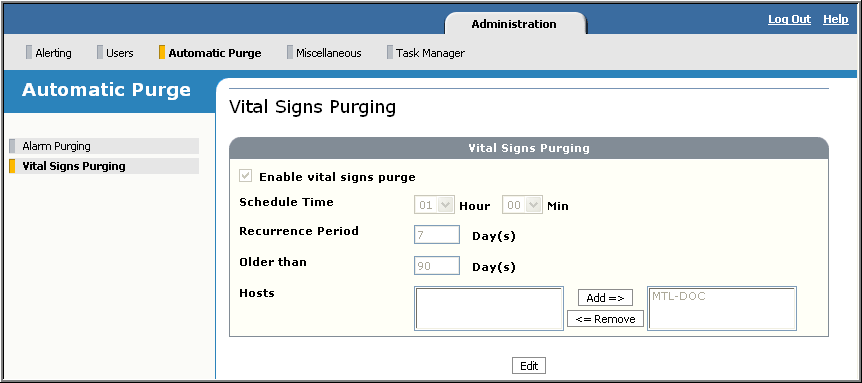
- Click Edit to modify the default settings:
- Enable vital signs purge: Uncheck to disable automatic vital signs purge. Default is enabled.
- Schedule Time: Specify when to run the automatic purge task. The default is 1 a.m (01:00). The time is for the current day. If it’s February 2, a schedule time of 00:00 means midnight, February 2, 01:00 means 1 a.m., February 2, and so on.
This means that depending on when submit your changes, an automatic vital signs purge could run immediately since the scheduled time has already passed.
- Recurrence Period: Specify how frequently to run the automatic task. The default is every 7 days.
- Older Than: Specify the time period after which vital signs are purged. The default is 90 days. For example, to purge vital signs older than 30 days (from the time they were collected), you would change the setting from 90 to 30.
The current day is included in the calculations.
- Hosts: By default, all hosts configured for vital signs collection are selected. This includes hosts that had vital signs collected in the past but may not be currently assigned a role in the network. (You may have unassigned the resource or removed the host in Network Design.) Note that as soon as you enable a host for vital signs collection, it automatically appears in the selected list.
The Management Station automatically removes a host from the list if you disable vital signs collection before any vital signs were collected. The host disappears from the list. Only hosts that you manually remove appear in the Remove box.
- Click Submit. The Management Station displays a results page with your settings.
Once you set these fields, the Management Station is configured to “wake up” at the scheduled time according to the recurrence setting, check the timestamp on the collected vital signs, and purge any older than the number of days specified.
For example, if today is February 2, 2012, and you’ve specified to purge vital signs older than 30 days starting today from host mtl-words, then all vital signs collected before January 4, 2012 00:00 are purged. The current day is always included.
If the Management Station doesn’t find any vital signs on this host that satisfy this condition, it goes back to sleep. A non-editable task appears in the Scheduled Tasks list of the Task Manager that shows the date and time of the next purge.
