How to create the network
Here are the steps to creating a Nuance network. For a detailed example, see Tutorial—creating a network.
Step 1: Plan the network
Determine the needed hosts and clusters, and the software relationships among these elements.
Considerations for defining clusters:
- Will you set up clusters by geography, by application, by corporate organization, or a combination of all these?
- Will you create a distributed environment where each host performs a dedicated role?
- Will the clusters be autonomous or will they share certain resources?
Answer this kinds of questions before creating the network in Management Station.
Step 2: Create the network
Here’s a recommended approach for creating the network with Management Station:
-
At the Nuance network level:
-
Add clusters and create the desired network hierarchy as you go along. For example, if Cluster 1 contains two child clusters, add these to the parent cluster immediately.
-
Rename the clusters appropriately, for example, Acme Corporation instead of Cluster 1. Cluster names must be unique at the same level.
-
Continue in this fashion—adding, creating the hierarchy, renaming—until you’ve added all your clusters and completed the network structure.
-
-
At the cluster level:
-
Rename clusters.
-
Add host elements to the physical-host clusters. A host element is not yet bound to a physical host.
-
Optionally, assign roles before adding the host elements to the network. Assign a role only to hosts running Nuance speech software.
-
You certainly aren’t restricted to this approach. For example, you can add all the clusters at once, then move them into the desired structure. You can assign physical hosts right away as you add these to the network. You can add the hosts and assign roles later on, and so on. The Network Design is flexible and you can create your network in any way you choose.
Tip: To assign roles from the command line without using Management Station, see Managing services with scripts.
To access Management Station:
-
Use the programs shortcut on the Management Station host (Windows only) or enter http://MS_hostname:8080/mserver in a web browser. MS_hostname can be a name or IP address.
-
Log in to Management Station. The default user is Administrator.The default password is changeit. The first time, you’re prompted to change to a more secure password.
As a security feature, you are locked out after five unsuccessful attempts to log into the Management Station. (To resolve this situation, see Managing users.)
-
Hosts managed by this Management Station appear in the left frame under Available Resources. You configured them to point to this Management Station during the Nuance Speech Suite installation.
To start to create your network, click Nuance Network in the left frame then Network Design from the toolbar. The Add Network Element page appears.
On this page, you can:
-
Add cluster and host elements. Depending on your choice, different fields appear.
For example, this is the appearance when adding a host element:
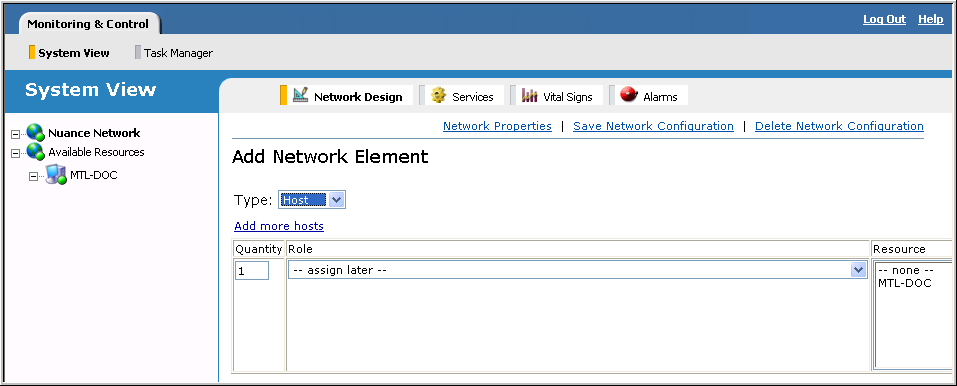
Guidelines when adding host elements:
-
To add multiple hosts with the same role, enter the desired quantity, choose the role, and click Add Network Element. The role configures the host with predefined services. See Roles. To add multiple hosts with different roles, click Add more hosts as many times as needed. Choose a role for each host then click Add Network Element. You don’t have to assign a role immediately when adding a host element to the network. You can assign it later.
Note: Management Station displays all available roles. If you're using the Voice Platform add-on product and its roles do not appear, the cause might be that Management Station loaded the license file before you updated it during the Voice Platform installation. Reload the license file by restarting Management Station.
-
To assign a physical host immediately, select it from the Resource list then click Add Network Element. The physical host is removed from the Resource list and Available Resource list in the network view.
-
You can defer adding hosts or assigning physical hosts to a later time, after you’ve added all your clusters. For example, if you know that Cluster 1 has two hosts and Cluster 2 four hosts, you can add the hosts when you configure those clusters. Likewise, you can assign the physical host when you configure a particular host. How to configure clusters and hosts is described later.
-
-
Save the network configuration to reapply it to this host or another Management Station host. See Saving configurations with Management Station.
-
Delete the entire network and start over. Any assigned physical hosts become available resources again.
The Network Design uses a default naming scheme for added elements. Clusters are named Cluster N, for example, Cluster 1, Cluster 2, and so on. Host elements are named Role_Filename_N. Once you assign a physical host, the Network Design uses the machine name.
Once you’ve added a cluster to the network, select it to display the Cluster Information page.
For example:
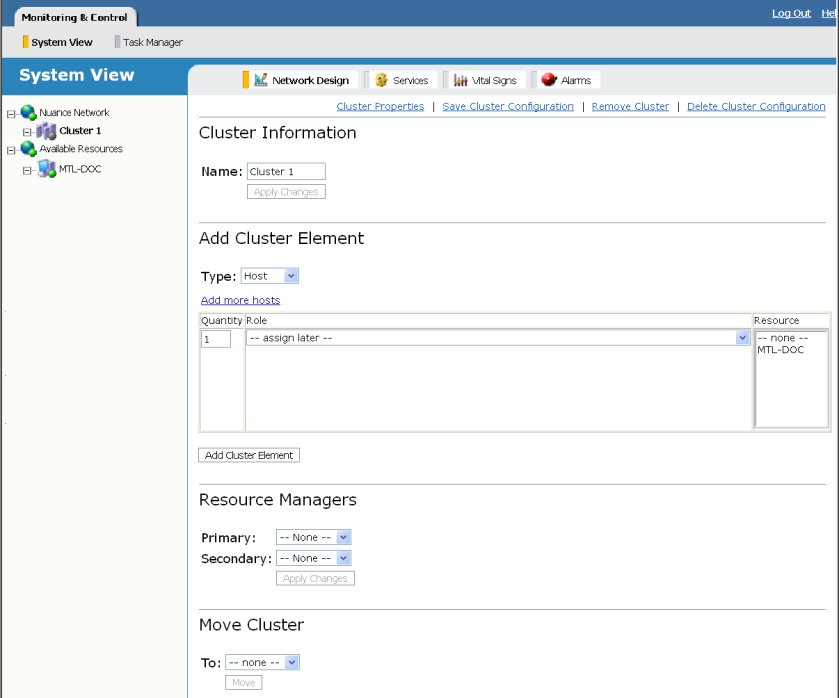
On this page, you can:
- Rename the cluster. (Click Apply Changes for the new name to take effect.)
- Add host elements or child clusters to this cluster.
- Optionally, assign a physical host as you add a host. Note that you can do this later on when you configure each host.
- Move the cluster to another part of the network.
- Save the cluster configuration to reapply it to this host or another Management Station host. See Saving configurations with Management Station.
- Remove the cluster from the network. Any assigned physical hosts become available resources again.
- Delete the cluster configuration. The cluster remains as an element in the network. Any assigned physical hosts become available resources again.
Note: If services are running, certain functions may not be available, for example, Remove Host and Delete Host Configuration links. You need to stop the services first.
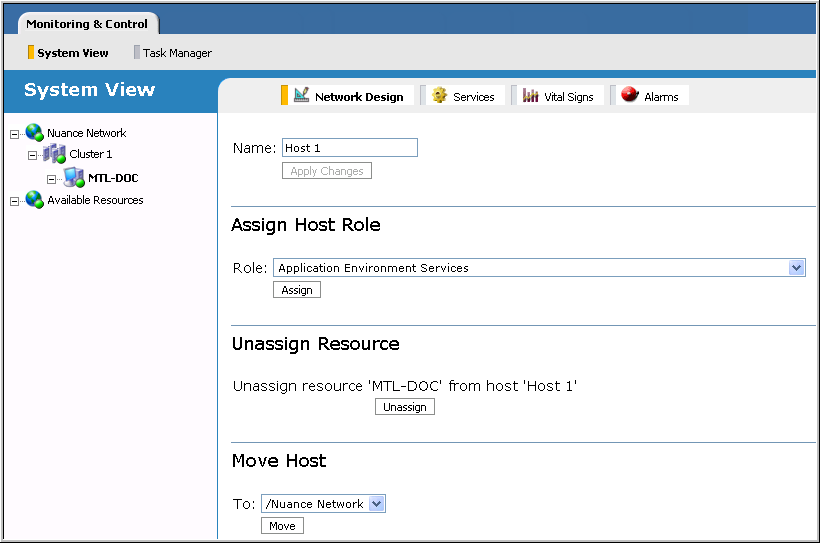
Once you’ve added a host element to the network, select it to display the Host Information page. For example:
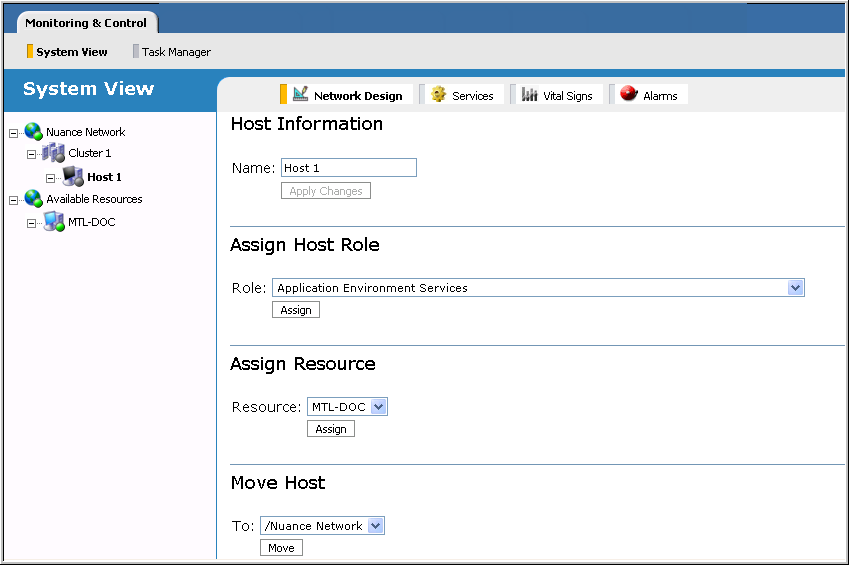
On this page, you can:
- Rename the host. (Click Apply Changes for the new name to take effect.)
- Assign a role if you haven’t already done so. In this instance, an Assign Host Region appears on the Host Information page. Assign a role only to hosts running Nuance speech software.
- Assign or unassign a physical host to a host. If you unassign a physical host, it reappears under Available Resources in the network view. The name reverts to its role filename. (If the host was assigned a role, first stop all services.)
- Move the host to another part of the network. The list contains all the available locations.
- Save the host’s role to apply it to another host at another time. See Saving configurations with Management Station.
- Remove the host from the network. Any assigned physical host becomes an available resource again.
- Delete the host’s configuration. The host remains as an element in the network and the role reverts back to the default role name. Any assigned physical host becomes an available resource again.
To assign another role, just select the host from the network and choose another role from the Assign Host Role region.
If this link is not active, you have services running on this host. You need to stop them first.
Step 3: Assign physical hosts
All hosts configured at installation to point to this Management Station appear in the Available Resources in the network view with a green LED indicating online. For example:
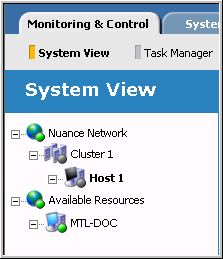
Assign them to the host elements:
-
Select the host from the network view.
-
Choose the physical host from the Resources list and click Assign. The name changes to the physical host, which is now removed from the list of available resources. For example:
Step 4: Configure the network
Once you’ve created the network, you may need to fine-tune service configurations for your deployment. You do this by setting service properties on service instances. You can configure service properties at any time, since these functions are also available outside the Network Design.
