Client app development
This topic describes the main steps in a typical client application that interacts with a Mix.dialog application. In particular, it provides an overview of the different methods and messages used in a sample order coffee application.
Sample dialog exchange
To illustrate how to use the API, consider the following simple dialog exchange between an end-user and a dialog application:
- System: Hello! Welcome to the coffee app. What type of coffee would you like?
- User: I want an espresso.
- System: And in what size would like that?
- User: Double.
- System: Thanks, your order is coming right up!
Overview
The DialogService is the main entry point to the Nuance Dialog service.
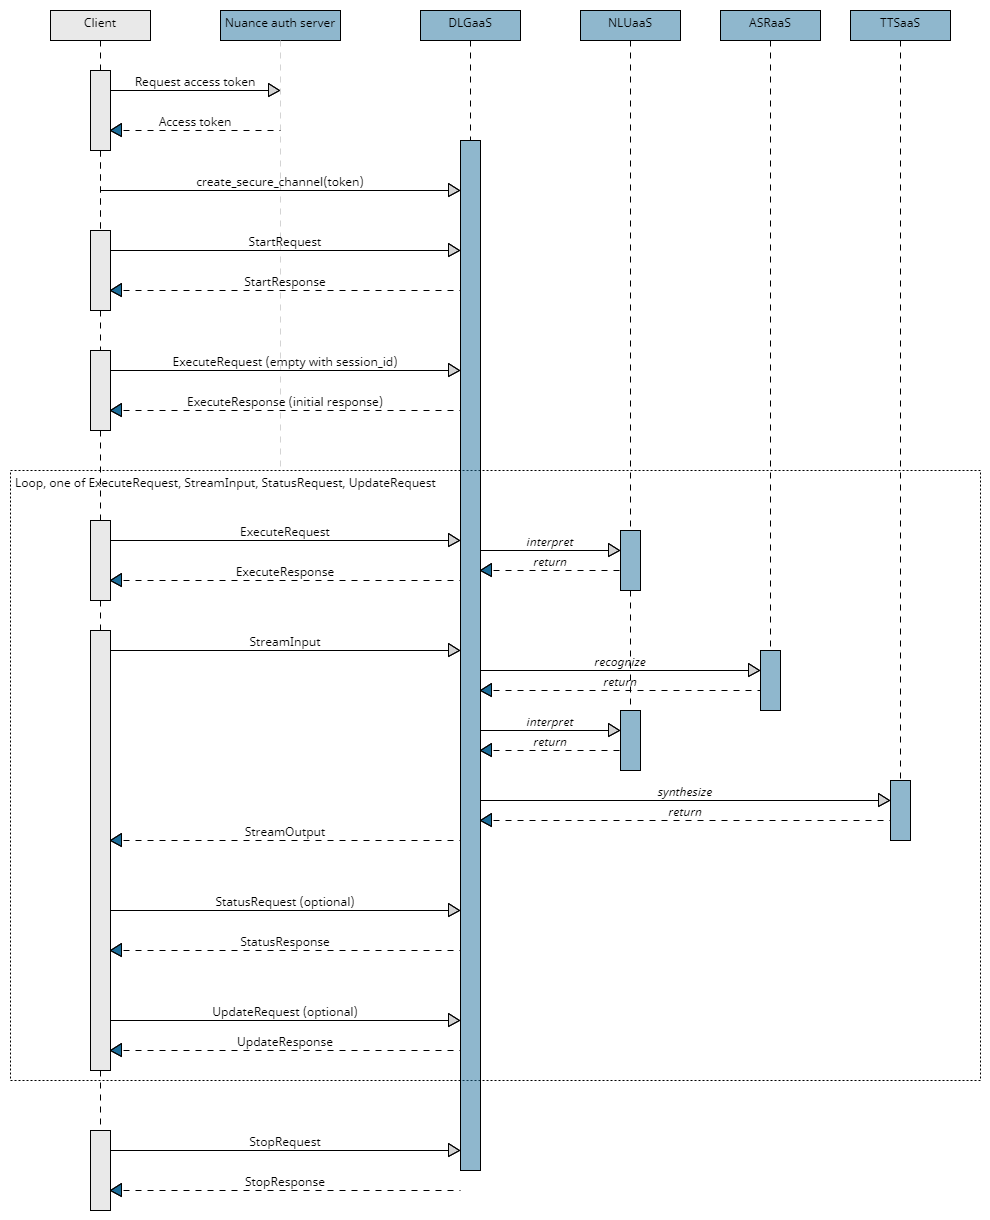
A typical workflow for accessing a dialog application at runtime is as follows:
-
The client application authorizes with the service by requesting an access token from the Nuance authorization server and using it to opens a secure channel to the service.
-
The client application imports service functions and calls a client stub that uses the channel.
-
The client application creates a new conversation sending a StartRequest to the DialogService. The service returns a session ID, which is used at each interaction to keep the same conversation. The client application also sends an ExecuteRequest message with the session ID and an empty payload to kick off the conversation.
-
As the user interacts with the dialog, the client application sends one of the following message types, as often as necessary:
-
An ExecuteRequest message for text input, data exchange, external interpretations of user input, or reporting issues handling input.
An ExecuteResponse is returned to the client application when a question and answer node, a data access node, or an external actions node is encountered in the dialog flow.
-
A StreamInput message for audio input (ASR) and/or audio output (TTS).
A StreamOutput is returned to the client application.
-
-
Optionally, at any point during the conversation, the client application can check that the session is still active by sending a StatusRequest message.
-
Optionally, at any point during the conversation, the client application can update session variables by sending an UpdateRequest message.
-
The client application closes the conversation by sending a StopRequest message.
This workflow is shown in the following high-level sequence flow:
Step 1. Authorize with the Dialog service
To connect to the Dialog service, you need to do two things:
- Obtain an OAuth token
- Create a secure gRPC channel to the service
Obtain OAuth token
Nuance Mix uses the OAuth 2.0 protocol for authorization. To call the runtime service, your client application must request and then provide a Mix access token. The token expires after a period of time so must be regenerated periodically. Nuance recommends reusing the access token until it expires.
Note:
The application may be limited to a certain maximum number of active access tokens and the authorization service is subject to rate limits, as described in Rate limits. If limits are exceeded, the application may be refused a new access token and a 429 TOO_MANY_REQUESTS error code may be returned. Make sure to reuse access tokens until they expire to avoid these errors.Your client application uses the client ID and secret from the Mix.dashboard (see Prerequisites from Mix) to generate an access token from the Nuance authorization server, available at the following URL:
https://auth.crt.nuance.com/oauth2/token
The token may be generated in two ways
- As part of the client application: The client application receives the Client ID and secret and the OAuth URL and generates and manages the token itself.
- As part of a run script file: The run script generates the token and then passes it to the client application.
The sample Python app examples provide Linux bash scripts and Windows batch scripts supporting each of these two scenarios. Note that the first approach of letting the client application handle token generation and management is prefered, as it allows for better reuse of the token for the duration of its lifetime.
Note that the same token should be reused until it expires rather than requested for each interpretation. Generating a new token every time adds to latency. Also, token requests have more strict rate limits in place.
Create a secure gRPC channel to the service
Next, create a secure gRPC channel to the service by providing:
- The URL of the Dialog service
- The access token obtained earlier
def create_channel(args):
    log.debug("Adding CallCredentials with token %s" % args.token)
    call_credentials = grpc.access_token_call_credentials(args.token)

    log.debug("Creating secure gRPC channel")
    channel_credentials = grpc.ssl_channel_credentials()
    channel_credentials = grpc.composite_channel_credentials(channel_credentials, call_credentials)
    channel = grpc.secure_channel(args.serverUrl, credentials=channel_credentials)

    return channel
Step 2. Import service functions and call client stub
Next, do the following:
- Import service functions
- Call client stub
Import Dialog functions and messages
The client should import all functions from the DLGaaS client stubs that you generated from the proto files in gRPC setup by importing the contents of the generated stub files.
This lets you conveniently reference all Dialog service methods and messages by name.
# Pull in DLGaaS service and message files
from nuance.dlg.v1.common.dlg_common_messages_pb2 import *
from nuance.dlg.v1.dlg_messages_pb2 import *
from nuance.dlg.v1.dlg_interface_pb2 import *
from nuance.dlg.v1.dlg_interface_pb2_grpc import *
Do not edit these stub files.
Import other Mix service functions and messages
If you plan on using ASRaaS speech recognition or TTSaaS text to speech, orchestrated by Dialog, you will need to use ASR and TTS messages to configure the streaming requests. Similarly, if you use client-side orchestration with the Mix services, you will need to instantiate service stubs and use messages from the services.
To avoid the potential for name collisions in message types (for example, both ASR and TTS have AudioFormat messages, and both TTS and Dialog have Voice messages), import the client stub module names and reference the messages using the module names.
# Pull in TTS service and message files to support backup TTS and reference TTS messages in Dialog requests
from nuance.tts.v1 import nuance_tts_v1_pb2, nuance_tts_v1_pb2_grpc

# Pull in ASR service and message files to reference ASR messages in Dialog requests and to do client side orchestration with ASRaaS if needed
from nuance.asr.v1 import resource_pb2, result_pb2, recognizer_pb2, recognizer_pb2_grpc

# Pull in NLU service and message files to reference NLU messages in Dialog requests and to do client side orchestration with NLUaaS if needed
from nuance.nlu.v1 import runtime_pb2, runtime_pb2_grpc, result_pb2
Again, do not edit the stub files.
Call client stub
Next, call the service client stub from the imported files. The stub uses the secure channel created earlier.
with create_channel(args) as channel:
    stub = DialogServiceStub(channel)
In some languages, this stub is defined in the generated client files: in Python it is named DialogServiceStub and in Go it is DialogServiceClient. In other languages, such as Java, you must create your own stub.
Step 3. Start the conversation
With a channel established to the Dialog service and a Dialog service client stub instantiated, you can start the conversation.
To do this, you need to do two things:
- Start a new Dialog session
- Kick off the conversation
Start a new session
Before you can start the new conversation, the client app first needs to send a StartRequest message with the following information:
- A unique session ID. If you specify an ID, it will be used. Otherwise, provide an empty session ID, which tells the Dialog service to create a new ID for this conversation.
- The selector, which provides the channel, library, and language used for this conversation. This information was determined by the dialog designer in the Mix.dialog tool.
- The StartRequestPayload, which contains the reference to the model, provided as a ResourceReference. For a Mix application, this is the URN of the Dialog model to use for this interaction. The StartRequestPayload can also be used to set session data.
- An optional
user_id, which identifies a specific user within the application. See UserID for details. - An optional
client_data, used to inject data in call logs. This data will be added to the call logs but will not be masked. - An optional session timeout value,
session_timeout_sec(in seconds), giving the idle time after which the session is terminated. The default value is 900 (15 minutes) and the maximum is 259200 (72 hours).
def start_request(stub, model_ref_dict, session_id, selector_dict={}, timeout):
    selector = Selector(channel=selector_dict.get('channel'),
                        library=selector_dict.get('library'),
                        language=selector_dict.get('language'))
    start_payload = StartRequestPayload(model_ref=model_ref_dict)
    start_req = StartRequest(session_id=session_id,
                        selector=selector,
                        payload=start_payload,
                        session_timeout_sec=timeout)
    log.debug(f'Start Request: {start_req}')
    start_response, call = stub.Start.with_call(start_req)
    response = MessageToDict(start_response)
    log.debug(f'Start Request Response: {response}')
    return response, call
A new unique session ID is generated and returned as a startresponse; for example:
'payload': {'session_id': 'b8cba63a-f681-11e9-ace9-d481d7843dbd'}
The client app must then use the same session ID in all subsequent requests that apply to this conversation.
Additional notes on session IDs
- The session ID is often used for logging purposes, allowing you to easily locate the logs for a session.
- If the client app specifies a session ID in the StartRequest message, then the same ID is returned in the response.
- If passing in your own session ID in the StartRequest message, please follow these guidelines:
- The session ID should not begin or end with white space or tab
- The session ID should not begin or end with hyphens
Kick off the conversation
With the session started, the client app just needs to signal to Dialog to start the conversation. Recall that the API operates on a cycle of client requests followed by server responses. So to receive the opening messages and prompt from the dialog, you need to poke Dialog with a minimal initial response.
The details depend on the types of computer-generated output you need:
- Text only
- Speech generation
In both cases, you need to send an empty ExecuteRequest to Dialog to get started. Include the session ID but leave the user_text field of the payload user_input empty.
Text output
To kick off the conversation and receive initial messages as text output, send the ExecuteRequest in an Execute() call.
input = UserInput(user_text = None)
execute_payload = ExecuteRequestPayload(user_input = input)
execute_request = ExecuteRequest(session_id = session_id,
                        selector = selector,
                        payload = execute_payload)
execute_response, call = stub.Execute.with_call(execute_request)
Generated speech output via TTSaaS
To kick off the conversation and receive initial messages as both text and streaming generated speech audio, include the same ExecuteRequest within a StreamInput as part of an ExecuteStream() call.
Note that in this case, you also need to include voice and audio configurations in the tts_control_v1 field of the StreamInput to request and configure the speech generation by TTSaaS.
input = UserInput(user_text = None)
execute_payload = ExecuteRequestPayload(user_input = input)
execute_request = ExecuteRequest(session_id = session_id,
                        selector = selector,
                        payload = execute_payload)
audio_format = nuance_tts_v1_pb2.AudioFormat(pcm = nuance_tts_v1_pb2.PCM(sample_rate_hz = 16000))
audio_params = nuance_tts_v1_pb2.AudioParameters(audio_format = audio_format)
voice = nuance_tts_v1_pb2.Voice(name = "Evan", model = "enhanced")
tts_control_v1 = TtsParamsV1(audio_params = audio_params, voice = voice)
stream_input = StreamInput(request = execute_request, tts_control_v1 = tts_control_v1)
stream_outputs = stub.ExecuteStream(stream_input)
For more details on how to request speech generation, see Step 4b. Interact with the user using audio.
Step 4. Step through the dialog
At each step, the client app needs to:
- Plays system outputs specified in the response from the previous turn
- Collects user input (or retrieve data) as needed
- Return input or data to DLGaaS to advance to the next step
The client app can send inputs for the next turn to Dialog in one of five different forms depending on the place in the dialog and the modalities being used:
- Send user text input, input selection from an interaction, an interpretation of user input, or an ASRaaS result with Execute()
- Send streaming user speech audio input from user with ExecuteStream()
- Send requested data from client-side data fetch with Execute()
- Signal to proceed with server-side data fetch with Execute()
- Send a DialogEvent with Execute() to flag Dialog about a problem externally processing user input
The sub-steps that follow describe the key details of these different possibilities.
Step 4a. Interact with the user (text input)
Interactions that use text input and do not require streaming for either speech input or text-to-speech output are done through ExecuteRequest calls, providing the following information:
- The session ID returned by the StartRequest. This lets Dialog know which ongoing Dialog session the request relates to.
- The selector, which provides the channel, library, and language to be used for this conversation from that point forward (This is optional; it is required only if the channel, library, or language values have changed since they were last sent.).
- The ExecuteRequestPayload, which can contain the following fields:
- user_input: Provides the input to the Dialog engine. For the initial ExecuteRequest, the payload is empty to get the initial message. For the subsequent requests, the input provided depends on how text interpretation is performed. See Interpreting text user input for more information.
- dialog_event: Can be used to pass in Dialog events that will drive the dialog flow when there were problems with externally handled user input.
- requested_data: Contains data that was previously requested by the Dialog.
- An optional
user_id, which identifies a specific user within the application. See UserID for details.
def execute_request(stub, session_id, selector_dict={}, payload_dict={}):
    selector = Selector(channel=selector_dict.get('channel'),
                        library=selector_dict.get('library'),
                        language=selector_dict.get('language'))
    input = UserInput(user_text=payload_dict.get('user_input').get('userText'))
    execute_payload = ExecuteRequestPayload(
                        user_input=input)
    execute_request = ExecuteRequest(session_id=session_id,
                        selector=selector,
                        payload=execute_payload)
    log.debug(f'Execute Request: {execute_payload}')
    execute_response, call = stub.Execute.with_call(execute_request)
    response = MessageToDict(execute_response)
    log.debug(f'Execute Response: {response}')
    return response, call
Warning:
Do not pass in both auser_input field and a dialog_event field in an ExecuteRequestPayload on the same turn. If a Dialog event is passed in, Dialog will ignore any contents of user_input.
ExecuteResponse for output
The dialog runtime app returns the Execute response payload when a question and answer node, a data access node, or an external actions node is encountered in the dialog flow. This payload provides the actions to be performed by the client application.
There are several types of actions that can be requested by the dialog application:
- Messages action: Indicates that a message should be played to the user. See Message actions.
- Data access action: Indicates that the dialog needs data from the client to continue the flow. The dialog application obtains the data it needs from the client using the data access gRPC API. The client application is responsible for obtaining the data from a data source. See Data access actions.
- Question and answer action: Tells the client app to play a message and to return the user input to the dialog. See Question and answer actions.
- End action: Indicates the end of the dialog. See End actions.
- Escalation action: Provides data that can be used, for example, to escalate to an IVR agent.
- Continue action: Prompts the client application to respond to initiate a backend data exchange on the server side. Provides a message to play to the user to smooth over any latency while waiting for the data exchange.
For example, the following question and answer action indicates that the message “Hello! How can I help you today?” must be displayed to the user:
Note:
Examples in this section are shown in JSON format for readability. However, in an actual client application, content is sent and received as protobuf objects."payload": {
"messages": [],
"qa_action": {
"message": {
"nlg": [],
"visual": [{
"text": "Hello! How can I help you today?"
}
],
"audio": []
}
}
}
A question and answer node expects input from the user to continue the flow. This can be provided as raw text to be interpreted by Nuance or as already interpreted input in the next ExecuteRequest call.
To provide the user input as audio, or to request text-to-speech outputs use the StreamInput request, as described in Step 4b.
To provide data requested in a data access act,ion, send it in the payload of an ExecuteRequest as described in Step 4c.
To respond to a continue action and prompt Dialog to proceed with a server-side data fetch for a data access node, follow Step 4d.
To report a DialogEvent when there is a problem handling input externally, follow Step 4e.
Step 4b. Interact with the user (using audio)
Interactions with the user that require audio streaming in either direction are done through multiple ExecuteStream calls.
ExecuteStream takes in one or more StreamInput messages and returns one or more StreamOutput messages.
This provides a streaming audio option to handle audio input and audio output.
Streaminput for input
The StreamInput message can be used to:
- Configure speech recognition and/or text-to-speech (TTS) generation.
- Provide the user input requested by a question and answer action as streaming audio input for automatic speech recognition (ASR) and NLU interpretation.
- Initiate synthesis of an output message into audio output using text-to-speech (TTS).
StreamInput contents
A StreamInput message can have the following fields:
- request: Provides the ExecuteRequest with the session ID, selector, and request payload. Sent once on the first StreamInput message of a turn only.
- asr_control_v1: Provides the parameters to be forwarded to the ASR service, such as the audio format, recognition flags, recognition resources to use (such as DLMs, wordsets, and speaker profiles), whether results are returned, and so on. At a minimum, details of the audio formatting/encoding of the input audio must be specfied here. Setting
asr_control_v1enables streaming of input audio. Sent once on the first StreamInput message of a turn only. audio: Speech audio to stream for speech recognition, as bytes. Each StreamInput message contains part of the speech audio. An empty StreamInput message once all the audio is sent the indicates to Dialog the end of the audio stream.- tts_control_v1: Provides the parameters to be forwarded to the TTS service, such as the audio encoding and voice to use for speech synthesis. At a minimum, the
audio_formatfield must be specified here in theaudio_paramsfield for speech audio to be produced. A TTSaaS voice valid for your organization and the current language must also be specified either undertts_control_v1or in the Mix.dialog TTS settings. Setting TTS audio and voice parameters enables streaming of audio output. If you request TTS, but do not specify a valid voice in either of these two locations, DLGaaS will send a request to TTSaaS, but the request will fail. Sent once on the first StreamInput message of a turn only. - control_message: (Optional) Message to start the recognition no-input timer if it was disabled with a stall_timers recognition flag in asr_control_v1. Sent once on the first StreamInput message of a turn only.
StreamInput can perform speech recognition only, TTS only, or both speech recognition and TTS.
Note:
To determine whether to perform speech recognition on audio input or TTS on an output message, DLGaaS looks at the asr_control_v1 and tts_control_v1 fields:
- If
asr_control_v1is provided, Dialog will expect audio input and will attempt to perform speech recognition on the audio via ASRaaS. - If
tts_control_v1is provided, Dialog will attempt to generate TTS output via TTSaaS. - If
asr_control_v1andtts_control_v1are both provided, Dialog will expect audio input and will attept to perform both speech recognition via ASRaaS and TTS generation via TTSaaS.
If your application requires generated speech output in the next system response, send a StreamInput with tts_control_v1 parameters specified, even if you are not including input for the turn (for example, for a data transfer or when sending a DialogEvent).
Warning:
Do not pass in a dialog_event field in an ExecuteRequestPayload on the same turn that you set asr_control_v1. When asr_control_v1 is set, Dialog expects audio input, and as a result, if a Dialog event is passed in for the same turn, Dialog will ignore the Dialog event.
Do not pass in audio and user_input (text-based input or NLU interpretations) in the same turn. If you pass in audio and non-null contents for user_input within the same turn, the user_input will override the ASRaaS request.
The code sample below from the Sample Python runtime client demonstrates how to initiate an ExecuteStream request that can support bidirectional streaming of ASR input and TTS output.
The method execute_stream_request() handles a number of different cases and includes several Boolean flags:
initialto indicate whether it is a normal request in the flow of the dialog (False), or an initial request to get the first prompts (True).interpret_textto indicate whether or not text input was providedrequest_asrto indicate whether or not ASR was requestedrequest_ttsto indicate whether TTS was requested
Depending on the arguments sent in, this method can handle the following cases:
| Case | initial | interpret_text | request_asr | request_tts |
|---|---|---|---|---|
| Get initial prompts, no inputs (audio or text), TTS output requested | True | False | False | True |
| Regular streaming request, text input, TTS output requested | False | True | False | True |
| Regular streaming request, audio input, TTS output requested | False | False | False | True |
The method build_stream_input() is called on to generate an iterator of StreamInput() objects as an input to execute_stream_request(). It includes configuration for ASR and TTS, if requested, and the ExecuteRequestPayload with the user text input, if provided.
The method execute_stream_request() sends the ExecuteStream request and returns the responses and audio.
When ASR and/or TTS are requested via the --audioFile and --tts command line run script arguments, the Python client app in main() calls the execute_stream_request() method to initiate ExecuteStream requests. It makes two calls, one to get the initial prompts, and a second to send the user input.
In each case, the received TTS audio, if requested, is saved locally to a .wav file. The Python client includes code to save the received audio to a .wav file with settings corresponding to the .wav audio settings used in the TTS request. The code is shown below:
Streamoutput for output
ExecuteStream returns a series of StreamOutput objects. A StreamOutput object has the following fields:
- response: Provides the ExecuteResponse with messages and actions to be performed by the client application. Sent once on the first StreamOutput message of a turn only.
audio: Synthetic speech audio returned by TTS (if TTS was requested) as bytes. Each StreamOutput message contains part of the synthesized speech audio.asr_result: Contains the ASR transcription result of audio input from the previous turn (if audio input was sent). Sent once on the first StreamOutput message of a turn only.asr_status: Indicates the status of the transcription of audio input from the previous turn (if audio input was sent). Sent once on the first StreamOutput message of a turn only.asr_start_of_speech: Contains the start-of-speech message for audio input from the previous turn (if audio input was sent). Sent once on the first StreamOutput message of a turn only.
Note that speech responses do not necessarily need to use synthesized speech from TTS. Another option is to use recorded speech audio files.
For more details on different options for handling inputs and outputs, see Handling inputs and outputs.
Step 4c. Send requested data
If the last ExecuteResponse included a Data access action requesting client-side fetch of specified data, the client app needs to fetch the data and returns it as part of the payload of an ExecuteRequest under requested_data. The payload will otherwise be empty, not containing user input. This happens when the dialog gets to a data access node that is configured for client-side data access. For more information about this, see Data access actions.
payload_dict = {
    "requested_data": {
      "id": "get_coffee_price",
      "data": {
        "coffee_price": "4.25",
        "returnCode": "0"
      }
    }
}

response, call = execute_request(stub,
                        session_id = session_id,
                        selector_dict = selector_dict,
                        payload_dict = payload_dict
                )
Note:
If you require both text output and generated speech audio in the next response, include the same ExecuteRequest within a StreamInput as part of an ExecuteStream() call withtts_control_v1 parameters configured.
Step 4d. Proceed with server-side data fetch
If Dialog is carrying out a data fetch on the server-side that will take some time, and a latency message has been configured in Mix.dialog, Dialog can send messages to play to fill up the time and make the user experience waiting more pleasant as part of a Continue action.
To move on, the client app has to signal that it is ready for Dialog to carry on when it is ready. As you would when you first kick off a conversation, send an ExecuteRequest that includes the session ID but leave the user_text field of the payload user_input empty.
payload_dict = {
            "user_input": {
                "user_text": None
            }
        }
response, call = execute_request(stub,
                        session_id = session_id,
                        selector_dict = selector_dict,
                        payload_dict = payload_dict
                )
Note:
If you require both text output and streaming generated speech audio in the next response, include the same ExecuteRequest within a StreamInput as part of a single ExecuteStream() call withtts_control_v1 parameters configured.
Step 4e. Pass in a DialogEvent
If user input is handled externally, the client app needs to collect input, obtain an interpretation of the meaning in terms the dialog will understand, and send this interpretation to Dialog to drive the next turn.
If there is an issue processing or interpreting the input for whatever reason, the client app needs to flag Dialog accordingly. This is handled by passing in a DialogEvent as part of an Execute request payload.
Note:
If you require both text and streaming generated speech audio in the next response, include the same ExecuteRequest within a StreamInput as part of a single ExecuteStream() call withtts_control_v1 parameters configured.
Warning:
Do not pass in a dialog_event field in an ExecuteRequestPayload on the same turn that you are passing in user input, whether via a user_input field or via audio.
When asr_control_v1 is set, Dialog expects audio input, and as a result, if a Dialog event is passed in for the same turn, Dialog will ignore the Dialog event.
When a Dialog event is passed in, Dialog will ignore any contents of user_input.
Step 5. Check session status
In a client application using asynchronous communication modalities such as text messaging, the client will not always necessarily know whether a session is still active, or whether it has expired. To check whether the session is still active, and if so, how much time is left in the ongoing session, the client app sends a StatusRequest message.
This message has only one field: The session ID returned by the StartResponse.
def status_request(stub, session_id):
    status_request = StatusRequest(session_id=session_id)
    log.debug(f'Status Request: {status_request}')
    status_response, call = stub.Status.with_call(status_request)
    response = MessageToDict(status_response)
    log.debug(f'Status Response: {response}')
    return response, call
Some notes:
- This request can be sent at any time once a session is created. No user input is required, and this request does not trigger an event in the dialog and does not change the dialog state or reset the idle time remaining. To reset the idle time remaining, send an UpdateRequest with an empty payload.
- This request can be called before an Execute, ExecuteStream, or Update call to check that the session is still active before sending the request.
A StatusResponse message is returned giving the approximate time left in the session. The status code can be one of the following:
- OK: The specified session was found.
- NOT_FOUND: The session specified could not be found.
Step 6. Update session data
To update session data variables without otherwise advancing the conversation, the client app sends the UpdateRequest message. This message has the following fields:
- The session ID returned by the StartResponse.
- The UpdateRequestPayload, which contains the key-value pairs of variables to update. See Exchanging session data for details. The variables sent will be logged in the call logs, unless
suppressLogUserDatais set tofalsein the StartRequest. If one of the variables updated is identified as sensitive, its value will be masked in the log events. - An optional
client_data, used to inject data in call logs. This data will be added to the call logs but will not be masked. - An optional
user_id, which identifies a specific user within the application. See UserID for details.
def update_request(stub, session_id, update_data, client_data, user_id):
    update_payload = UpdateRequestPayload(
                        data = update_data)
    update_request = UpdateRequest(session_id = session_id,
                        payload = update_payload,
                        client_data = client_data,
                        user_id = user_id)
    log.debug(f'Update Request: {update_request}')
    update_response, call = stub.Update.with_call(update_request)
    response = MessageToDict(update_response)
    log.debug(f'Update Response: {response}')
    return response, call
Some notes:
- This request can be sent at any time once a session is created. No user input is required, and this request does not trigger an event in the dialog and does not change the dialog state.
- Session variables sent though the UpdateRequest payload should be defined in the Mix.dialog project. If they are not, the response will still be successful but no variables will be updated.
- This request resets the session idle timeout remaining if the payload is empty.
- This request is usually called before an ExecuteRequest.
An empty UpdateResponse is returned. The status code can be one of the following:
- OK: The UpdateRequest was successful.
- NOT_FOUND: The session specified could not be found.
Step 7. Stop the conversation
To stop the conversation, the client app sends the StopRequest message; this message has the following fields:
-
The session ID returned by the StartRequest.
-
An optional
user_id, which identifies a specific user within the application. See UserID for details.
def stop_request(stub, session_id=None):
    stop_req = StopRequest(session_id=session_id)
    log.debug(f'Stop Request: {stop_req}')
    stop_response, call = stub.Stop.with_call(stop_req)
    response = MessageToDict(stop_response)
    log.debug(f'Stop Response: {response}')
    return response, call
The StopRequest message removes the session state, so the session ID for this conversation should not be used in the short term for any new interactions, to prevent any confusion when analyzing logs.
Note:
If the dialog application concludes with an External Actions node of type End, your client application does not need to send the StopRequest message, since the End node closes the session. If both the StopRequest message is sent and the dialog application includes an End node, the StatusCode.NOT_FOUND error code is returned, since the session is closed and could not be found.
To complete the dialog and end the logging for a session, you must send the StopRequest message or the dialog application must include an End node.
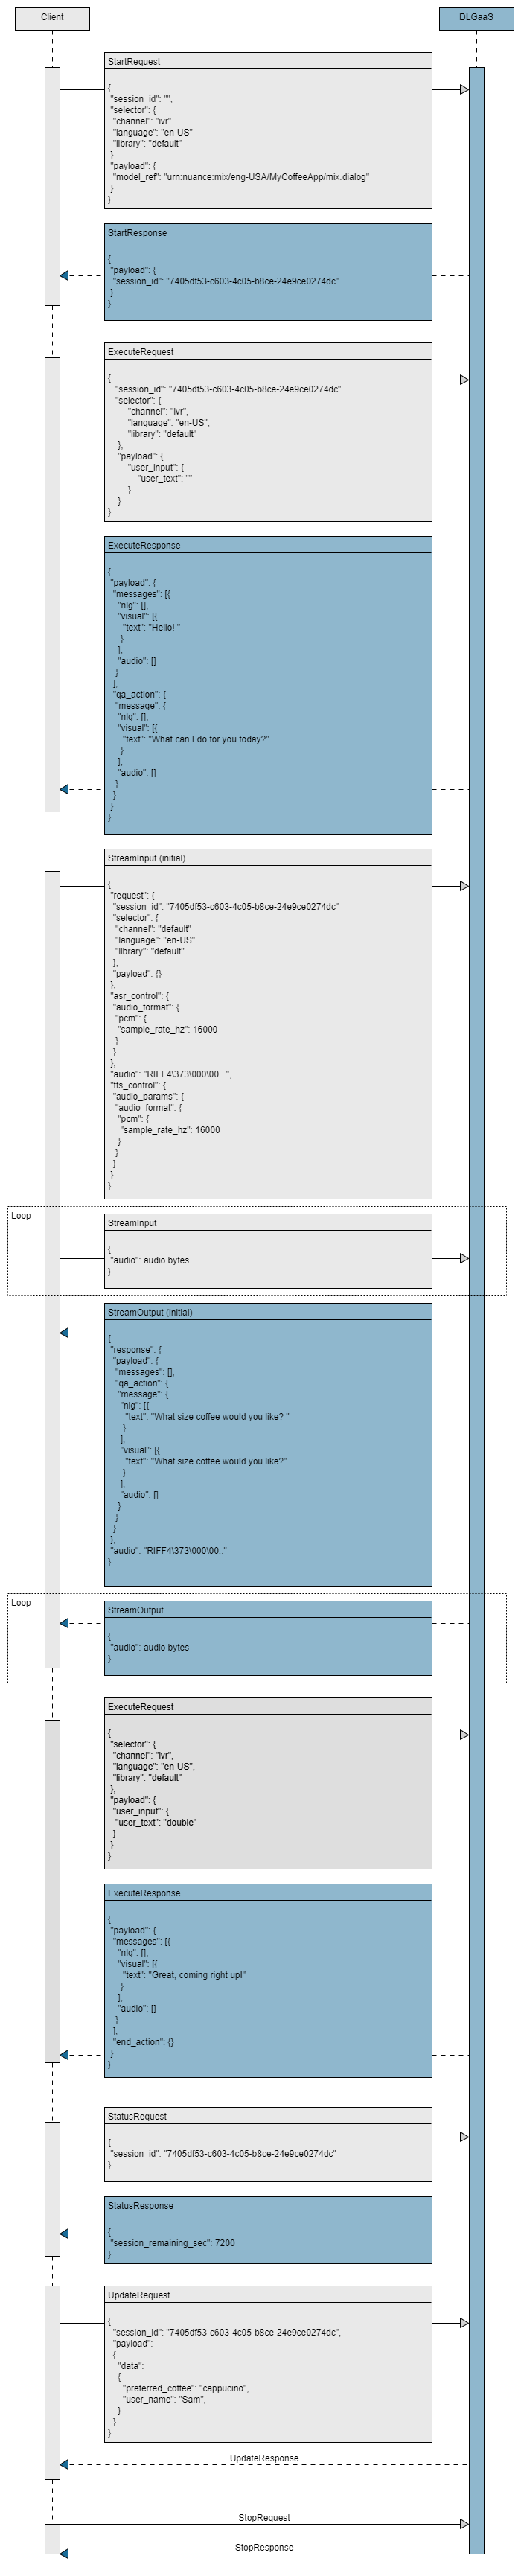
Detailed sequence flow
Feedback
Was this page helpful?
Glad to hear it! Please tell us how we can improve.
Sorry to hear that. Please tell us how we can improve.