Apply automation
The Automate data menu appears in the samples actions bar above the samples. Automate data provides options for automating basic tasks of grouping and annotating samples. Currently this menu supports one automation task, Auto-intent.
Clicking Automate data launches an Automate data popup module. Here, the chosen automation can be selected (Currently Auto-intent is the only available automation).
Note:
Automation can also be applied when importing a file with samples, whether in the Develop tab of Mix.nlu or in the Mix dashboard. See the Import project data documentation for more details on file import options.Auto-intent
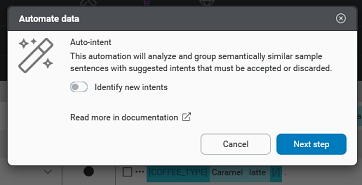
Auto-intent performs an analysis of UNASSIGNED_SAMPLES, suggesting intents for these samples.
Each previously unassigned sample is tentatively labeled with one of a small number of auto-detected intents present within the set of unassigned samples.
There are two options for Auto-intent:
- Group samples by existing intents. This is the default option.
- Identify new intents and group samples by existing or new intents.
If a sample is recognized as fitting the pattern of an already defined intent, Auto-intent suggests this existing intent.
In the second option, for groups of samples that appear related to each other, but which do not appear to fit the pattern of an existing intent, the samples are labeled generically as AUTO_INTENT_01, AUTO_INTENT_02, and so on.
Health checks
When an automation action is initiated, Mix.nlu runs a health check of the training sample, model, and data sent for automation. This involves a check of several things:
-
Quantity of annotated samples: Whether there are sufficient annotated samples in your training. If not, you should add additional annotated samples for improved accuracy.
-
Trained model available : Whether there is an existing trained model. If not, a model will be trained first.
-
Model was trained on fairly recent project data: Whether the existing trained model is up to date with the project samples. If not, the model will be retrained first before running Auto-intent.
-
Quantity of data sent for automation: This check is performed only if you are trying to identify new intents for Auto-intent. It indicates whether you have enough samples to effectively detect new intents. If not, you should add additional samples for the automation run.
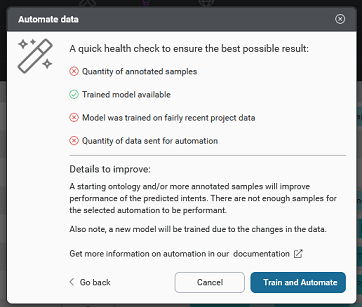
These checks assure that you have a robust, up to date model and that the Auto-intent run will give useful results when running automation. When the checks are done, results will be displayed visually in the Automate data pop-up module.
If the checks all pass, you will be able to proceed straightaway with automation using the existing trained model.
Consequences of failed health checks
If any of the checks do not pass, you will be informed and advised of how that impacts the next steps.
| Health check | Consequences if check fails |
| Quantity of annotated samples | Informs that adding a starting ontology and/or more annotated samples will improve performance of the predicted intents. |
| Model available | Informs that a trained model is needed and that a new one will be trained before running automations, adding additional latency. |
| Project data reflected in model | Informs that a new model will be trained due to the changes in the data, adding additional latency. |
| Quantity data sent for automation | Informs that the automation needs a sufficient volume of samples to be performant. Smaller uploads will have sub-optimal performance. |
If you don’t have any UNASSIGNED_SAMPLES on which to apply Auto-intent, you will not be able to proceed with the automation.
If there are not enough annotated samples in your training set, you will be advised to add more. You can still continue with the Auto-intent request.
If there is no existing trained model or your model is out of date, Mix.nlu will train a new model before proceeding with the automation. This will add some time to the automation process.
Run Auto-intent on UNASSIGNED_SAMPLES
Note:
To run Auto-intent, you need to have UNASSIGNED_SAMPLES.
If the number of unassigned samples is large, the process may take a long time to complete. When you initiate an Auto-intent operation, a warning will appear on the screen, and you will not be able to perform further modifications of the sample data until the operation completes.
Warning:
Before running Auto-intent, make sure to check your UNASSIGNED_SAMPLES for problematic content, including profanity, talk of violence, or hate speech, and remove any samples that contain such content.To run Auto-intent:
-
Choose Automate data from the actions bar above the table. This will launch a pop-up automation module
-
Choose the automation to apply. Currently, Auto-intent is the only option and is pre-selected.
-
Select Identify new intents for the Auto-intent run if needed, using the toggle.
-
Click Next step. This will initiate health checks of the samples and model. Depending on the results of the pre-check, you may receive feedback.
-
Click Automate or Train and automate to continue. (Train and automate appears if the health check reveals there is no trained NLU model or the model is out of date).
This initiates the Auto-intent process. When the run is finished, it returns a suggested intent classification for each previously unassigned sample.
Warning:
If you run Auto-intent, any pending suggestions from a previous Auto-intent run will be overwritten.Review Auto-intent suggestions
When the Auto-intent operation completes, you can view the suggestions. Initially, these suggestions are tentative, and from a verification perspective, they are in the status Intent-suggested. No intent is yet assigned.
If there are any newly identified intents, you should review the new intents to see if any of them need to be merged after the fact.
Accept or discard Auto-intent suggestions
You can next choose to accept or discard the Auto-intent suggestions.
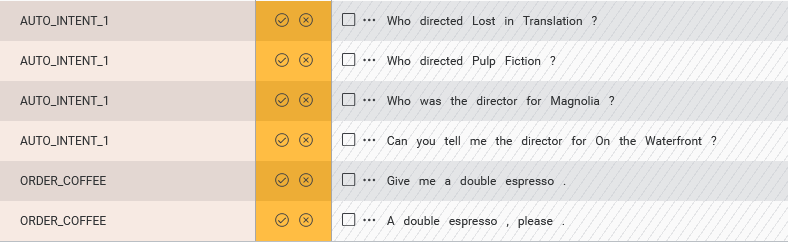
Clicking the checkmark icon accepts a suggestion, while clicking the x icon discards the suggestion.
For a sample with a suggestion for an existing intent, accepting the suggestion assigns the sample to that intent and moves the sample from Intent-suggested to Intent-assigned. Discarding the suggestion moves the sample back to UNASSIGNED_SAMPLES. A toast icon will be displayed to confirm your choice has been applied.
For any individual samples that were misidentified, you can manually change the sample intent.
Rename a newly identified intent
For a sample identified as a newly identified intent (AUTO_INTENT_01, AUTO_INTENT_02…), you are prompted to rename the intent to a meaningful name when you try to accept the suggestion.
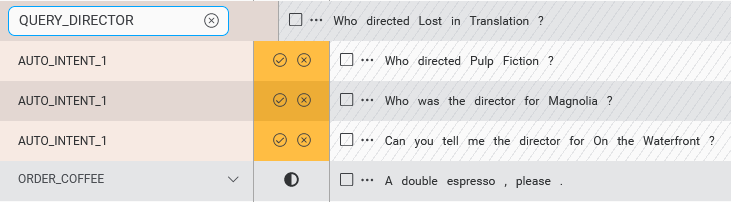
Enter a new name in the text field provided and press Enter.
Three things happen when you do this:
- The new intent is added to the ontology.
- The sample is added to the training set under the new intent, with the sample set to Intent-assigned.
- The intent suggestions for all the other samples tagged under the same new intent will update to reflect the new name, but remain in the Intent-suggested state. You still need to separately accept or discard each sample to either add to the training set or return to UNASSIGNED_SAMPLES.
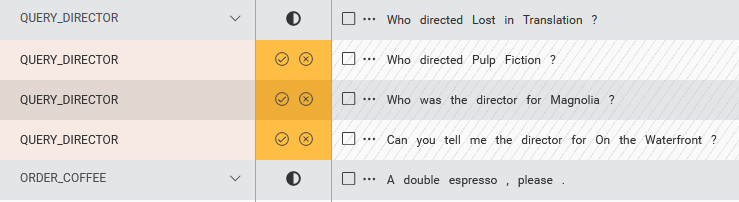
Merge two newly identified intents
You may find in some cases that Auto-intent will interpret multiple new intents that in reality represent the same intent. The Auto-intent algorithm inclines toward identifying “smaller” intents to give more flexibility to developers.
If you find that this has happened, it is relatively simple to merge the two newly identified intents.
-
Rename one of the intents.
-
Move the samples (for example, using bulk move intents) from the second new intent to the renamed intent.
Note:
For Auto-annotation to work effectively, some number of samples for the intent must have been manually annotated previously. Otherwise, Mix will have no point of reference from which to work in identifying entities.Run Auto-annotation
To run Auto-annotation:
- Choose Automate data from the action bar above the table.
- Select the Auto-Annotation option.
- Choose an intent from the list of existing intents on which to apply Auto-annotation.
- Click Automate (or Train and automate, if applicable) to continue.
This initiates the Auto-annotation process. When the run is finished, it returns a suggested entities annotation for each previously unassigned sample.
Note:
For intents with a lot of samples, this may take a lengthy period of time. You will not be able to modify the training set until it is completed.Accept or discard auto-annotate suggestions
When the Auto-annotate operation completes, you can view the suggestions. Initially, these suggestions are tentative, and from a verification perspective, they are in the status Annotations-suggested. No annotations are yet assigned. You can next choose to accept or discard the suggestions.
Clicking the checkmark icon will accept the suggestion, while clicking the trash icon will discard the suggestion. A toast icon will be displayed to confirm your choice has been applied.
Feedback
Was this page helpful?
Glad to hear it! Please tell us how we can improve.
Sorry to hear that. Please tell us how we can improve.