Transferring a chat session to a live agent
Virtual assistants designed in Mix can transfer users to a live agent by sending two reserved variables, transferDestination and businessUnit, to NDEP. These variables specify the target group of live agents and their business unit in NDEP. To further refine the pool of targeted agents within the agent group, the virtual assistant can also specify the desired agent attributes and skills, via either of these variables: agentAttribute or agentAttributes.
Overview of the workflow
In Mix.dialog, you must define two variables of type string, named transferDestination and businessUnit, to hold the IDs of the desired live agent group and business unit. Ask your NDEP administrator for the required live agent and business unit IDs.
If you wish to target only agents with specific attributes, also create the schemas for agentAttribute (for a single attribute), and agentAttributes (for multiple attributes), as needed, and add these two complex variables to your dialog design. Refer to Create a schema, and Create a complex variable, in the Mix.dialog documentation, for more information.
If you wish to override the default engagement priority and queue threshold parameters that are configured on the NDEP side, create two more variables of type string: transferPriority and transferQueueThreshold.
You’ll need to set these variables in the Enter node (or in another node) of the component that will be triggering the escalation, and use them as Send parameters for the external actions node that will be initiating the transfer itself. Remember that you must preinitialize complex variables like agentAttribute and agentAttributes once, typically in the Start node for your dialog design, before you can start using them in assign actions. Ask your NDEP administrator to provide the names and values for all attributes relevant to your application.
If you want to offer alternative options to the end users when all live agents are very busy or unavailable, you can retrieve transfer queue information from NDEP before transferring chats. Add the variables listed in Transfer queue information to get from NDEP and use them as Get parameters in a data access node upstream from the external actions node that is meant to initiate the transfer.
Basic escalation
This scenario shows how to configure an external actions node for your virtual assistant to transfer the end user to a live agent.
- In the component from where the escalation is to take place, select the Enter node (or another node, upstream from the external actions node).
- Add an assign action that sets businessUnit to the appropriate business unit ID—for example, “19000792”.
- Add an assign action that sets transferDestination to the desired agent group ID—for example “10004091”.
- Select the external actions node (or add one if this hasn’t yet been done).
- Expand Action type and choose Transfer, if it’s not already set.
- Add Send parameters for businessUnit and transferDestination.
- Configure the Success and Failure transitions as required, if they’re not already set.
Specify agent attributes
This scenario shows how to specify a desired attribute or skill to narrow down the pool of targeted agents, when transferring the end user to a live agent.
- In the component called Main, select the Start node, and preinitialize agentAttribute.
- Switch to the component from where the escalation is to take place, and perform the configuration steps for a basic escalation.
- Select the Enter node (or the node where you already added the assignments for businessUnit and transferDestination).
- Add an assign action that sets the name field of agentAttribute to the name of the desired skill or attribute—for example, “language” (or “department”).
- Add an assign action that sets the value field of agentAttribute—for example, “english” (or “sales”).
- Select the external actions node, and add a Send parameter for agentAttribute.
Note:
NDEP expect only one of agentAttribute or agentAttributes. If you configure Send parameters for both, only agentAttributes will be used.Specify data to pass to the live agent
This scenario shows how to send additional information from your virtual assistant, to be displayed as “transfer notes” in Agent Desktop—for example, key customer information, and the intents traversed before the escalation.
- In the component from where the escalation is to take place, perform the configuration steps for a basic escalation.
- Select the external actions node, and add Send parameters for every variable holding data you want to provide to the live agent—for example the variable accountBalance whose value would be retrieved from a backend system by your virtual assistant, before the escalation takes place.
This assumes you have already configured the required variables, and assignments or backend calls to set their value, in your dialog design.
Override engagement priority and queue threshold
This scenario shows how to allow your virtual assistant to override engagement priority and queue threshold when escalating chats to live agents by sending two reserved variables, transferPriority and transferQueueThreshold, to NDEP.
- In the component from where the escalation is to take place, perform the configuration steps for a basic escalation.
- Select the Enter node (or the node where you already added the assignments for businessUnit and transferDestination).
- Add an assign action that sets transferPriority to the desired value—for example, “11”.
- Add an assign action that sets transferQueueThreshold to the desired value—for example, “101”.
- Select the external actions node, and add Send parameters for transferPriority and transferQueueThreshold.
Get transfer queue information from NDEP
In the dialog design for your virtual assistant, it is a good practice to make provisions for retrieving transfer queue information from NDEP—for example, information about agents’ availability, queue depth, number of chat slots available, estimated wait time, and whether the site is in hours of operations or not—before transferring a chat to live agents. This allows you to provide a better user experience, such as by offering a range of alternative options when it’s not possible to transfer the user to a live agent.
- In the component from where the escalation is to take place, select the Enter node (or the node where you added assignments for businessUnit and transferDestination if you have already started designing the escalation dialog flow).
- Verify if there are assign actions for all variables required for the escalation (the required businessUnit, transferDestination, the optional agentAttribute or agentAttributes, and so on), and add any missing assignments.
- If you want to know whether the target site or agent group is within hours of operations or not, add an assign action for siteId (required for retrieving ndepInHOP).
- Add a data access node, with client-side fetching enabled (default), upstream from the external actions node that will be initiating the transfer.
- Add Send parameters for businessUnit, and transferDestination.
- If you require targeting specific agent skills or attributes, add a Send parameter for agentAttribute (single attribute) or agentAttributes (multiple attributes).
- If you will be retrieving ndepInHOP, add a Send parameter for siteId (required for retrieving ndepInHOP), and a Get parameter for ndepInHOP.
- Add Get parameters for ndepAvailability, ndepQueueDepth, ndepAvailableSlots, and ndepEstimateWaitTime.
- Configure the Success and Failure transitions of the data access node.
- Down the Success path, add conditions around the external actions node, to determine whether to perform the transfer to the live agent or not, based on the transfer queue information retrieved from NDEP (see Transfer logic example).
- Configure the external actions node as required (see Basic escalation and the other use cases described above).
Warning:
For transfer flows that involve sending agentAttributes (multiple attributes) to NDEP, your virtual assistant should not rely on the estimated wait time, available slots, and queue depth information from NDEP. In such cases, NDEP is likely to return a value of -1 (default) for ndepEstimateWaitTime, ndepAvailableSlots, and ndepQueueDepth. This is a limitation. As a workaround, use ndepAvailability to build your transfer logic.Transfer logic example
This example shows how you could build conditions based on transfer queue information from NDEP to improve the experience of the end user when the virtual assistant can’t transfer them immediately to a live agent.
If there is an agent or a queue slot available at the transfer destination (ndepAvailability is true), communicate the estimated wait time.
![]()
Else (ndepAvailability is false), report that the session cannot be transferred to a live agent.
![]()
Communicate the estimated wait time
If the estimated wait time (ndepEstimateWaitTime) or place in queue (ndepQueueDepth) is 0, it is possible to transfer the chat session to the target destination(transferDestination/businessUnit) without delay.
![]()
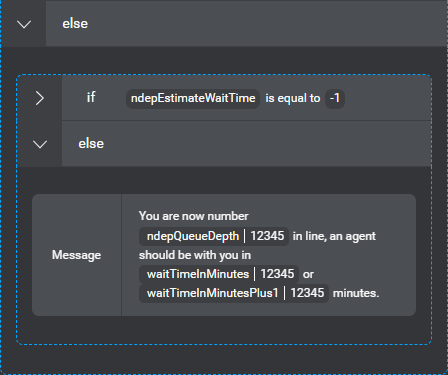
Else, show a message to the end user, letting them know how long they are likely to wait, or, if the backend failed to return this information, the virtual assistant could ask the end user whether they would like to continue with the current session.
-
If ndepEstimateWaitTime is -1, report that it’s currently not possible to calculate the estimated wait time.
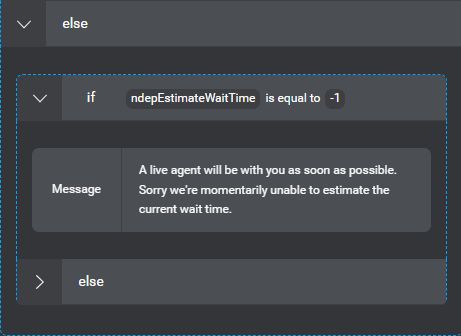
-
Else, report the estimated wait time for this end user, or their position in the queue.
Report that the session cannot be transferred to a live agent
If ndepInHOP is false, show a message mentioning the hours of operation.
![]()
Else, report that there are no agents available at this time.
![]()
Feedback
Was this page helpful?
Glad to hear it! Please tell us how we can improve.
Sorry to hear that. Please tell us how we can improve.