Importing files
This section describes how to import files into a Mix project. Once you have constructed your files, there are three ways to import them into Mix.
- Mix dashboard GUI
- Mix.api via script or command line
- Mix.cli command line utility
The instructions in this section assume that a Mix project has already been created. For more details, see Create a Mix project.
Import files via the dashboard
Project files can be imported under the Mix dashboard.
Note:
Pron and rewrite file upload in the Mix dashboard is restricted to Nuance Professional Services users and is not available for all users.To import the TRSX into a Mix project in the dashboard:
-
Log in to the Mix dashboard and go to the Projects panel.
-
Select the project from the projects list.
-
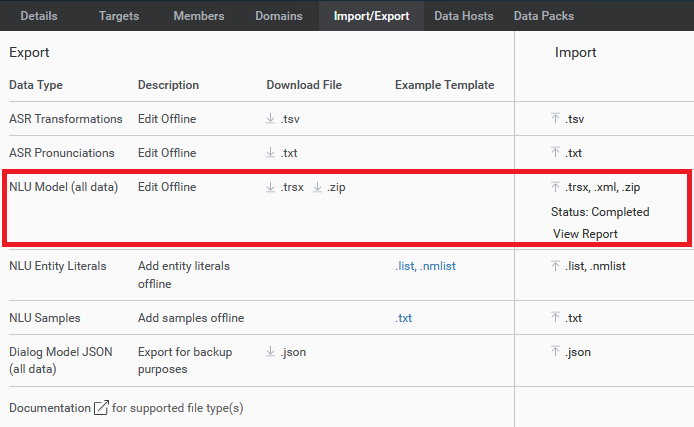
Click on the Import/Export tab.
-
On the row NLU Model (all data), click on the Import column and select a TRSX file or drag your TRSX file onto the column. If the project is multi-language, you will be prompted to identify the language to which the TRSX file applies.
-
As needed, select the language for the TRSX.
-
Repeat steps 4 and 5 as needed for other languages in the project.
-
On the row ASR Pronunciations, click on the Import column and select a
_client.prons.txtfile or drag the file onto the column. If the project is multi-language, you will be prompted to identify the language to which the prons file applies.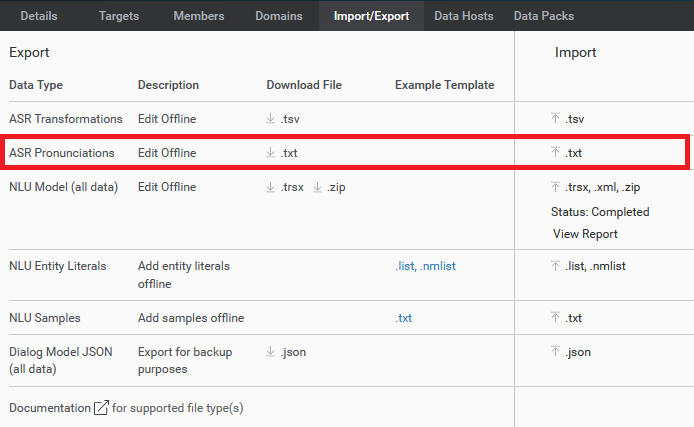
-
As needed, select the language for the prons file.
-
Repeat steps 7 and 8 as needed for other languages in the project.
-
On the row ASR Transformations, click on the Import column and select your
_tmfe.tsvrewrite file or drag your rewrite file onto the column. If the project is multi-language, you will be prompted to identify the language to which the rewrite file applies.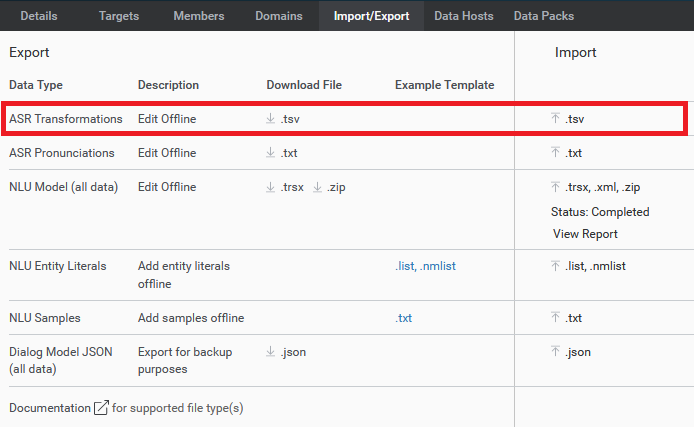
-
As needed, select the language for the rewrite file.
-
Repeat steps 10 and 11 as needed for other languages in the project.
Create project files zip for API-based import
For API-based imports using Mix.api or Mix.cli, project files are uploaded to an existing project as a zip folder.
This folder should have the following contents:
metadata.jsonlocale1locale1.trsx_client_prons.txt_tmfe.tsv
locale2locale2.trsx_client_prons.txt_tmfe.tsv
- and so on
The folder contains a JSON file with metadata, and a sub-folder for each language and locale used in the project, with the name of the folder taken from the ab-CD format language code. For example, en-US, fr-CA, and so on.
For more details on project structure, see Project package file structure.
Note:
A Mix application with app ID, client ID, and client secret must already exist in order to access Mix.api or Mix.cli.
Pron and rewrite files are restricted to Nuance Professional Services users and are not enabled for upload by all users.
Import files via Mix.api
To import files into Mix via the Mix.api:
-
Create a project files zip folder containing your project files.
-
Authorize with Mix using your client ID and client secret to obtain a token to access Mix.api.
-
Import the project zip using the Replace project contents endpoint. Use the previously obtained token in the header.
curl -X 'POST' \
  'https://mix.api.nuance.com/v4/projects/$PROJECTID/.replace' \
  -H 'accept: application/json' \
  -H 'Content-Type: multipart/form-data' \
  -H 'authorization: Bearer $TOKEN' \
  -F 'content=project_contents.zip;type=application/x-zip-compressed'
Import files via Mix.cli
Carry out the following steps to import project files using Mix.cli.
-
If not done previously, use the mix init command and enter the required information to configure Mix.cli to work with your application. This includes service credentials.
-
Use the mix auth command to obtain an authorization token to access Mix.api.
-
Use the mix projects:replace command to replace project contents with your project files zip folder.
Next steps
With your project files imported, you can proceed to build your DLM.