Client app development
This topic describes how to implement basic speech synthesis in the context of a simple Python client application.
The client used in these examples synthesizes plain text or SSML input, streaming the audio back to the client and optionally creating an audio file containing the synthesized speech.
Tip:
To run the simple client used in this section, see Try it out below. For another synthesis client, see Sample synthesis client.Sequence flow
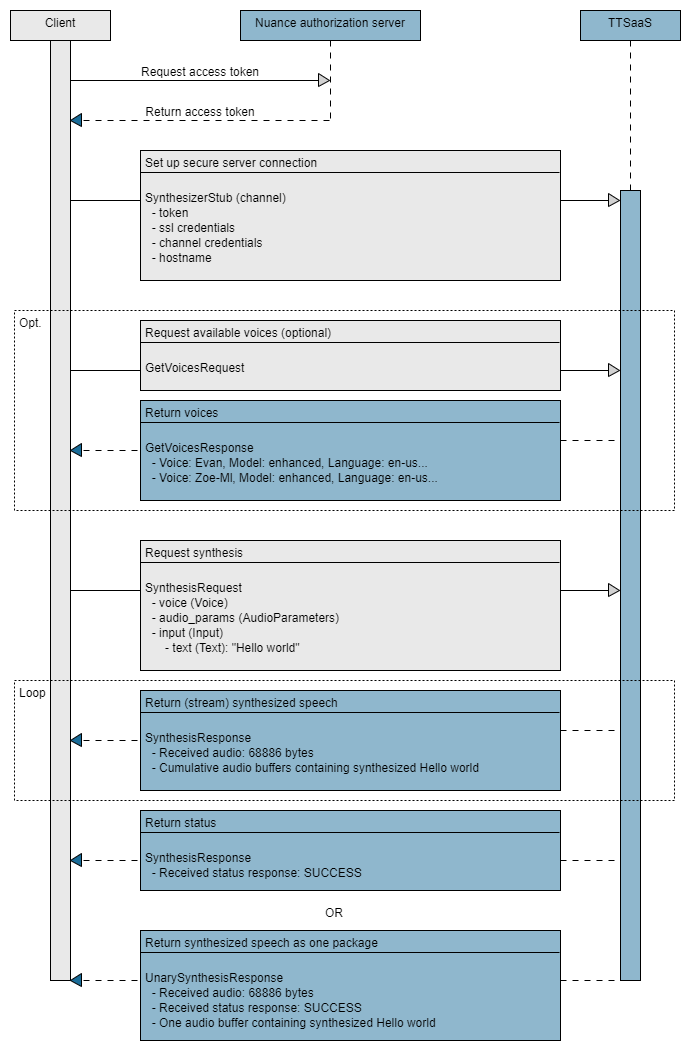
The essential tasks are illustrated in the following high-level sequence flow of an application at runtime.
Development steps
Developing a client application involves several steps, from authorizing the client to processing the synthesis results.
Authorize
Nuance Mix uses the OAuth 2.0 protocol for authorization. The client application must provide an access token to be able to access the TTSaaS runtime service. The token expires after a short period of time so must be regenerated frequently.
Your client application uses the client ID and secret from your Mix account (see Prerequisites from Mix) to generate an access token from the Nuance authorization server.
The token may be generated in several ways, either as part of the client application or as a script file.
In this example, a Linux shell script or Windows batch file generates a token, stores it in an environment variable, and passes it to the client. The script also changes the colons in the client ID to %3A so curl can parse the value correctly.
#!/bin/bash

CLIENT_ID=<Mix client ID, starting with appID:>
SECRET=<Mix client secret>
#Change colons (:) to %3A in client ID
CLIENT_ID=${CLIENT_ID//:/%3A}

MY_TOKEN="`curl -s -u "$CLIENT_ID:$SECRET" \
"https://auth.crt.nuance.com/oauth2/token" \
-d "grant_type=client_credentials" -d "scope=tts" \
| python -c 'import sys, json; print(json.load(sys.stdin)["access_token"])'`"

python3 simple-mix-client.py --server_url tts.api.nuance.com:443 \
--token $MY_TOKEN \
...@echo off
setlocal enabledelayedexpansion
set CLIENT_ID=<Mix client ID, starting with appID:>
set SECRET=<Mix client secret>
rem Change colons (:) to %3A in client ID
set CLIENT_ID=!CLIENT_ID::=%%3A!
set command=curl -s ^
-u %CLIENT_ID%:%SECRET% ^
-d "grant_type=client_credentials" -d "scope=tts" ^
https://auth.crt.nuance.com/oauth2/token
for /f "delims={}" %%a in ('%command%') do (
for /f "tokens=1 delims=:, " %%b in ("%%a") do set key=%%b
for /f "tokens=2 delims=:, " %%b in ("%%a") do set value=%%b
goto done:
)
:done
rem Remove quotes
set MY_TOKEN=!value:"=!
python simple-mix-client.py --server_url tts.api.nuance.com:443 ^
--token %MY_TOKEN% ^
...The client uses the token to create a secure connection to the TTSaaS service.
# Set arguments
options = parser.add_argument_group("options")
options.add_argument("--token", nargs="?",
                     help="Access token", required=True)

# Create channel and stub
call_credentials = grpc.access_token_call_credentials(args.token)
channel_credentials = grpc.composite_channel_credentials(
    grpc.ssl_channel_credentials(), call_credentials)
Import functions
The client’s first step is to import all functions from the TTSaaS client stubs, synthesizer*.py, generated from the proto files in gRPC setup, along with other utilities.
# Import functions
import sys
import grpc
import argparse
from nuance.tts.v1.synthesizer_pb2 import *
from nuance.tts.v1.synthesizer_pb2_grpc import *
from google.protobuf import text_format
The client stubs (and the proto files) are in the following path under the location of the client: nuance/tts/v1/. Do not edit these files.
Set arguments
The client includes arguments that that it can accept, allowing users to customize its operation. For example:
-
--server_url: The Mix endpoint and port number for the TTSaaS service. -
--token: An access token to authorize the application. -
--nameand--model: The name and model of a voice to perform the synthesis. To learn which voices are available, see Geographies. -
--textor--ssml: The material to be synthesized, in this client either plain text or SSML. -
--output_wav_file: Optionally, a filename for saving the synthesized audio as a wave file.
# Set arguments
options = parser.add_argument_group("options")
options.add_argument("-h", "--help", action="help",
                     help="Show this help message and exit")
options.add_argument("--server_url", nargs="?",
                     help="Server hostname (default=localhost)", default="localhost:8080")
options.add_argument("--token", nargs="?",
                     help="Access token", required=True)
options.add_argument("--name", nargs="?", help="Voice name", required=True)
options.add_argument("--model", nargs="?",
                     help="Voice model", required=True)
options.add_argument("--sample_rate", nargs="?",
                     help="Audio sample rate (default=22050)", type=int, default=22050)
options.add_argument("--text", nargs="?", help="Input text")
options.add_argument("--ssml", nargs="?", help="Input SSML")
options.add_argument("--send_log_events",
                     action="store_true", help="Subscribe to Log Events")
options.add_argument("--output_wav_file", nargs="?",
                     help="Destination file path for synthesized audio")
options.add_argument("--client_data", nargs="?",
                     help="Client information in key value pairs")
Define synthesis request
The client creates a request using SynthesisRequest, including the arguments received from the end user.
# Define synthesis request
def create_synthesis_request(name, model, text, ssml, sample_rate, send_log_events, client_data):
    request = SynthesisRequest()

    request.voice.name = name
    request.voice.model = model

    pcm = PCM(sample_rate_hz=sample_rate)
    request.audio_params.audio_format.pcm.CopyFrom(pcm)

    if text:
        request.input.text.text = text
    elif ssml:
        request.input.ssml.text = ssml
    else:
        raise RuntimeError("No input text or SSML defined.")

    request.event_params.send_log_events = send_log_events

    return request
The request specifies a voice name and model plus the input to synthesize, either plain text or SSML. For example, for plain text input:
./simple-mix-client.py --server_url tts.api.nuance.com:443 \
--token $MY_TOKEN \
--name "Zoe-Ml" --model "enhanced" \
--text "The wind was a torrent of darkness, among the gusty trees." \
--output_wav_file "highwayman.wav"
simple-mix-client.py --server_url tts.api.nuance.com:443 \
--token %MY_TOKEN% ^
--name "Zoe-Ml" --model "enhanced" ^
--text "The wind was a torrent of darkness, among the gusty trees." ^
--output_wav_file "highwayman.wav"Or as SSML input, with optional SSML elements and a different output audio file:
./simple-mix-client.py --server_url tts.api.nuance.com:443 \
--token $MY_TOKEN \
--name "Zoe-Ml" --model "enhanced" \
--ssml "<speak>This is the normal volume of my voice. \
<prosody volume="10">I can speak rather quietly,</prosody> \
<prosody volume="90">But also very loudly.</prosody></speak>" \
--output_wav_file "ssml-loud.wav"
simple-mix-client.py --server_url tts.api.nuance.com:443 \
--token %MY_TOKEN% ^
--name "Zoe-Ml" --model "enhanced" ^
--ssml "<speak>This is the normal volume of my voice. ^
<prosody volume="10">I can speak rather quietly,</prosody> ^
<prosody volume="90">But also very loudly.</prosody></speak>" ^
--output_wav_file "ssml-loud.wav" Create channel and stub
To call TTSaaS, the client creates a secure gRPC channel and authorizes itself by providing the URL of the hosted service and an access token.
In many situations, users can pass the service URL and token to the client as arguments. In this Python app, the URL is in the --server_url argument and the token is in --token.
The client then defines a client stub function or class using this channel information.
# Set arguments
options = parser.add_argument_group("options")
options.add_argument("--server_url", nargs="?",
                     help="Server hostname (default=localhost)", default="localhost:8080")
options.add_argument("--token", nargs="?",
                     help="Access token", required=True)
# Create channel and stub
call_credentials = grpc.access_token_call_credentials(args.token)
channel_credentials = grpc.composite_channel_credentials(
    grpc.ssl_channel_credentials(), call_credentials)
with grpc.secure_channel(args.server_url, credentials=channel_credentials) as channel:
    stub = SynthesizerStub(channel)
In some languages, this stub is defined in the generated client files: in Python it is named SynthesizerStub and in Go it is SynthesizerClient. In other languages, such as Java, you must create your own stub.
Send request and process results
Finally, the client calls the stub to send the synthesis request, then processes the response (a stream of responses) using the fields in SynthesisResponse: audio, events, and status.
The response returns the synthesized audio to the client, streaming it and optionally saving it in an audio file. In this client, the audio is saved to a file named in the --output_wav_file argument.
# Send request and process results
with grpc.secure_channel(args.server_url, credentials=channel_credentials) as channel:
    stub = SynthesizerStub(channel)
    request = create_synthesis_request(name=args.name, model=args.model, text=args.text,
        ssml=args.ssml, sample_rate=args.sample_rate, send_log_events=args.send_log_events,
        client_data=args.client_data)
    stream_in = stub.Synthesize(request)
    audio_file = None
    wav_header = None
    total_audio_len = 0
    try:
        if args.output_wav_file:
            audio_file = open(args.output_wav_file, "wb")
            wav_header = generate_wav_header(sample_rate=args.sample_rate, bits_per_sample=16, channels=1, audio_len=0, audio_format=1)
            audio_file.write(wav_header)
        for response in stream_in:
            if response.HasField("audio"):
                print("Received audio: %d bytes" % len(response.audio))
                total_audio_len = total_audio_len + len(response.audio)
                if(audio_file):
                    audio_file.write(response.audio)
            elif response.HasField("events"):
                print("Received events")
                print(text_format.MessageToString(response.events))
            else:
                if response.status.code == 200:
                    print("Received status response: SUCCESS")
                else:
                    print("Received status response: FAILED")
                    print("Code: {}, Message: {}".format(response.status.code, response.status.message))
                    print('Error: {}'.format(response.status.details))
    except Exception as e:
        print(e)
    if audio_file:
        wav_header = generate_wav_header(sample_rate=args.sample_rate, bits_per_sample=16, channels=1, audio_len=total_audio_len, audio_format=1)
        audio_file.seek(0, 0)
        audio_file.write(wav_header)
        audio_file.close()
        print("Saved audio to {}".format(args.output_wav_file))
Try it out
You can try out this simple client application on Linux or Windows to synthesize text and save it in an audio file. To run it, you need:
- Python 3.6 or later.
- The generated Python stub files from gRPC setup.
- Your client ID and secret from Prerequisites from Mix.
- The Python client files: simple-mix-client.zip.
Download the zip file and extract its files into the same directory as the nuance directory, which contains your proto files and Python stubs.
On Linux, give run-simple-mix-client.sh execute permission with chmod +x. For example:
For example:
unzip simple-mix-client.zip
chmod +x run-simple-mix-client.sh
These are the resulting application files, in the same directory as the nuance directory:
├── run-simple-mix-client.bat
├── run-simple-mix-client.sh
├── simple-mix-client.py
└── nuance
    ├── rpc (RPC message files)
    └── tts
        ├── storage (Storage files)
        └── v1
            ├── synthesizer_pb2_grpc.py
            ├── synthesizer_pb2.py
            └── synthesizer.proto
Edit the sample shell script or batch file to add your Mix client ID and secret.
#!/bin/bash

CLIENT_ID=<Mix client ID, starting with appID:>
SECRET=<Mix client secret>
#Change colons (:) to %3A in client ID
CLIENT_ID=${CLIENT_ID//:/%3A}

MY_TOKEN="`curl -s -u "$CLIENT_ID:$SECRET" \
"https://auth.crt.nuance.com/oauth2/token" \
-d "grant_type=client_credentials" -d "scope=tts" \
| python -c 'import sys, json; print(json.load(sys.stdin)["access_token"])'`"

python3 simple-mix-client.py --server_url tts.api.nuance.com:443 \
--token $MY_TOKEN \
--name "Zoe-Ml" --model "enhanced" \
--text "The wind was a torrent of darkness, among the gusty trees." \
--output_wav_file "highwayman.wav"@echo off
setlocal enabledelayedexpansion
set CLIENT_ID=<Mix client ID, starting with appID:>
set SECRET=<Mix client secret>
rem Change colons (:) to %3A in client ID
set CLIENT_ID=!CLIENT_ID::=%%3A!
set command=curl -s ^
-u %CLIENT_ID%:%SECRET% ^
-d "grant_type=client_credentials" -d "scope=tts" ^
https://auth.crt.nuance.com/oauth2/token
for /f "delims={}" %%a in ('%command%') do (
for /f "tokens=1 delims=:, " %%b in ("%%a") do set key=%%b
for /f "tokens=2 delims=:, " %%b in ("%%a") do set value=%%b
goto done:
)
:done
rem Remove quotes
set MY_TOKEN=!value:"=!
python simple-mix-client.py --server_url tts.api.nuance.com:443 ^
--token %MY_TOKEN% ^
--name "Zoe-Ml" --model "enhanced" ^
--text "The wind was a torrent of darkness, among the gusty trees." ^
--output_wav_file "highwayman.wav"Run the client using the script file. All the arguments are in the script, including the text to synthesize and the output file. The results are the same on Linux and Windows:
./run-simple-mix-client.sh

Received audio: 24926 bytes
Received audio: 11942 bytes
Received audio: 10580 bytes
Received audio: 9198 bytes
Received audio: 6316 bytes
Received audio: 8908 bytes
Received audio: 27008 bytes
Received audio: 59466 bytes
Received status response: SUCCESS
Saved audio to highwayman.wav
run-simple-mix-client.bat
Received audio: 24926 bytes
Received audio: 11942 bytes
Received audio: 10580 bytes
Received audio: 9198 bytes
Received audio: 6316 bytes
Received audio: 8908 bytes
Received audio: 27008 bytes
Received audio: 59466 bytes
Received status response: SUCCESS
Saved audio to highwayman.wavThe synthesized speech is in the audio file, highwayman.wav, which you can play in an audio player.
If you want to synthesize your own text, edit the shell script to change the input text in --text, the output file in --output_wav_file, and optionally the language and voice in --name.
More features
Features not shown in this simple application are described in the sample synthesis client and other sections:
-
Get voices: To learn which voices and languages are available, see Get voices.
-
More SSML: For more information about SSML input and tags, see SSML input.
-
Tokenized sequence: To provide input in the form of a tokenized sequence of text and Nuance control codes, see Input to synthesize and Tokenized sequence.
-
Upload resources. See Synthesis resources and Sample storage client.
-
User dictionary: To provide a user dictionary or other resources, see Run client with resources.
-
Unary: If you prefer a non-streamed response, see Run client for unary response.
Feedback
Was this page helpful?
Glad to hear it! Please tell us how we can improve.
Sorry to hear that. Please tell us how we can improve.