View and update sample sentences
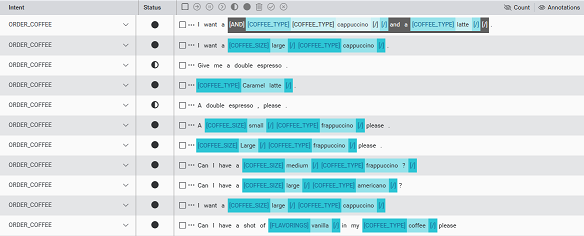
The sample sentence data is displayed in a table, with one row for each sample. The data is displayed for the following columns:
| Column | Description |
|---|---|
| Intent | Intent type for the sample. This can have one of the following values:
|
| Status | Indicates the sample status with an icon. This includes the same values used in the Develop tab.
|
| Sample | The text of the sample, along with any already assigned entity annotations, as well as:
|
The data in the table can be sorted by column values:
- Intent: Alphabetical order
- Status: From Excluded to Annotation-assigned. UNASSIGNED_SAMPLES are considered as Excluded for sorting purposes.
- Sample: Sample text in alphabetical order
Click on the column header to sort the samples by that column. Click again to sort in the opposite order.
Visibility toggles
The header bar above the Sample contents column has toggles to control the visibility of:
- Count: The number of identical copies of the given sample in the training set.
- Annotations: Show or hide entity annotations in the displayed samples.

Filter displayed samples
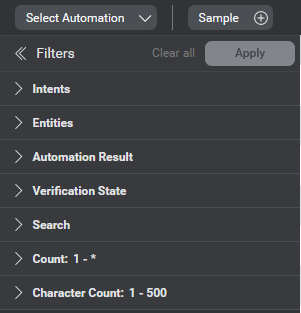
By default, the Optimize tab displays all samples.
To filter the samples down to a smaller subset of samples, use the filter panel beside the table. You can filter the samples on these dimensions:
- Intents: Select one or more intents from a list of options. The options include user-defined intents, as well as new intents suggested by Auto-intent of the form AUTO_INTENT_01, AUTO_INTENT_02, and so on. When you filter by intents, the results will show samples assigned under the selected intents, as well as UNASSIGNED_SAMPLES whose Auto-intent suggested intent is one of the selected options.
- Entities: On one or more entities, including custom entities, predefined entities, and imported entities.
- Automation Result: Show samples with results from automation operations such as Auto-intent
- Verification state: Intent-assigned, Annotations-assigned, Excluded.
- Search: By search string or regex pattern. Note: If the string entered in the search field is a valid regex pattern, then it will be treated as a regex pattern. Otherwise, it will be treated as a regular search string.
- Count: By number of duplicates/weighting of samples. Select lower and upper limits to define a filter range. If no upper limit is specified, this will select all samples with a count greater than or equal to the lower limit.
- Character count: By range for the length of the samples in characters
Multiple items to include can be selected in the Intents and Entities filters by clicking the available checkboxes. Click once on a checkbox to select and a second time to deselect.
Filters for which at least one selection has been made are marked with a blue dot. When you select the first item, the filter value is displayed on the filter label. If you select more than one item, a simple count of how many are selected out of the total number of options is displayed.
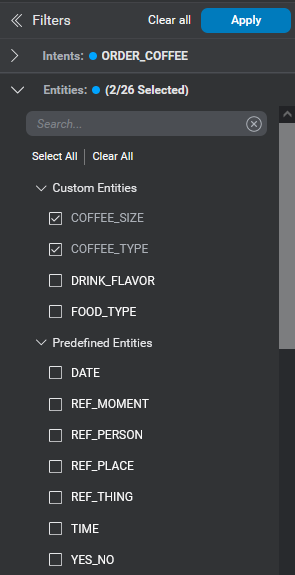
Within the Intents and Entities filters you can click Select All to check all the checkboxes; this makes it easier to select all except by selecting all then deselecting the specific items you don’t want to see. Clear All unchecks all the checkboxes for a filter.
Once you have chosen the filters you want to apply, click Apply in the filters header. The data displayed in the table will update to show only data corresponding to the filter values.
Clicking Clear all in the filters header resets the selections in the filters to their original defaults and displays all samples.
You can hide the filter panel to free up space as needed and open it again to go back.
Update individual samples
You can perform several actions on individual samples:
- Add or modify sample annotations
- Change sample status
- Change sample intent
- Exclude a sample from the training set or re-include
The controls and behavior for individual sample operations are mostly the same as those in the Develop tab.
Change a sample intent in the intent menu
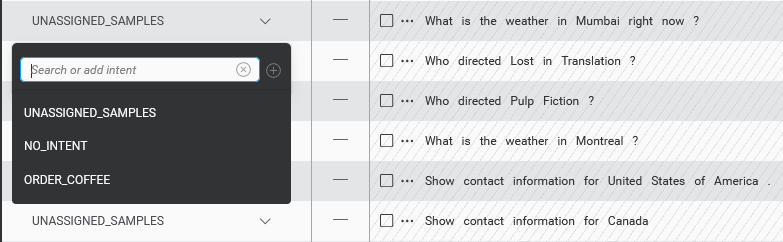
An intent menu available in the Intent column of each sample allows an alternate means to change the intent for a sample.
To change the sample intent to an existing intent:
-
Click to open the intent menu.
-
Select a new intent for the sample. There are multiple ways to do this:
- Scroll through the list of existing intents, and find the intent you want.
- If there are a lot of intents in your project, you can also use the search field to track down the intent you want more quickly.
-
Click on the intent name to select the intent.
Create a new intent from the intent menu
Sometimes, you may realize that the sample does not fit any of the existing intents. In this case, you can create a new intent directly in the menu. With the intent menu open:
-
Type in a new intent name in the search field. You will see no results in the search field and will be prompted to add the intent.
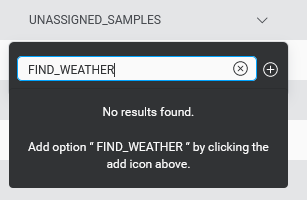
-
Click the add icon
 in the intent menu.
In both cases, the Move Samples menu will open to allow you to move the sample to the new intent and decide how you want to deal with any entities in the sample.
Related topics
Feedback
Was this page helpful?
Glad to hear it! Please tell us how we can improve.
Sorry to hear that. Please tell us how we can improve.