Message operations
You can define separate channel-specific message variations. You can also add message variations in up to three different formats (also called output modalities)—Rich Text, TTS, Audio Script—depending on the channel. Messages defined for the default channel apply to all channels unless a channel-specific variation exists. Messages defined for a specific channel—and their format-specific variations—are only used in that channel.
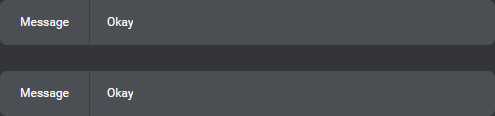
In most contexts where messages appear in the Node properties pane, a pair of View messages as selectors allow you to view message variations, by channel and output modality, directly on the compact messages—for example, to review the TTS version of the messages for the Digital VA voice channel. Once you have selected a modality, your selection persists as long as the current channel supports it. If you switch to a context where the applicable channel doesn’t support the selected modality, the modality selector falls back to the first output modality available for the current channel. For example, if you’re viewing default Audio Script messages, and then switch to the Digital VA text channel, the modality selector will fall back to Rich Text, because this channel doesn’t support Audio Script. Navigating to another node always resets the View messages as channel selector to All channels.
You can use HTML code in Rich Text messages, and SSML tags in TTS and Audio Script messages.
Tip:
If your project uses standard or enhanced TTS voices, see SSML tags for more information. If your project uses neural TTS voices, see SSML input for more information.Notes:
- If you want to use emojis and symbols in messages or assignments, enter their graphic form directly into the text fields. Legacy Unicode escape sequences you might have in existing projects are supported for backward compatibility only. HTML decimal and hexadecimal equivalents are not supported.
- In preview mode, Mix.dialog does not render rich output formatting: format attributes found in messages appear as raw source code, in the chat pane.
Add a message
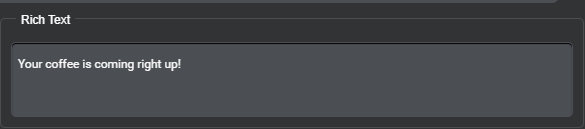
When you create a message node, it already has one blank message placeholder from where to set a message.
On the other hand, for a new question and answer node, you must explicitly add the initial placeholder for setting the system question.
The steps for adding a message depend on where you want to add it:
- In a multilingual project, switch to the desired language, if it isn’t already the active language.
- If the message must be limited to a specific channel, undock the desired channel if it isn’t already, and select it.
- Add a message placeholder if there isn’t one already.
- Click the message placeholder.

This opens the message editor. - Use the message editor to create your message.
Once you have created a message, you can perform various operations directly from the compact message in the Node properties pane, including:
Add a message placeholder
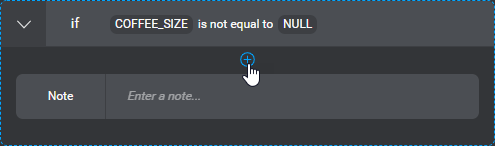
- If there aren’t any placeholders yet, click + Message.

- If other messages, notes, actions, or conditions already exist, click the Add icon
 , where you want to insert the message, and choose Message.
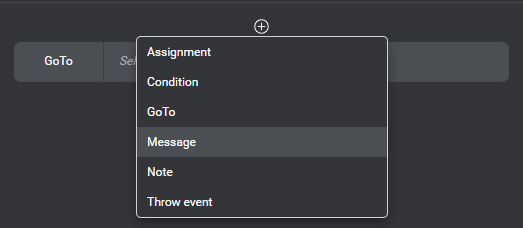
- To add the first placeholder under a condition, click the Add icon and choose Message.
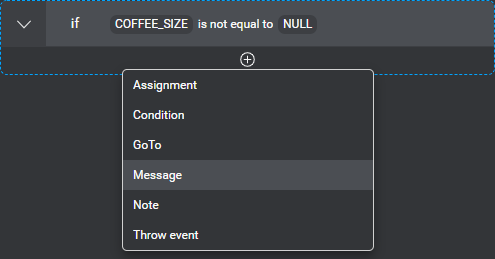
- To add a message under a condition where other messages, notes, actions, or conditions already exist, bring your pointer to the area where you want insert the message, click the Add icon that appears, and choose Message.
Use the message editor
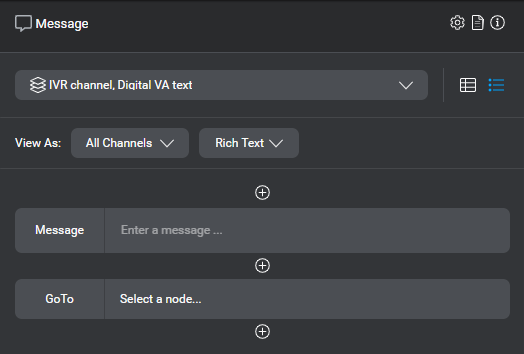
By default, if the current node does not require any channel-specific messages and actions (all channels are docked), the message editor shows fields for all the output modalities that are available across all channels in your project. These fields correspond to the fields under default in the Messages resource panel.
![]()
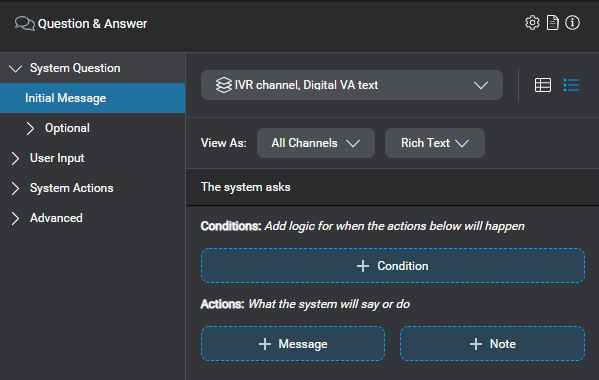
On the other hand, if there are undocked channels at this node, using the main channel selector (at the top of the Node properties pane) before editing a message, determines which fields appear in the message editor—that is, one field for each output modality specified for the selected channel. These fields correspond to those under the same channel in the Messages resource panel.
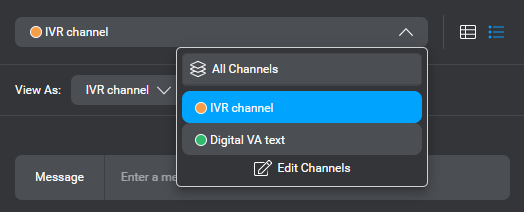
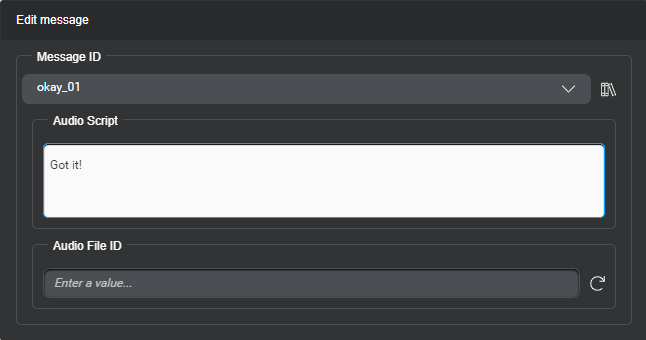
For example, if you select the undocked IVR channel from the main channel selector (at the top of the Node properties pane), the message editor might have only one field, for the Audio Script modality. This field corresponds to the one under IVR channel Override in the Messages resource panel.
![]()
What you see in the message editor is a reference to a global message resource. If you modify the message text, or its name, in any context where the same message ID appears, all other references will automatically reflect your changes.
Note:
To force a new line in a Rich Text message, use Shift+Enter (or Shift+Return). In the internal representation of messages, line breaks appear as\n. Don’t insert line breaks in TTS and Audio Script messages.
Use an existing message
- Click New Message (above a blank message field), or the message ID (if there is already a message in the field).
A list appears showing all messages in your project.
Tip: Use the Search field to narrow down the list, if desired. Only messages whose name contains the search string remain in the list.
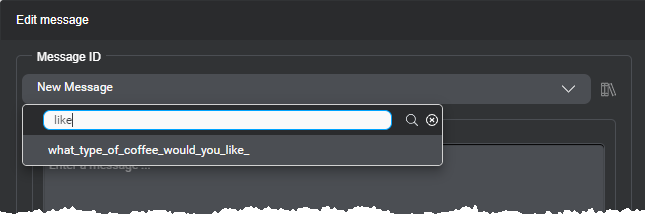
- Choose the desired message from the list.
This creates a reference to the original message. If you modify the message text, or its name, in any context where the same message ID appears, all other references will automatically reflect your changes.
Modify an existing message
Make the desired changes to the default text or any channel-specific or modality-specific variations, in the corresponding fields. You can annotate parts of the message text to make them dynamic. You can also generate, specify, or modify the audio file ID, if needed (see Naming guidelines).
All other references to this message in your project automatically reflect your changes.
What you see in the message editor is a reference to a global message resource. Click the Library icon ![]() , next to the message selector, to view this message in the Messages resource panel, and verify whether other contexts also reference this message.
, next to the message selector, to view this message in the Messages resource panel, and verify whether other contexts also reference this message.
Create a new message
Enter the desired default text, annotations (if this message requires dynamic elements), and any modality-specific variations in the corresponding fields. You can also generate or specify the audio file ID, if needed (see Naming guidelines).
This creates a message resource that you can reuse anywhere in your project.
Duplicate a message
Duplicating a message creates an unlinked copy of the original message. Any changes you make to the new message will not affect the original message, and vice versa. The new message has a distinct message ID (a numeric suffix is appended to the original message ID), which you can see in the message editor (and in the Messages resource panel).
- Bring your pointer to the right-hand side of the compact message you want to duplicate.
- Click the More options icon
 that appears and choose Duplicate message.
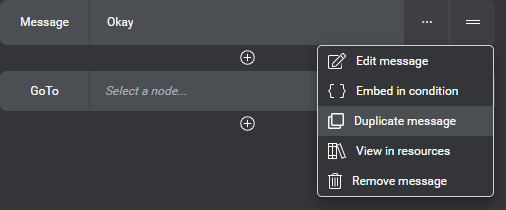
A copy of the message appears.
- Now, depending on your purposes, you might want to:
- Click the new compact message to open the message editor, and make the desired changes.
Open the Messages resource panel from a message
- Bring your pointer to the right-hand side of the compact message you want to duplicate.
- Click the More options icon that appears and choose View in resources.
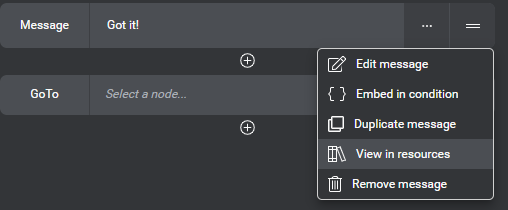
The Messages resource panel opens, and your message is in focus.
See Manage messages, for more information.
Remove a message
Removing a message from a node, or from project settings, only deletes the reference to the original message resource. The global resource remains available in your project.
- Bring your pointer to the right-hand side of the compact message you want to remove.
- Click the More options icon that appears and choose Remove message.
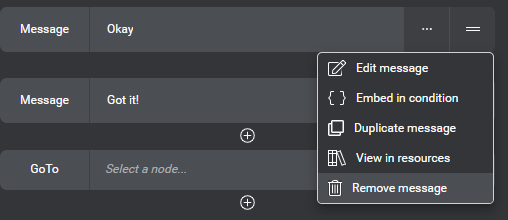
Create a condition from a message
- Bring your pointer to the right-hand side of the compact message for which you want to create a condition.
- Click the More options icon that appears and choose Embed in condition.
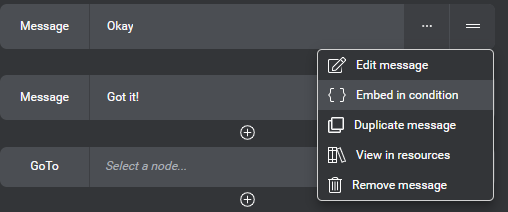
Your message now appears under a condition placeholder.
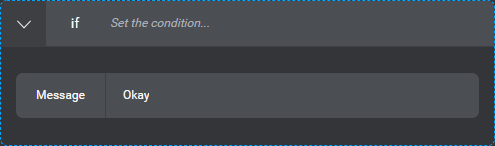
- Set the desired condition.
Add a dynamic message
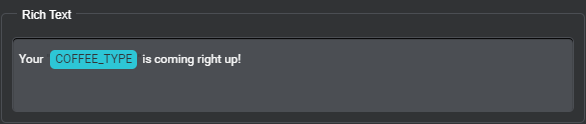
As you type any message, you can specify placeholders (annotations) to be replaced at runtime according to what the user said or according to what happened during the interaction. Make sure your design includes actions to initialize the variables or to collect the entities or the intent you specified.
- Start typing your message.
- When you reach the point where you want to insert a placeholder for a variable or entity:
- Type a left square bracket (
[).
A menu appears.
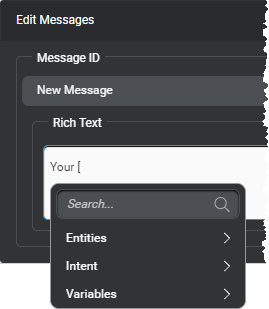
- Expand the appropriate category: Entities, for an entity; Intent, for the active intent; or Variables, if you want insert the placeholder for a variable.
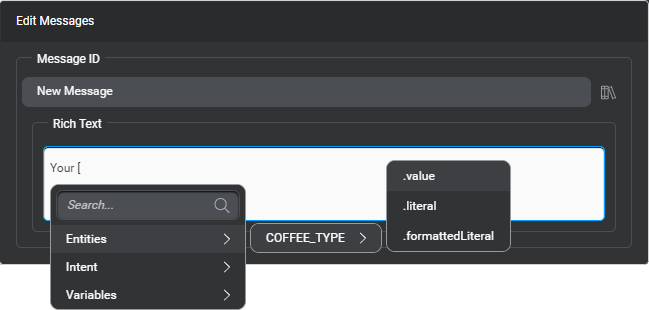
Tip: Use the search field to quickly find the element you need. - Navigate to the element you want to use.
Depending on the type of element, you might have to choose between different attributes, such as the element’s value or literal, its length, and so on (see Supported methods). For variables and entities that support output formatting, you can choose Formatted value (and then customize the format, if desired). - The name of the dynamic element you chose appears as highlighted text in your message.
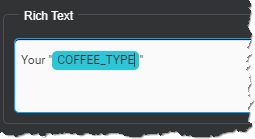
- Type a left square bracket (
- Complete your message.
Note:
Renaming variables or entities used in existing dynamic messages does not update the text of the annotations. You can edit the display text, if desired.Annotate a message
You can annotate an existing message to add dynamic placeholders for variables, entities, or attributes of the active intent.
- Highlight the part of your message you want to replace with a dynamic placeholder.
A menu appears. - Expand the appropriate category and navigate to the element you want to use.
Depending on the type of element, you might have to choose between different attributes, such as the element’s value or literal, its length, and so on (see Supported methods). For variables and entities that support output formatting, you can choose Formatted value (and then customize the format, if desired).
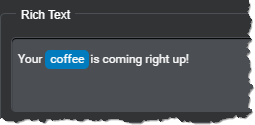
The highlighted text now represents the specified entity or variable. You can edit the display text, if desired.
Change the variable or entity for an annotation
This can be useful, for example, after you have duplicated a dynamic message and the copy should use a different variable.
- Click the annotation you want to modify, and choose Edit value.

A menu appears. - Expand the appropriate category and navigate to the element you want to use.
Depending on the type of element, you might have to choose between different attributes, such as the element’s value or literal, its length, and so on (see Supported methods). For variables that support output formatting, you can choose Formatted value (and then customize the format, if desired).
The highlighted text now represents the specified entity or variable. You can edit the display text, if desired.
Edit the text of an annotation
This can be useful, for example, after you have renamed a variable or entity that was used in an existing dynamic message.
Click the annotation you want to modify, choose Edit display text, and modify the text as desired.
This only changes the text on the annotation, not the entity or variable that the annotation represents.
Note:
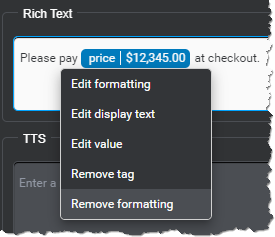
It is not possible to add text before the first character or after the last character of the original display text of an annotation. As a workaround, you can enter the desired text between the original first and last characters, and then delete these.Remove an annotation in a message
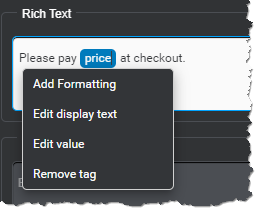
Click the annotation you want to undo, and choose Remove tag.
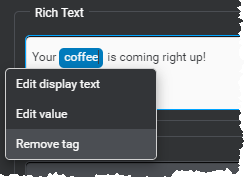
Only static text from the former annotation remains.
Configure output formatting for an annotation
This section applies to variables and entities of the types that support output formatting.
- Click the annotation for which you want to specify output formatting.
- If the annotation already represents the formatted value of a variable or entity, choose Edit formatting; otherwise, choose Add formatting.
A format editor with applicable formatting options (for the data type, active language, and message format) appears. - If you are editing an Audio Script message, in a language that supports dynamic concatenated audio playback, choose the desired playback mode for this annotation: TTS or Dynamic concatenated audio.
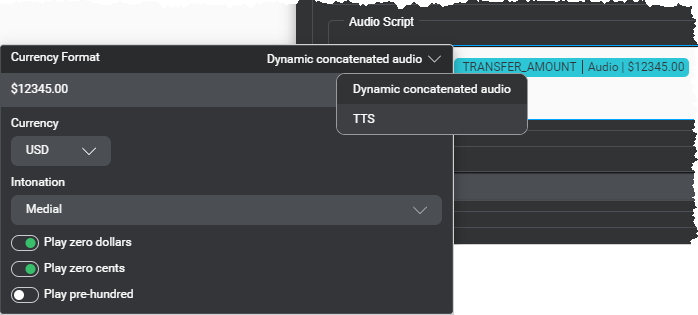
- Use the formatting options.
- When the sample value matches the desired format, click outside the editor to close it.
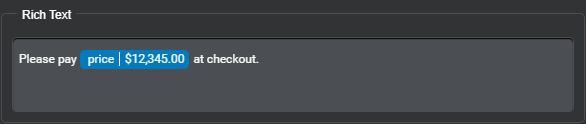
The formatted sample value text appears on the annotation, next to the display text.
Remove output formatting for an annotation
This section applies to variables and entities of the types that support output formatting.
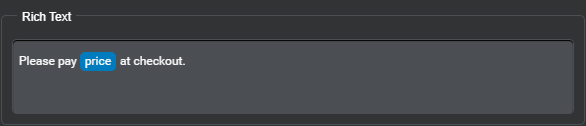
Click the annotation for which you want to restore the unformatted output behavior, and choose Remove formatting.
The annotation no longer shows a formatted value sample; only the display text remain.
Set a format pattern for alphanumeric values or digits
This section applies to variables and entities of the types that support output formatting.
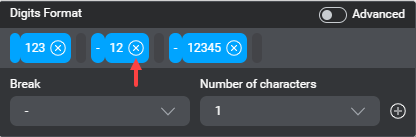
By default, the format editor for alphanumeric values or digits contains a default pattern, showing groups, such as 123-12-12345. Each group can have up to 9 characters. The Rich Text format supports a leading character and delimiters between groups. For TTS and dynamic concatenated audio playback, the space between groups represents a pause.

Remove a group
Click the Remove group icon ![]() of the group you want to remove.
of the group you want to remove.
Add the first group
- (Rich Text only) Choose the initial character.
- Choose the number of characters for the group.
- Click the Add icon .
Insert a group
- Click the blank area to the right of the group after which you want the new group to appear.
- (Rich Text only) Choose the desired delimiter from the Break list.
- Choose the number of characters you want to add.
- Click the Add icon .
Increase the length of a group (Rich Text only)
- Click the blank area to the right of the group you want to modify.
- Choose None from the Break list.
- Choose the number of characters you want to add.
- Click the Add icon .
Use the advanced format editor for alphanumeric values or digits
This section applies to variables and entities of the types that support output formatting.
When you switch to the advanced editor, the pattern string reflects the current format—for example, ###-##-##### for Rich Text, or 3 2 4 for TTS and Audio Script.

For Rich Text, the pattern string can only include # to represent any letters or digits (only digits, for values of type Digits). The characters -, ., /, \, (, ), +, *, and space are the only supported delimiters.
For TTS and Audio Script, the pattern string can only include digits between 1 and 9, to represent groups of characters (and spaces between the digits, if desired). For example, 3 2 4 represents a group of three characters, pause, two characters, pause, four characters.
To go back to the basic format editor, clear the pattern string, and then turn off Advanced.
Disable the legacy concatenation behavior
This procedure applies to Mix projects that were created before April 2022, and its purpose is to take advantage of the new default runtime concatenation behavior for dynamic messages, which now prevents the dialog service from automatically adding spaces in dynamic messages at runtime.
To migrate a project:
- Export the JSON representation of your dialog design.
- Open the JSON file in a text editor, and look for the
globalSettingOverrideselement. - Inside this element, look for the object literal that contains
"settingName": "add-spaces-around-dynamic-prompt-parts".
For example:
{ "id": "0708927c-7843-45ac-b660-d0d90b5bf0a0", "projectId": "3105", "settingName": "add-spaces-around-dynamic-prompt-parts", "settingType": "INTERNAL_SETTINGS", "channelId": "", "predefinedName": "PREDEFINE_NOT_SET", "value": "true", "language": "", "entityId": "" } - In this object literal, replace
"value": "true"with"value": "false". - Save the JSON file and import it back into the project.
- In Mix.dialog, open the Messages resource panel, and review your dynamic messages, to make sure the spacing is adequate around the annotations.
After you have disabled the legacy concatenation behavior a project, if you decide to enable it again, proceed in the same fashion, but replace "value": "false" with "value": "true", before importing the JSON file back into your project.
Feedback
Was this page helpful?
Glad to hear it! Please tell us how we can improve.
Sorry to hear that. Please tell us how we can improve.