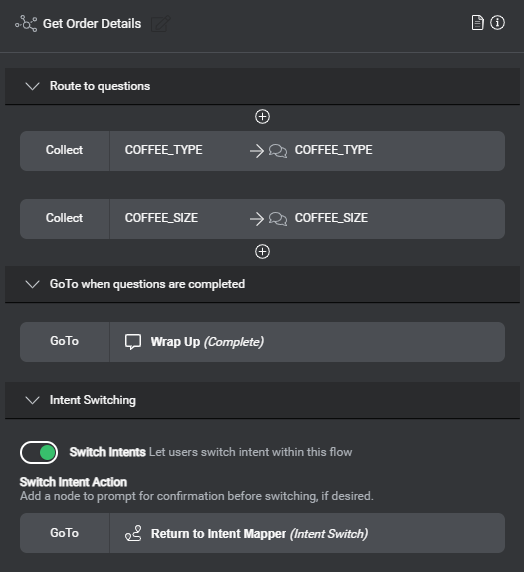
Set up a question router node
Use a question router node to manage all entities required to fulfill an intent. The question router node specifies multiple pieces of information to be collected, and determines the next node in the dialog flow, based on the information collected so far.
Depending on what the user already provided, when the dialog flows reaches a question router node, some information might already be available. In such cases, the corresponding slots are considered filled, and the question router node directs the dialog flow to the question and answer node that is meant to collect information for the next slot that has yet to be filled. When the dialog flow returns from a question and answer node, more slots might have been filled. Once all slots are filled, the question router node uses the transition under GoTo when questions are completed.
Click a question router node on the design canvas, to see its properties in the Node properties pane.
Setting up a question router node involves these tasks:
- Replace the default node name, Question Router, with a unique name representing the questions to be fired from this node—for example, Get Order Details.
- Build a question routing table for your intent by specifying every piece of information to collect—that is, entities you have defined with your NLU intents—in the desired sequence.
For example, you might want your coffee app to prompt the user for the type of coffee they would like to order, before any other information—such as the coffee size—required to fulfill the ORDER_COFFEE intent. This allows you to design your application so that it won’t unnecessarily prompt the user for the coffee size it the specified coffee type only comes in one size. - Set where to go with the answers once all the required slots have been filled.
- Configure intent switching, as needed.
List the questions
- Under Route to questions, click + Collect Entity.

A Collect placeholder appears.

- Click the placeholder.
An editor appears.
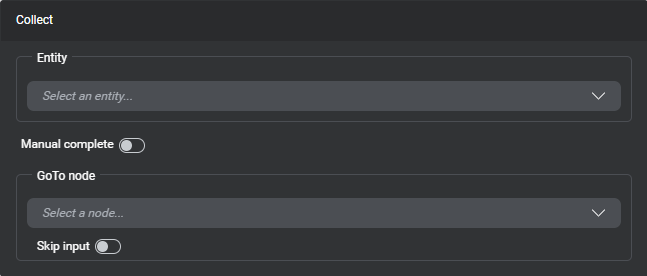
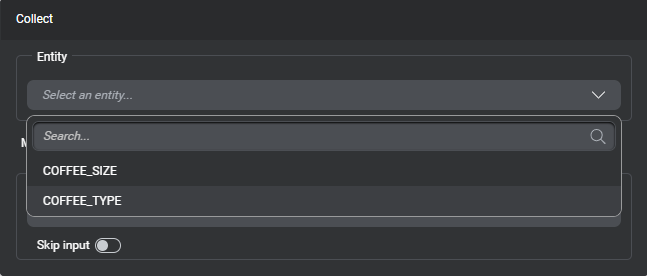
- Expand the Entity list, and choose the first piece of information to be collected—for example, COFFEE_TYPE.
Tip: Use the search field to narrow down the list if needed.
- If this entity requires validation (for example, before accepting a payment amount, you want to verify whether the specified amount meets the minimum required), turn on Manual complete.
In your validation logic, you will use assign actions to:- Set the .isCompleted attribute for this entity to
true, upon successful validation (see Entity lifecycle considerations, for more information). - Clear the entity, if the specified value didn’t pass validation.
- Set the .isCompleted attribute for this entity to
- Expand GoTo node, point to Add new, and choose Question & Answer.
This connects the question router node to a new question and answer node named after the entity to collect.
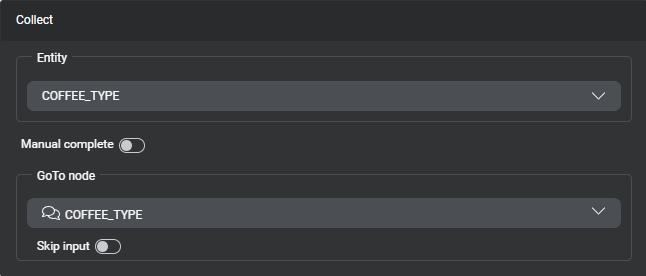
- If you want to skip collection for this entity under certain conditions (see Entity lifecycle considerations, for more information):
- Turn on Skip input.
Fields appear allowing you to define a condition.
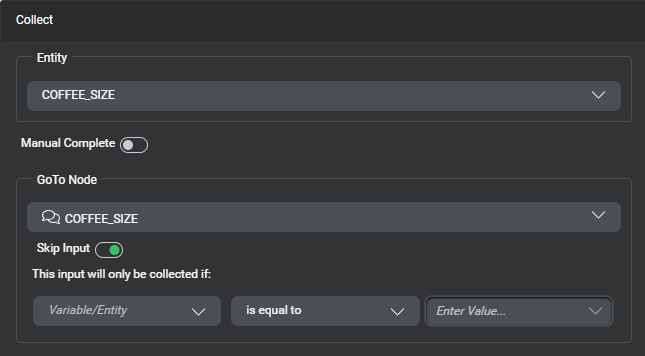
- Set the condition that determines when the optional entity must be collected.
For example, since ristretto only comes in one size, you don’t need to ask for the coffee size when the user orders a ristretto, which translates as collect COFFEE_SIZE only if the value of COFFEE_TYPE is not ristretto:

- Turn on Skip input.
- Click outside the editor to close it.
- To specify more pieces of information to collect:
- In the Node properties pane, click the Add icon
 , below or above a Collect parameter.
A new Collect placeholder appears. - Click the placeholder, and use the selectors in the editor that appears, as described above, to add a question and answer node for the next piece of information to be collected.
- Proceed in the same fashion, until you have specified all the desired entities.
- In the Node properties pane, click the Add icon
You can reorder or remove questions, if desired.
Remove a question
- Bring your pointer to the right-hand side of the Collect parameter you want to remove.
- Click the More options icon
 that appears and choose Delete.
Change the order of the questions
- Bring your pointer to the right-hand side of the Collect parameter you want to move.

- Use the handle
 that appears, to drag the selected element up or down.
 - Drop the selected element at the desired position.
Set where to go with the answers
Under GoTo when questions are completed, click the GoTo placeholder, and set the desired transition. In the context of an intent component, you might:
- Add a question and answer node to confirm the collected answers
- Add a message node with a message summarizing the entities collected to fulfill the intent
- Choose Return to return to the main dialog flow directly
Configure intent switching
In a component that has a question router node handling entity collection, you can choose to allow or prevent intent switching. For example, in a banking app, a user who wants to pay a bill and has started providing the required information might suddenly ask how much money they have in a specific account. By default intent switching is enabled, and when a user says something that is recognized as a different intent, at a question and answer node, the dialog flow uses the Intent Switching transition of the question router node that handles entity collection for the active intent, to eventually return to the upstream intent mapper. Any entities collected so far for the active intent persist, unless you add actions to clear them before switching.
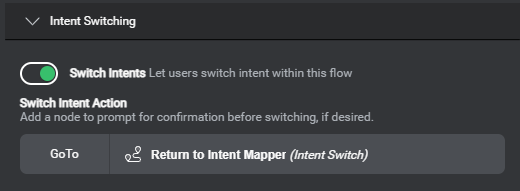
To prevent users from switching to another intent at this part of the dialog flow, turn off Switch intents.
Note:
With the current version of Mix, in a multi-intent project, when an intent, or an entity that isn’t the entity in focus is recognized at a question and answer node downstream from a question router node where Switch intents is turned off, this doesn’t generate a nomatch event. Instead, the dialog flow returns to the question router node, which determines that the same entity still needs to be collected. This might lead to a looping situation which wouldn’t provide any information to the end user. If your design must support a component that can’t allow intent switching, as a workaround, you can add logic between the question router node and each question and answer node under the question router node: for example, increment a counter and either move on to the question and answer node, or throw an event if the maximum number of attempts is exceeded. In the question and answer nodes, you could configure different reentry messages based on the value of the counter.Depending on your purposes, additional actions might be required before letting the user switch to the other intent. For example:
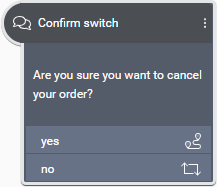
- Prompt the user to confirm they really want to abandon the current task
- Clear all entities handled in this question router node
Under Switch intent action, click the GoTo placeholder, and set the desired transition:
- Choose Return to intent mapper to return to the upstream dialog flow without clearing the entities collected so far.
- Add a question and answer node to ask the user to confirm their intention, and then, from the question and answer node, return the dialog flow to the question router node if the user says no, or return to the intent mapper node if the user says yes.
- Add a decision node (or a message node with a message showing the next intent), add actions to clear all entities associated with the active intent, if appropriate, and a transition set to Return to intent mapper.
Feedback
Was this page helpful?
Glad to hear it! Please tell us how we can improve.
Sorry to hear that. Please tell us how we can improve.
