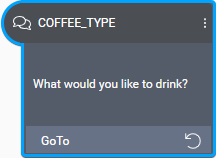
Set transitions
A transition identifies the next node to execute after completing an action. Choose the appropriate transition type, based on where the target node is located and the purpose of the transition. Distinctive elements represent transitions between nodes on the canvas. Mix.dialog supports these transition types: GoTo, Return to, Return, and Return to intent mapper.
| Transition type | Appearance | Description |
|---|---|---|
| GoTo | Arrow between two nodes on the canvas. Color-coded by channel. Gray (default) represents a transition that applies to all channels. Other colors represent channel-specific transitions. | Transitions to another node within the same dialog component. |
| Return to | Returns any collected entity information back to a question router node that handles a set of entities. | |
| Return | Returns to the intent mapper node or component call node that called the current component from another component. Not available in the component called Main. | |
| Return to intent mapper | Returns to the upstream intent mapper node when a user says something that is recognized as an intent, while entities are being collected to fulfill a different intent. Requires intent switching to be enabled, in the question router node that handles the entities for the active intent. |
Setting up a question router node determines transitions to other nodes from which the dialog flow should eventually return—via a Return to transition—after having collected information for entities handled by the question router node.
Setting up an intent mapper node determines transitions to other nodes or to other components that handle intents in your project. When a separate component handles an intent, the dialog flow must eventually return to the intent mapper node that called the current component via a Return transition.
Similarly, if your design uses component call nodes to transition to separate components that handle specific parts of the dialog flow, such a component should eventually use a Return transition to go back to the node from where it was called.
Data access nodes and and external actions nodes only support GoTo transitions. If your dialog design requires a different type of transition for the Success path or the Failure path of a data access node, add a decision node (for example), and set the desired transition from that node.
Protection against infinite loops
Self-hosted environments: This behavior requires engine pack 2.2 (or later) for Speech Suite deployments; engine pack 3.10 (or later) for self-hosted Mix deployments.
As a protection against infinite loops, the maximum number of times a dialog flow is allowed looping through a node before reaching a question and answer node is 100. (In self-hosted environments with a version of the Dialog service earlier than 1.3, this limit is 20.)
At runtime, exceeding this limit will generate an error response (400, FAILED_PRECONDITION), from the Dialog service to the client application.
If your design is likely to involve loops with more than 100 iterations, consider delegating this logic to your client application or a dedicated backend. Remember that the client application or a dedicated backend are often better suited than the dialog model to perform conditional logic, such as iterating through lists to verify, for example, whether a medication is listed in the user’s file and that the maximum number of refills hasn’t yet been reached.
Add a transition
The steps you must perform for adding a transition depend on where you want to add it:
- If the transition must be limited to a specific channel, undock the desired channel if it isn’t already, and select it.
- Add a GoTo placeholder if there isn’t one already.
- Click the GoTo placeholder.

This opens the GoTo editor. - Use the GoTo editor to create your transition.
Once you have created a transition, you can perform various operations directly from the compact GoTo in the Node properties pane, including:
Add a GoTo placeholder
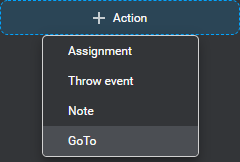
- If there aren’t any placeholders yet, click + Action and choose GoTo.
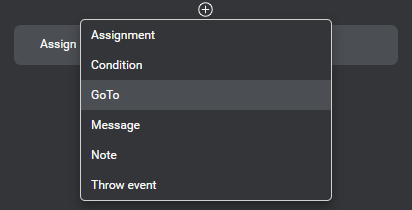
- If other messages, notes, actions, or conditions already exist, click the Add icon
 , where you want to insert the transition, and choose GoTo.
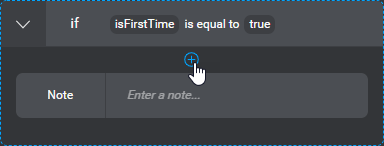
- To add the first placeholder under a condition, click the Add icon and choose GoTo.

- To add a transition under a condition where other messages, notes, actions, or conditions already exist, bring your pointer to the area where you want insert the transition, click the Add icon that appears, and choose GoTo.
Use the GoTo editor
- Expand the GoTo node list and choose the appropriate node or transition type:
- In a question and answer node that collects an entity to fulfill an intent, or in any node from which to return collected entity information back to a question router node, point to Return to, and choose the question router node that handles all entities for this intent.
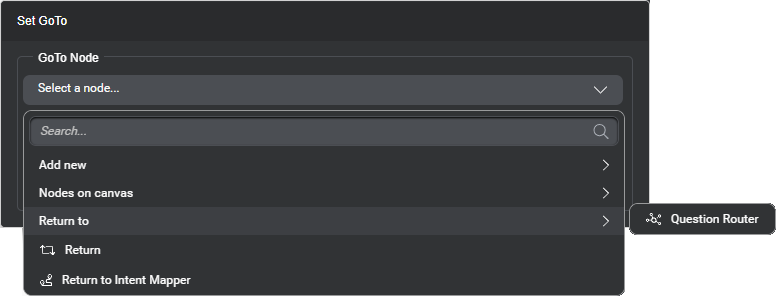
On the canvas, the current node has a distinctive icon to identify this transition (instead of an arrow between the current node and the question router node).
- To simply direct the dialog flow from the current node to another, point to Nodes on canvas and choose the next node from the list.
- If the destination node has not yet been created, point to Add new, and choose the desired node type.
This automatically connects the current node to a new node of the type you specified. - If the current transition is meant to support intent switching from the current node, and the dialog flow is designed to enter the current component from an intent mapper node, choose Return to intent mapper.
- To return the dialog flow to the intent mapper node or component call node that called the current component from another component, choose Return.
- If a transition has already been set but you would like to clear it momentarily, choose Remove connection.
- In a question and answer node that collects an entity to fulfill an intent, or in any node from which to return collected entity information back to a question router node, point to Return to, and choose the question router node that handles all entities for this intent.
- (Optional) If the transition you’re setting allows it, replace the default label if desired.
Start and Enter nodes do not have transition labels. You cannot change the Success and Failure transition labels of data access nodes, or the Switch Intent transition label of question router nodes. - Click outside the editor to close it.
The compact GoTo shows the transition type you specified, the destination, and the label (if any).

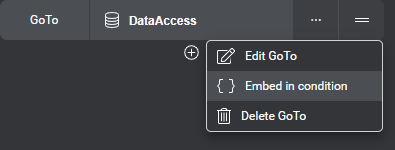
Delete a transition
- Bring your pointer to the right-hand side of the transition you want to delete.
- Click the More options icon
 that appears and choose Delete GoTo.
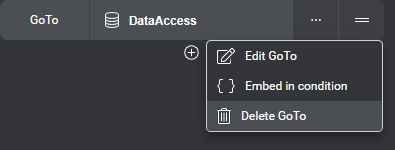
Create a condition from a transition
- Bring your pointer to the right-hand side of the transition for which you want to create a condition.
- Click the More options icon that appears and choose Embed in condition.
Your transition now appears under a condition placeholder.

- Set the desired condition.
Feedback
Was this page helpful?
Glad to hear it! Please tell us how we can improve.
Sorry to hear that. Please tell us how we can improve.