OAuth 2.0 Authorization Code flow
The OAuth 2.0 Authorization Code grant type flow works as follows:
- Your client application asks you for the permission to use your Mix user credentials. If you approve, the Mix authorization service sends an authorization code to the client app, through a redirect URL. A redirect URL (also sometimes called a callback URL) is an essential part of the OAuth flow. Because the Mix authorization service returns sensitive information (in this case, the authorization code), it is critical that the service does not redirect the user to an arbitrary location. The redirect URL must have been previously registered with the Mix authorization service.
- The client application sends a POST request with the authorization code to the Mix authorization service, which returns an access token.
You then specify this access token in each of the Mix.api calls that your application makes.
The Authorization Code grant type requires that the app launches a browser to begin the flow, as shown in the following diagram:
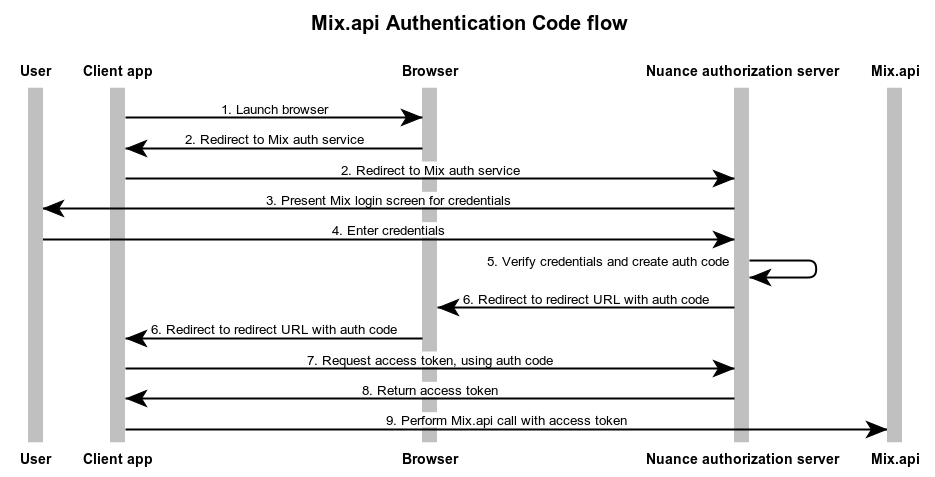
- The client application launches a browser.
- The browser redirects the user to the Mix authorization service, requesting an authorization code.
- The Mix authorization service presents the Mix login screen, asking you to provide your Mix user ID and password.
- You enter your credentials.
- The Mix authorization service verifies the credentials, displays the consent window, and asks whether you allow access to your application. If you allow access to your application, the Mix authorization service creates the authorization code.
- The Mix authorization service redirects to the redirect URL with the authorization code.
- The client application requests the access token, using the authorization code.
- The Mix authorization service returns the access token.
- The client application can now perform Mix.api calls using the access token.
For more information
For more information about OAuth 2.0 and the Authorization Code grant type, see:
- https://www.oauth.com/
- https://developer.okta.com/blog/2018/04/10/oauth-authorization-code-grant-type
Implement the Authorization Code flow in your client application
There are many ways that you can implement the OAuth 2 authorization flow for Mix.api in your client application.
As a summary, your application needs to:
- Obtain and configure the information required by the authorization flow.
- Create a web server that will handle the redirect URL.
- Get the authorization code.
- Get the access token.
Information required by the Authorization Code flow
Your application must provide the following information at different times during the Authorization Code flow:
| Parameter | Description |
|---|---|
| Client ID | ID that identifies the client. For the Authorization Code flow, this is the Default client ID. See Generate the client secret for the default Mix.api account. |
| Client secret | Secret password associated with the client ID. You generate this from your User Profile on the Mix dashboard. See Generate the client secret for the default Mix.api account. |
| Redirect URL | Redirect URL where authorization responses can be sent and received by your client application. This is the web server that is hosting the OAuth library. It must exactly match one of the redirect URLs that you registered on the Mix dashboard. See Register the redirect URL. |
| Authorization server URL | This is the URL of the Mix authorization service: auth.crt.nuance.com. |
| Tenant | Value added in the path of the request to control who can sign into the application. For Mix.api, this is mix. |
| Scope | Specifies the permissions that the application is requesting. For Mix.api, this is mix-api. |
Generate the client secret for the default Mix.api account
The profile page provides your default Client ID, which is the client ID that you need if you want to implement the Authorization Code grant type flow in your application.
You also generate the client secret for the default Mix.api account from your user profile.
To generate the client secret for the default Mix.api account:
- In the Mix dashboard, click your name and select Profile.
- In the Default area, click Generate Client Secret.
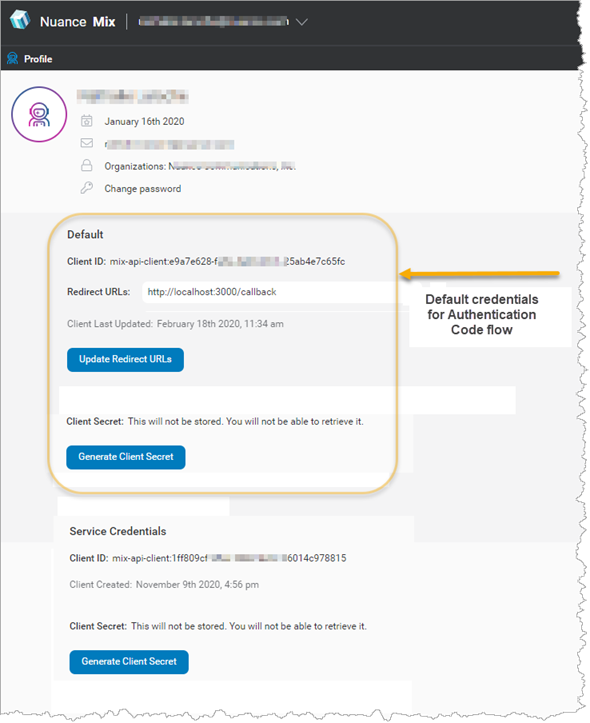
The client secret is generated. Save this client secret somewhere safe, as you will not be able to access it again from your profile page.
Register the redirect URL
This step registers the redirect URL with the Mix authorization service. Your client application must provide the same redirect URL when requesting an authorization code from the Mix authorization service.
To register a redirect URL:
- In the Mix dashboard, click your name and select Profile.
- In the Redirect URLs field, enter the redirect URL (for example,
http://localhost:3000/callback) and click the + icon. - Refresh the page to confirm that your redirect URL has been added.
Update an existing redirect URL
To update an existing redirect URL, update the URL in the appropriate field and click Update Redirect URLs.
Feedback
Was this page helpful?
Glad to hear it! Please tell us how we can improve.
Sorry to hear that. Please tell us how we can improve.