Workflow
To exchange data from the dialog application:
- Configure the base URL of the web service.
- Configure the data to exchange in the data access node.
- Build and deploy the dialog application.
- If latency messages are configured, handle them in the client application.
Note:
The dialog runtime application must have access to the backend server. See Backend integration for guidelines on implementing the REST web service.Configure base URL of web service in the dashboard
The External Resources tab lists the web services that are defined for a project. Server-side integration requires that the dialog runtime application has access to the backend server, so the URL of a web service may differ per environment.
The External Resources tab lets you specify an alias name to identify the web service, and you can set different URLs for this alias according to the environment, as appropriate.
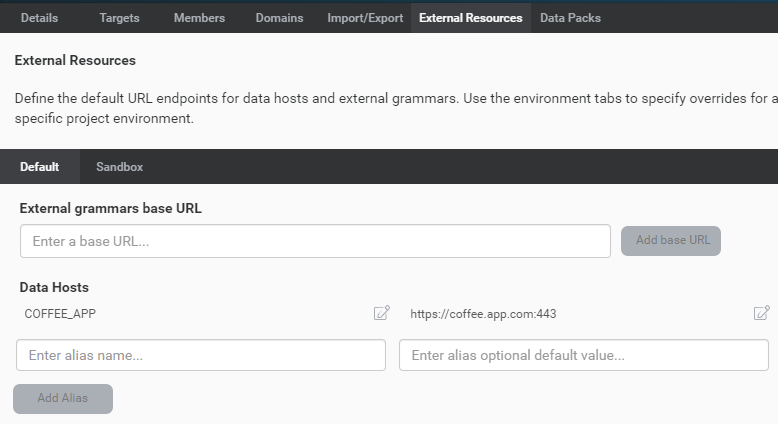
By default, the External Resources tab has these secondary tabs:
- Default: This is where you define alias names for web services. You can also specify a default URL for each alias (optional).
- Sandbox: This is where you can define specific URLs for the aliases, for the Sandbox environment.
If you have multiple environments (for example, QA, Production), a tab is available for each environment.
To add an alias and configure the default base URL for a web service:
- In the Mix dashboard, select the project.
- Click the External Resources tab.
- Click the Default tab.
- Under Data Hosts, for each web service:
- Enter the desired alias name.
For example, for the coffee app, you might enter COFFEE_APP. - (Optional) Enter a base URL for this alias.
For example, for the coffee app, this might behttps://coffee.app.com:443
- Enter the desired alias name.
- Click Add Alias.
- (Optional) To specify a different base URL for the Sandbox or any other environment:
- Click the tab for the environment.
For example, click the Sandbox tab. - Click the Edit icon
 for the alias.
 - Enter the desired base URL.
- Click the tab for the environment.
Order of precedence for URL values
You can specify a URL for an alias in the following locations:
- In the Default tab, under Data Hosts, which sets a value by default.
- In a specific environment tab (such as Sandbox), which sets a value for this environment. This value takes precedence over the default value set on the Default tab.
- When you create an application configuration, which sets a value for the environment where you deploy this application configuration. This value takes precedence over all other values.
Configure data to exchange in data access node
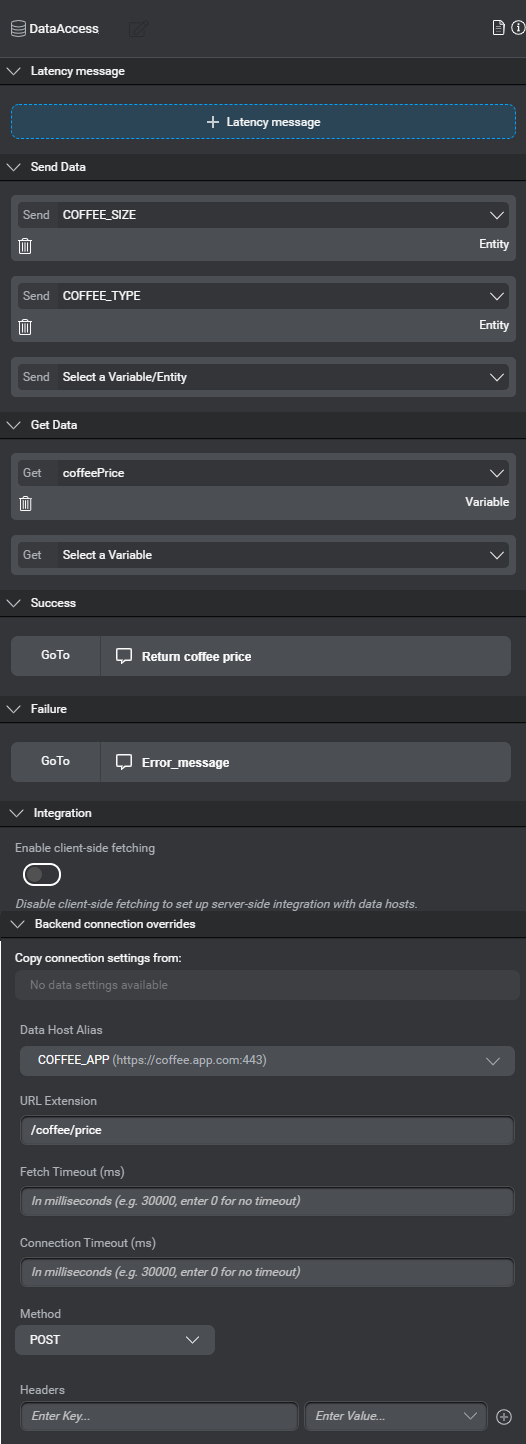
To configure the data to exchange for a server-side integration, create a data access node in Mix.dialog and specify the following fields:
| Field | Description |
|---|---|
| Latency message | Message played when a data access request is pending. See Handle latency messages in client app. |
| Send Data | Data that will be sent to the client application, for example, coffee size and type. This can be a variable or an entity. |
| Get Data | Data that will be returned by the client application, for example, coffee price. This is a variable. |
| Success | Node to go to if the external system returns a success code; that is, a returnCode of “0”. |
| Failure | Node to go to if the external system returns a failure code; that is, a returnCode that is not “0”. |
| Integration | Disable the Enable client-side fetching option to indicate that the dialog service interacts directly with a backend system to exchange data. See Specifying server- vs. client-side integration. |
| Copy connection settings from | Lets you select default connection settings. See Configure default connection settings. |
| Data Host Alias | Alias configured in the Mix dashboard to define the web service. For example, COFFEE_APP might refer to https://coffee.app.com:443. See Configure base URL of web service in the dashboard. |
| URL Extension | Specifies the endpoint used to access the data; for example, /coffee/price and /coffee/calories. This is defined by the backend (maximum 2000 characters). |
| Fetch Timeout | Number of milliseconds allowed for fetching the data before timing out. |
| Connection Timeout | Connection timeout in milliseconds. |
| Method | HTTP method to use; supported values are POST and GET. This is defined by the web service. |
| Headers | List of key-value pairs providing the headers to send to the web service. To specify a dynamic value, click the arrow to the right of the value field and select the variable. Alternatively, you can enter a static value (maximum 2048 characters) directly in the field. Note: Do not specify reserved or special header names such as Accept, Accept-*, and Content-Type. While Mix does not prevent you from using them, they may generate errors. Custom headers and headers used to identify the client with the server, for authorization, to provide generic information, and so on, can be sent. |
For example:
Note:
Try pane cannot be used to test the connection to the backend.For a detailed description of the data access node, see Set up a data access node.
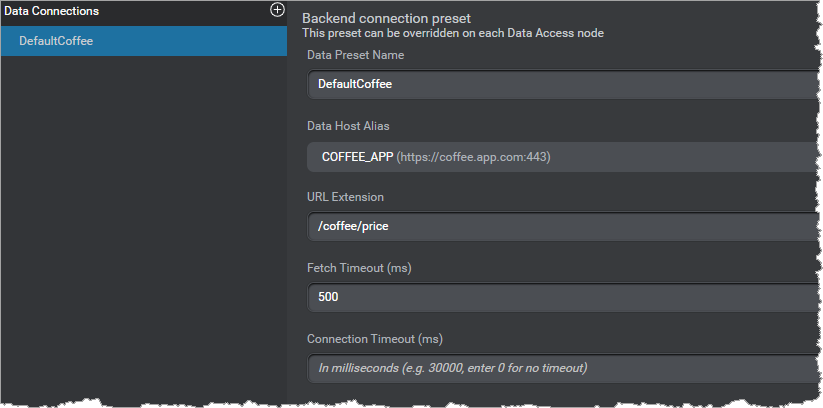
Configure default connection settings
You can configure default connection settings and use them in the data access node. This is useful if you plan to reuse them in multiple data access nodes.
To configure default connection settings:
- On the Mix.dialog toolbar, click Data.
- Click the + icon next to Data connections.
- Type a unique name for the data connection and press Enter.
- Enter the information described in the following table.
| Field | Description |
|---|---|
| Data Preset Name | Enter a name that defines this data connection. |
| Data Host Alias | Alias configured in the Mix dashboard to define the web service. For example, COFFEE_APP might refer to https://coffee.app.com:443. See Configure base URL of web service in the dashboard. |
| URL Extension | Specifies the endpoint used to access the data; for example, /coffee/price and /coffee/calories. This is defined by the web service (maximum 2000 characters). |
| Fetch Timeout | Number of milliseconds allowed for fetching the data before timing out. |
| Connection Timeout | Connection timeout in milliseconds. |
| Method | HTTP method to use; supported values are POST and GET. This is defined by the backend. |
| Headers | List of key-value pairs providing the headers to send to the web service. To specify a dynamic value, click the arrow to the right of the value field and select the variable. Alternatively, you can enter a static value (maximum 2048 characters) directly in the field. Note: Do not specify reserved or special header names such as Accept, Accept-*, and Content-Type. While Mix does not prevent you from using them, they may generate errors. Custom headers and headers used to identify the client with the server, for authorization, to provide generic information, and so on, can be sent. |
For example:
Build and deploy dialog application
To test your application in the runtime environment, you need to build a new version and deploy it in an environment.
When you deploy the application, you can configure a new URL for the alias if necessary, as shown in the following diagram. This URL will take precedence over all other values previously defined.
Feedback
Was this page helpful?
Glad to hear it! Please tell us how we can improve.
Sorry to hear that. Please tell us how we can improve.